Personal blog where I share art tutorials I find on this website and occasionally, maybe, something I might do.
132 posts
Latest Posts by anavsky - Page 3


some exploratory stuff. the kids in the first set are revisions from a story/world i based on the kalevala way back in like.. 2010?? looking at those old things was a bit of a nightmare, haha


I’ve updated my portfolio with some cats! :3
My PORTFOLIO
Thank you guys to follow me on Tumblr ! :)

Yes! School has started and so far I still have time for quite a bit of personal art. So far so good and I really hope this continues.

Some lasso heads I’ve been experimenting with. Trying to make 2d shapes more 3 dimensional…you know, and I feel like I’m getting somewhere with these. I’ve been doing these quite a lot these days so more to come! :D
Oh and happy new year guys!
Tips on Likeness: 1. Basics
Today(Jan 4 2016), I’ll be replying to as many questions/messages as I can, and a several of the questions so far, require a tip/tutorial posting for each. Here is one of them.
akiira-lee asked: How do you draw a character from any angle looking the same?For example, how do you look at a photo and see the character from the front and be able to draw him ¾, but still looking the same?
The biggest factor in capturing the likeness of a face in any given angle is in correctly studying the proportion of the individual’s facial features in relation to one another. If you study different faces in comparison to an evenly proportioned face (using loomis method), most individuals have certain features that stand out. These are the features that create unique/memorable proportion of the individual’s face that you need to capture in order to get the likeness. Sections to look for the unique proportions (simplified): - overall head shape - T-zone of the face (eyes, eyebrows, nose, mouth) - Jaw size - head size (hairline above and below) - Ear size ** look for width, length, and overall curvatures in proportion

Exaggerating this unique proportion of the face will enhance the likeness to that person as long as you don’t completely disrupt the rest of the relative proportion of the other features. This is also why good caricaturists are able to capture the likeness of the person even when they go for extreme proportions because they focus on exaggerating the unique proportion that’s already in that person’s face.

(art work by Pete Emslie)
Once you figure out the unique proportion of the person’s face, then you need to figure out the detailed characteristics of each features. There are too much for me to cover in this one article, but the main point is that, You need to separately study different types of each features such as: ( eyes- eye brows- nose- mouth- Jaw line- Cheek line)

Practice each types in different angles. If you’re having trouble with figuring out the angles, pick an actor or actress with the type of feature you want to study(e.g. droopy eyes), and find a video clip with them in it. Pause the video on different angles for you to practice off of.
With the individual’s unique proportion and details of the features in mind, now you need to place the features on to a strong base structure of a face. There are different theories and methods for drawing a base structure for a face. I personally recommend studying the “Loomis method” by Andrew Loomis.
Step by Step:
1. Draw the base structure in multiple angles. 2. Rough-in feature locations. FOCUS on the unique proportion. 3. Render in the features. FOCUS on the detailed characteristics of each.

If you stare at a person long enough, your eyes get accustomed, and what used to look unusual to you get familiarized and no longer stand out. Thus, to capture the likeness of an existing individual, instead of only referring to a single shot image of that person, studying a group shot is a lot more helpful. This is because if you use a group shot, the contrast between different faces will help the individual’s unique features to stand out constantly.
This may seem like a whole a lot of steps and things to keep in mind just to draw one face but eventually with practice, you’ll get to a point where you no longer need to take all the steps or spend as much time in figuring each out.
To conclude this long-ass post, I would like to say that, while these are all important skills to practice, also keep in mind that capturing the high level of likeness in face and keeping it consistent is not always the number one priority unless that’s the main focus of the type of work (e.g. portraitures). Some professionals have to balance out how much time they spend on likeness of the face and rely more on broader elements like, colour, hairstyle and outfit in order to spend more time on other areas of the work such as composition, character acting and cinematography depending on the type of work.
So ya.. it’s important but don’t beat yourself up to the point of hating your own work ( - v-)
*dies slowly since there's no way to send an anon message* Would it be a bother if I asked how you make your sprites? ((Or whoever makes them, sorry!)) they look amazing and I'm really curious by the style!
Aww, thank you! It’s not a bother at all! I do the same process I use for my non-pixel art drawings: I sketch something, then I do the lineart using only one color, then I paint the drawing using flat colors, after that I add the shadows and the lights, and then I recolor the lineart so the lines blend better:

I’m pretty amateur with pixel art, so I only know a few things, but one of the most important things to consider is to avoid messy/jagged lines, here’s an example from this thread:

Also, one of the best pixel art tutorials in my opinion would be this one. There are a lot of tips on how to properly shade sprites in order to avoid “pillow shading” and bland color palettes.

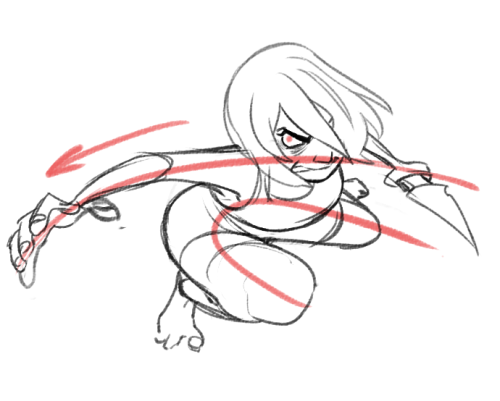
Dearest Kisu, the characters you draw are always full of like and dynamic! Do you have any tips to draw more dynamic characters/poses ? I love your art so much, you're such an inspiration to me
1. The action line:
It’s a line that you use when you create the posing that will help you translate a strenght/ an intention and give “a direction” to the body.

2. Perspective
It can help making a posing more dynamic if you vary angles, perspective and directions
3. Don’t be shy, exaggerate!
That’s how you really can translate mouvements through drawings!
4. Try to avoid “mirrorl” stuff.
It works very well when you want to do artistic stuff (like tarot card aesthetics) but not so much when you want it to look lively.


(Making hair and clothes flow help a lot too hahaha)
5. Try to do “one stroke” line so it doesn’t “break” the mouvement
Painting process video from the latest piece. #paintingprocess #watercolor #pentel #pentelaquash #winsorandnewton

It’s getting darker and chillier outside~
I got inspired by Jeff Turley and Tadahiro’s style~~

My BEST posts of 2015
December ♥ 623

November ♥ 1325

October ♥ 1784

September ♥ 2009

August ♥ 1031

July ♥ 519

June ♥ 1595

May ♥ 799

April ♥ 726

March ♥ 1825

February ♥ 827

January ♥ 3379

2015 ~ Wow, it’s hard to believe I did these this year. It feels so far away~
Generated using the
best of tumblr
tool.


I’m pretty sure this is what my daughter sees when she looks in the mirror.

Painting Fur Step by Step Guide
Artist: Tim Von Rueden (vonn)
Fur can be tough, so be patient and don’t rush the details. If you really analyze the movement and shaping of fur, you can see how intricate and fluid it can be. So instead of creating individual brushstrokes to represent fur or drawing triangles, instead work with layering the shapes and keeping the flow moving in a general direction.
For the full explanation, tips, and free downloadable guide, Check it out HERE!
how did you figure out how to do hands
well when I do hands I tend to break them into 3 big shapes
starting with the wrist then palm, thumb then the fingers

once I have the big shapes in I separate the fingers

here are some more examples of the different parts

one of the best ways that I learned how to draw hands was to draw a LOT of them, in different poses, while looking at a reference. This is a site that I found useful,
it has 3D models of hands that you can change the view so you can see the same pose from different angles. p.s. this site i linked to does contain nude figures just a heads up
I'm a student putting together a storyboard portfolio to show to animation studios. What types of sequences do studios like to see?
I’m gonna be honest, every studio is different. I’ve had reviews from people who work in the same studios, back to back, each asking for completely different things. Generally, it’s about what your passion is. Are you a comedy boarder? Action? Drama? Play up your strengths. Don’t flipflop to match what one particular studio wants. If they see the quality and vision in your work, they’re going to want you regardless of whether or not it fits their current projects. You’re an investment. When they look at you and see what you can do, they’re not thinking “OH wow, they’re perfect for what we’re doing RIGHT NOW”, because often times what they’re doing currently means it’s too late to bring you on. They’re going to be thinking “OH wow, they’re perfect for that project that’s JUST starting to gain traction.”So, aside from just doing what you love and playing up your strengths, think about presentation. It’s a matter of A) Presenting your boards in a grid format (say 4x3), or B) as a Clickthru. Clickthrus, in my experience, get the best reception. It allows the reviewer to take in each image one at a time, and see the connection between the panels.Generally, I’ve had TV folk tell me they are fine with Grid format, and Film folk ONLY want Clickthru. This is not a rule, by any means, but maybe it’ll help you depending on where you’re looking to apply.
Good luck!


