Ey Yo!! Kathy, Do You Have Tips To Learn To Draw Faster? I Know Artists Have A Unique Pace But It's Pretty
Ey yo!! Kathy, do you have tips to learn to draw faster? I know artists have a unique pace but it's pretty embarrasing that it takes me a week to draw something small n simple.. I want to be a cool artist that posts at least once every 2 or 3 days ;;
as you practice drawing more, and learn more art stuff (like anatomy, composition, gestures, coloring, shading, etc), you’ll get faster since you won’t spend as much time on every single step. eventually, you’ll figure out what works and what doesn’t, and you’ll be able to use that knowledge with future drawings. tbh i’ve always been a pretty fast sketcher, but i guess something that i always do is that i keep my sketches extremely vague and loose looking, and i finalize and draw in details along the way. my final drawings sometimes change really drastically from my initial sketches, but that’s because i’m not afraid to adjust my drawings as i line more. here’s an example of my progress to give an idea of how i draw

also goals are always something you’ve just gotta work up to! everyone has their own pace with drawing, and their own pace with learning. it’s hard not to compare yourself with everyone around you, but you just gotta do you, you feel me?
More Posts from Arttuti and Others
can you give a run down on skintones?
PART ONE: COLOR SELECTION.
In painting skin tones, a lot of the time I see people choose colors that are over-saturated or unbalanced. There isn’t really an exact art to this that I can explain—you just need to get a feel for what saturation balance you need for that particular skintone. Here are some examples of what I usually pick.

As you can see, I used different base colors (orange, reddish, yellow) for the skin shades in all three examples. The reason for this is because all skin tones have a different base color besides just Light, Medium, and dark. Some people divide them into categories of “warm” and “cool.” Pantone has some really good examples and references for this.

PART TWO: COLOR VARIATION.
Another big part about drawing and painting skin tones that a lot of people forget is how skin thickness affects color variation. The presence of bone, blood, and muscle underneath the skin affects its colors. This is especially noticeable on the face.

The colors here are a little exaggerated to show my point, but with a little adjusting and blending…

Voila! Subtle, but more realistic.
PART THREE: DETAILS.
Our skin is the largest organ on our body, and as our body’s first line of defense against the outside world, it’ll be covered with tiny details and imperfections. Things like sunburns, tans, freckles, scars, and facial hair all add character to your subject matter. Here are some examples!
TANS: Everyone tans differently, depending on your ethnicity and skin tone. Fair skinned folks tend to burn more than tan, which means you’ll need a more startling, eye-catching red.If you have a skin type that tends to tan more, the color will be more brown than red. For black skin tones, the tan is less red. (And while we’re on the subject: black people DO tan, so it’s important for you to put on sunscreen and be careful in the sun, too.)

Those are the areas that the sun tends to hit the most—and things like goggles, hats, and masks can change the shape of that area.
FRECKLES AND MOLES: Freckles are also products of the sun. Some people have freckles that stay year-round, while others have freckles that fade in the winter and return in the summer. Moles are skin cells that grow in a cluster instead of being spread throughout the skin. When exposed to the sun, they tend to darken. (Another note on skin health: if you have any oddly-shaped/colored moles, moles that have changed color, size, or shape, or anything of the sort, please check with your doctor!)
Freckles like to cluster around each other, sort of like stars, and they vary greatly in size. You can have a few freckles in one place, or a lot of freckles in multiple places. Most commonly freckled areas are your face, shoulders and neck, back, and forearms.

FACIAL HAIR: Facial hair also affects the colors of the face. For simplicity’s sake we’ll be using black hair, as it is the most noticeable. Facial hair usually grows in these areas, and can make the skin look blueish/grayish because of the darker hairs beneath the skin. If your hair is red, this also very noticeable.

END NOTE.
There you go! That’s about all I can think of at the moment for skin tones. As always, references and practice are your best friend (and so is this neat little trick that pheberoni has.) Good luck with your arting!


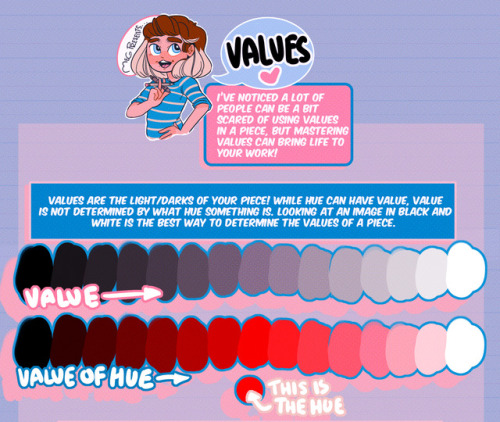
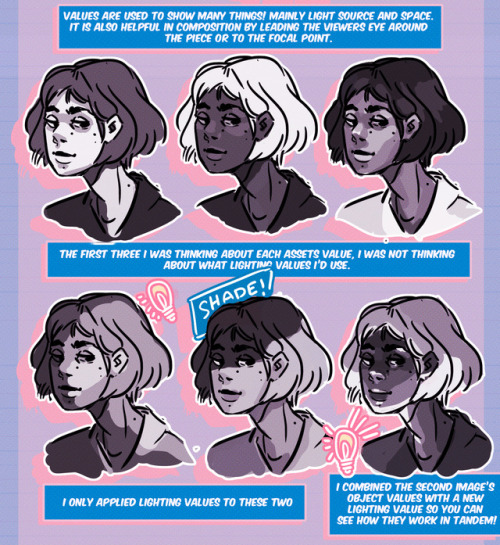
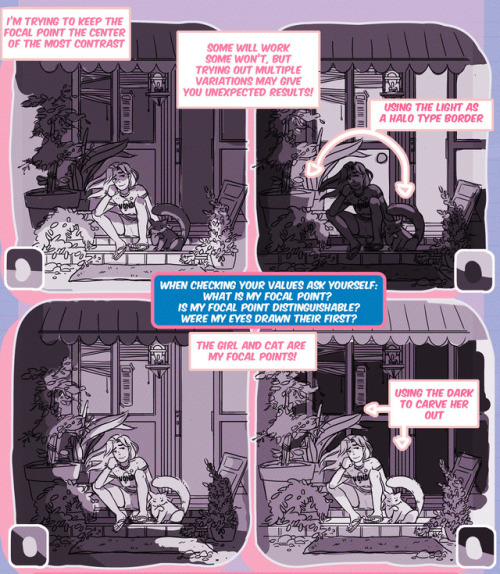

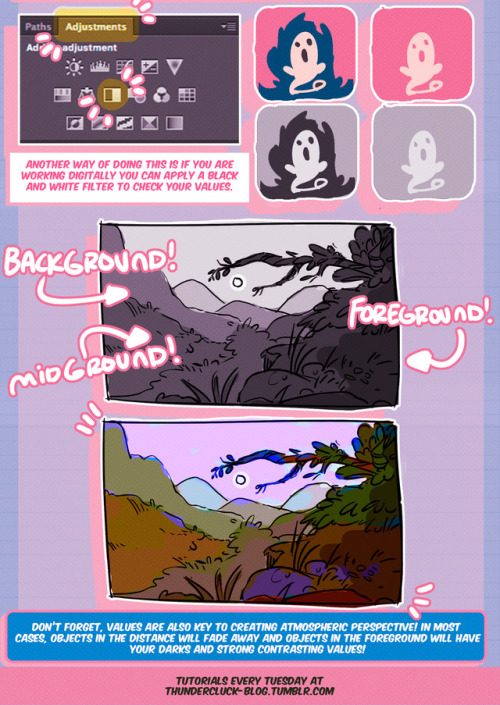
Hey friends, Meg here for WOOPS IT’S WEDNESDAY! Today we’re taking a look at how to study values and the importance of knowing how to use them! It’s not all about color, you know. If you have any tutorial recommendations send ‘em in here or my personal. Now go forth and I’ll see you next week!
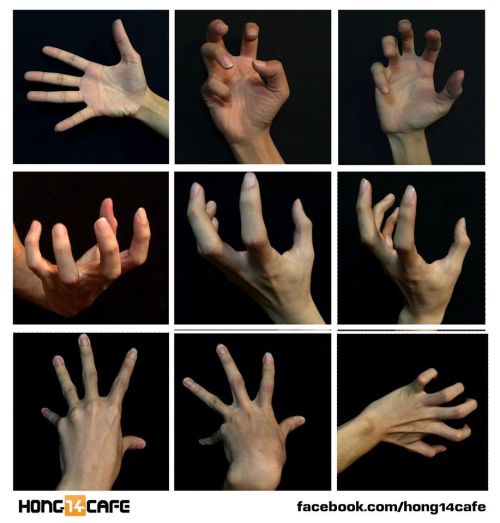
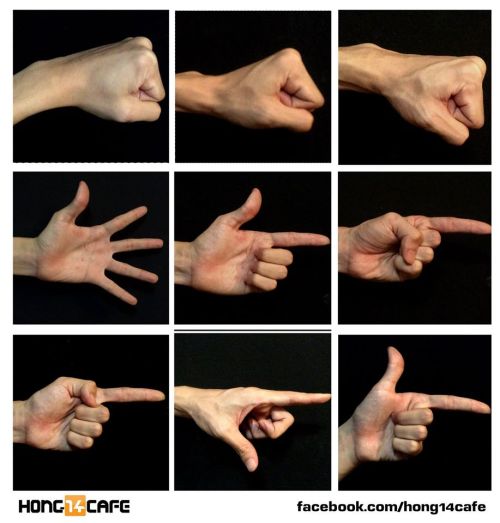
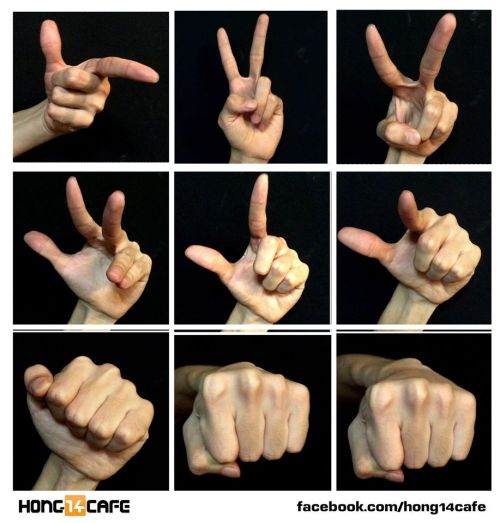
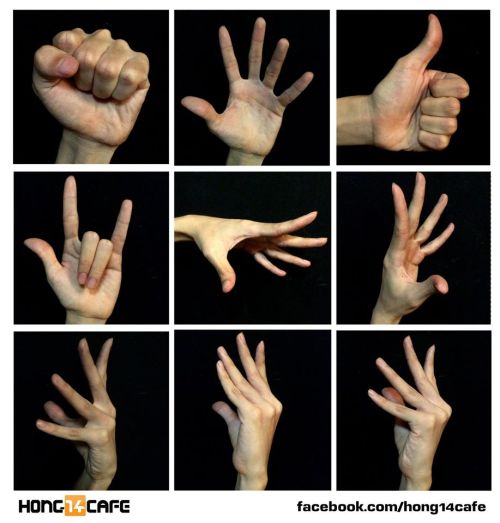
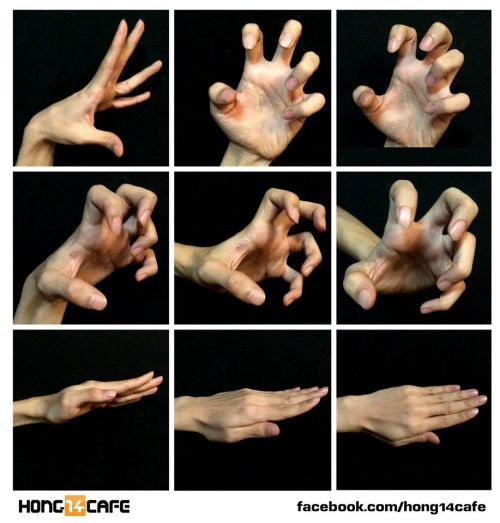
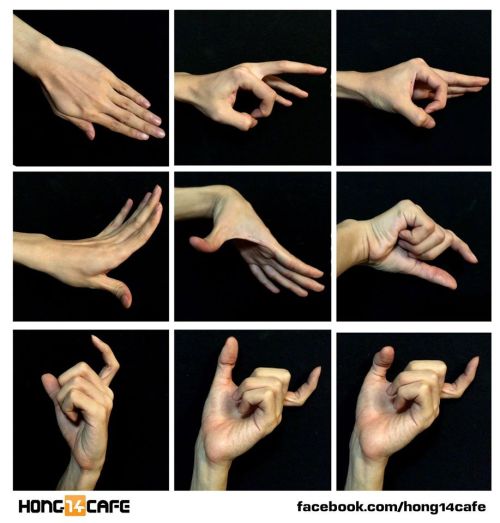
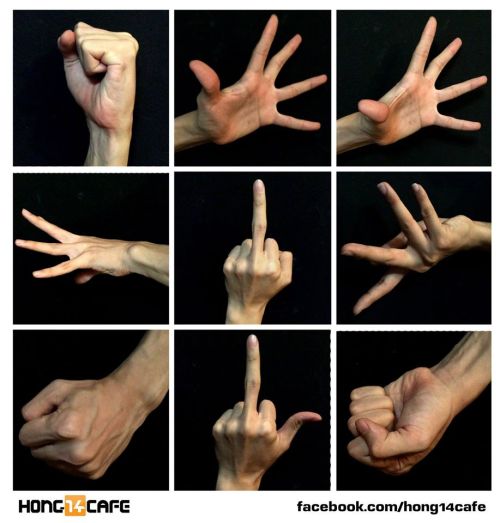
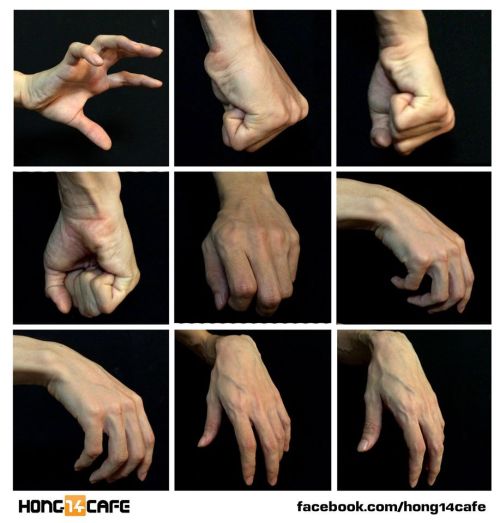
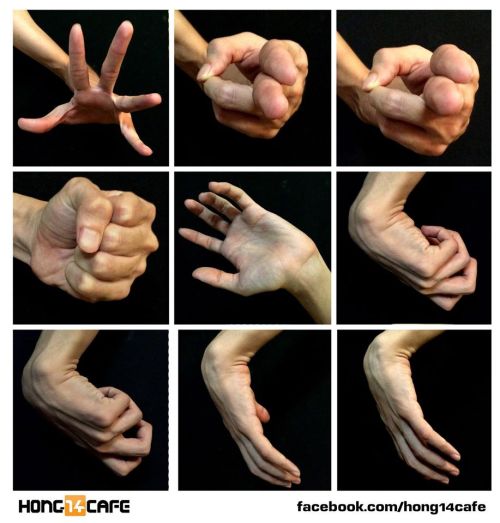
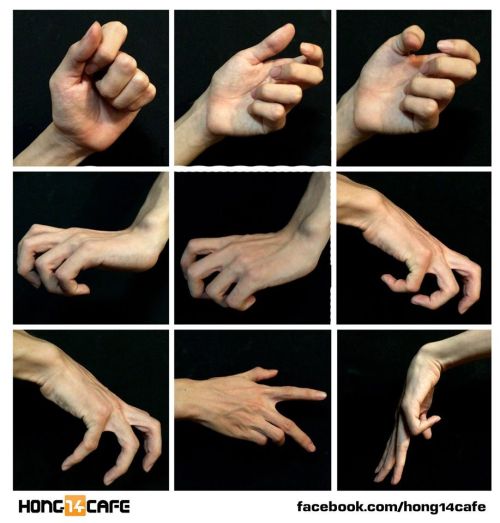
Fantastic hands references by the website Hong14cafe.
Hong14cafe: Facebook | Forum


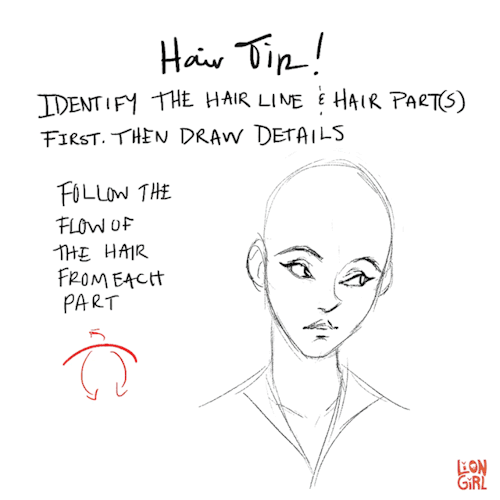

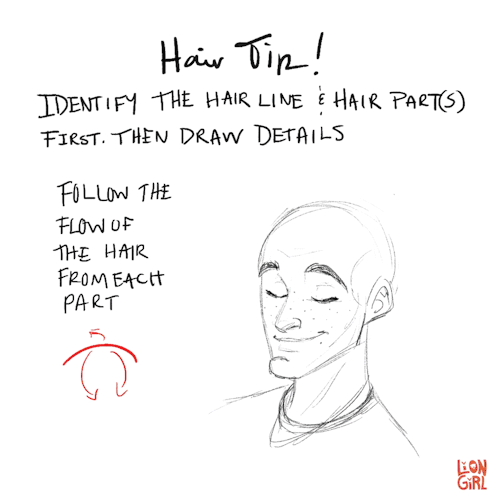

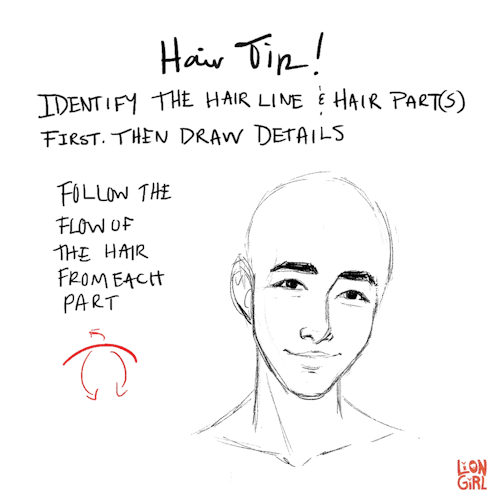
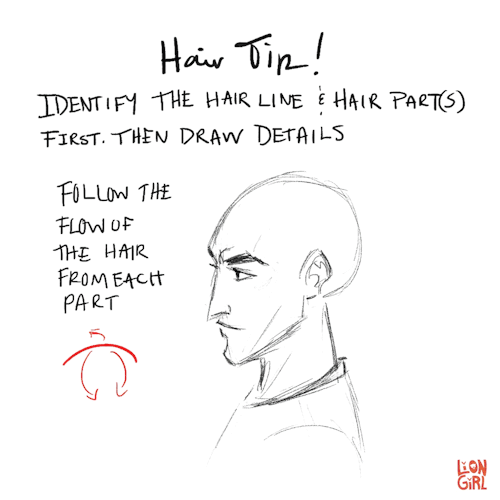
Hair Tip #1 - When drawing hair, start with the hairline and hair part(s). Then keep the flow and volume in mind while you add details!
I’m not the best at drawing or painting hair, but someone on instagram requested that I make a post about it so hopefully this will help someone! This is the first of 3 tips I’m going to share.
should i be trying to master like each feature before i try drawing a face? like should i be able to draw eyes really well, then move to the nose, mouth etc? i dont know when i should be moving on to the next step. right now, mouths are a frustrating thing but i also try to draw the whole face because proportions practice, so its all very over whelming and then i get discouraged cause drawing lips is so hard and putting everything to make a face is hard ;-;
I think if you’re having trouble with a feature you should definitely do some studies of it! I practiced the face all at once so I don’t really think there are any rules to this haha. The downside to trying to master one feature at a time is, like you said, not being sure when to move on. You might end up drawing amazing eyes but the rest of the face will always be a little off because you haven’t put enough time into studying the other features. I’m sure you’ve also come across artists who draw nice heads and it all falls apart when they try to draw a fullbody. Personally I’d just tackle the face all at once, take time to study the separate features but try not to neglect any of them and don’t think you can’t draw a face because you aren’t a master of a particular feature! You can do it * V * Here are some quick notes on lips, I hope they help a little.

Your art is so good !!! How do you color the skin its soo smooth
Thank you very much Anon ( ̄ε ̄@)hehehe!!Well I have some shots of one of my recent drawings so I’ll try to explain it a little bit hhahahah


Basically what I do is: 1. Put on base color2. Add some light shadows (They don’t even have to look very smooth, like the images above) 3. Then I start adding some darker shades of color and different skin tones to give it the correct shape, at this point I start adding some brighter tones, so yeah, they usually look very messy at this point. My brushstrokes also look like crosses or some sort on this step I think (I do it like that ‘cuz I think it’s easier to merge the colors later, at least for me hehehe) 4. Aaaand at the end, to merge the colors and make them look smoother I use a soft brush with low opacity to add some light shadows and brighter tones on bigger areas, I also try to use almost the same tones I used on the step three so it can merge nicely.So yeah, I think that’s about it (〜 ̄△ ̄)〜I hope I helped you out with that <3


-
 nunquamobliturum liked this · 6 years ago
 -
 space-dreams-world liked this · 7 years ago
 -
 jeunecarotte liked this · 7 years ago
 -
 sainteredhood liked this · 7 years ago
 -
 lucanuta liked this · 7 years ago
 -
 acciohedvig liked this · 7 years ago
 -
 sherlock-89 liked this · 7 years ago
 -
 neutral-pit liked this · 7 years ago
 -
 artreffff reblogged this · 7 years ago
 -
 glitterbite reblogged this · 7 years ago
 -
 arttuti reblogged this · 7 years ago
 -
wiips liked this · 7 years ago
-
 edgelord-trash reblogged this · 7 years ago
 -
 komorebikaleidoscope liked this · 8 years ago
 -
 thottybrucewayne liked this · 8 years ago
 -
 katsuyacrimson liked this · 8 years ago
 -
 nighthood liked this · 8 years ago
 -
 queenkoopah liked this · 8 years ago
 -
 exzire liked this · 8 years ago
 -
 wingedskyes liked this · 8 years ago
 -
 meowmoths liked this · 8 years ago
 -
 umbralultimanium liked this · 8 years ago
 -
 tytoz liked this · 8 years ago
 -
 parkerwarker liked this · 8 years ago
 -
 jaeger-bombastique liked this · 8 years ago
 -
 immediatefoxes reblogged this · 8 years ago
 -
immediatefoxes liked this · 8 years ago
-
 drunkwingtip liked this · 8 years ago
 -
 pootsacc reblogged this · 8 years ago
 -
 darilliumvoid reblogged this · 8 years ago
 -
 chipology liked this · 8 years ago
 -
 aurailia liked this · 8 years ago
 -
 sassyredfox liked this · 8 years ago
 -
 bwxvsbxtmr liked this · 8 years ago
 -
 bolgoom liked this · 8 years ago
 -
 peacchcup liked this · 8 years ago
 -
 yazbethe liked this · 8 years ago
 -
 floats-your-goat liked this · 8 years ago
 -
 robottiddies liked this · 8 years ago
 -
 queeniewriting liked this · 8 years ago
 -
 bigboysurprisetime liked this · 8 years ago
 -
 not-cosslemons liked this · 8 years ago
