I'm Having A Hard Time Drawing Different Glasses From Different Angles, Sort Of Like A 3/4 View, Could
I'm having a hard time drawing different glasses from different angles, sort of like a 3/4 view, could you help me with that ?


hope that helps! AND IF u need more help, LOOK FOR SOME GLASSES WEARING PEOPLE n snap their photos
More Posts from Arttuti and Others
lHey friends!
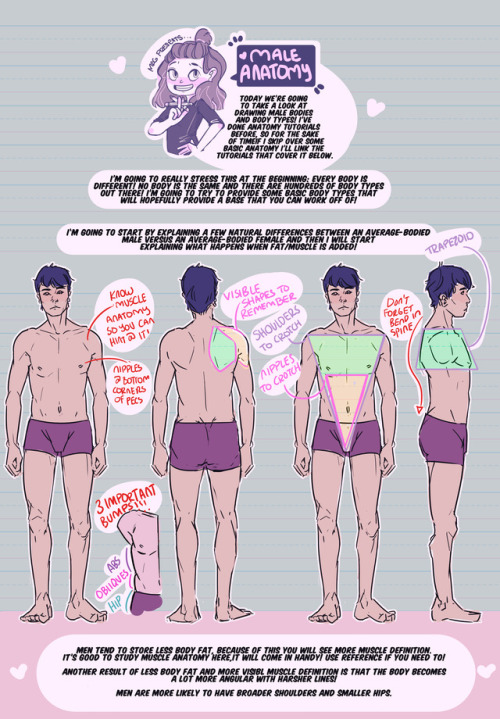
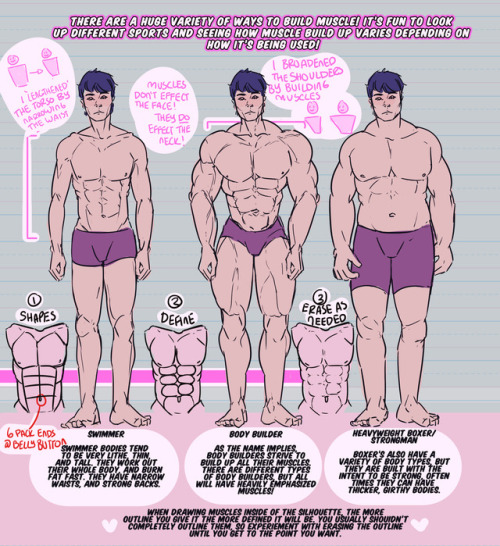
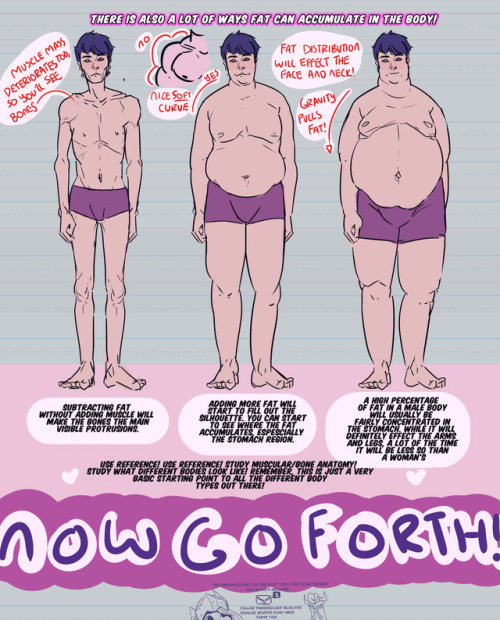
Meg here for TUTOR TUESDAY! Today has been hectic so I apologize for it’s lateness. But let’s look at male bodies and body types. I cannot stress enough that this is meant to be provide a few base body types that can then be compounded on as there are a MILLION body types out there. I’ve made anatomy tutorials and muscle/fat distribution tutorials that may help understand this one. This was recommended by @flowerlion-today , send in your recs here or my personal! Keep practicing, have fun, and I’ll see you next week!

Hands
As I do with most things, I draw hands from a series of gesture strokes that insinuate the pose and shape I want. Something I personally find very appealing about hands are all the joints, bends, and crooked bits so I start with those and build the rounder, meaty bits from there.

In the first two steps here if you just look at the individual strokes I’ve drawn, you can see they’re just some curves, really, that sketch out the shape of the hand, and I’m focusing on the joints and knuckles. (The fingertips in the second one are actually rly unnecessary and ugly to me haha – that’s usually the kind of thing I’d just throw down in step 3.)
And again below, just starting w/ some curves and squigglies to show the joints and knuckles:


These hands are by no means realistic or fully proportional but drawing’s supposed to be fun and these are really fun! I’m like, really not about that whole “draw a box and then the little tubes and those are the fingers” thing. It’s too technical and so much life gets lost when you sketch that way. Maybe it’s helpful for a pose you’re uncertain about but then just look at a photo or your own hand to see how things work, y’know?
Something else I’m really about is using shading and line to emphasize the bends and stuff even after I’ve got the hand down:

The first image here you can tell the fingers are bent, but they also look lumpy imo. To stylize further, I add some thin lines for the joints and fingernails, and then shade for some extra depth + to pronounce the foreshortening etc. (Fingers are so ugly from this angle! But we gotta draw them like this sometimes…)
Some examples where these extra lines assist in conveying the shape:

And shading:

(Bottom right is the same pose as a previous example which I didn’t realize till now sorry haha)
Some general tips:
- Use asymmetry!!! When the joints don’t line up exactly right, or you’ve drawn two hands doing the same thing but idk one’s curled a little bit more or the right pinky sticks out but the left doesn’t – these little touches make the drawing more dynamic, even if the general pose/concept is flat.
- Thumbs are really cool? They’re like trapezoidal. The same tapering thing kinda happens where the hand meets the wrist. A hand is like a big thumb
- Two things that a lot of beginner artists get wrong: which side the thumb is on (…always double-check…I still double-check sometimes too), and drawing the fingers straight instead of slightly bent when trying to draw a relaxed hand. Relaxed fingers curl! And this is much easier to draw imo than perfectly tense fingers
- Study your own hands and think about their shape. Part of developing a style + comfort with drawing a particular thing is how you choose to simplify the form thru line. I explained above that I focus on the joints and knuckles and seek to simplify those with curves and squiggles but maybe you’re more interested in a different aspect. (Like, you can see I don’t draw palms v much…that’s cuz I like knuckles haha)
Hope this is helpful/feel free to ask followup questions!


How I Animate

The Technique:
I draw the frames and then I use the liquify tool to push the lines into the next frame and redraw them where I need to. This allows me to keep the lines consistent, but gives me the control of frame by frame animation bc I am still making each frame manually! I also use 3d models as reference to help me with the angles! Super important to use reference while you animate (and with art in general), if youre no good handling 3d models then act it out and record yourself!

The Theory:
i think most people are at least loosely familiar with the 12 principles of animation (if youre not, heres a 2.5 minute video showcasing them!), but may not necessarily know how to employ them. the main 3 i tend to focus on when I animate is rhythm, telegraphing, and inertia so ill cover those there 👍
1. Timing & Rhythm
Timing is how you space out your frames both in how long an individual frame is held for, and also when you drawn an inbetween of two frames you can favour one frame slightly more than the other instead of drawing the exact average of the cels, giving the favoured cel more timing weight.

Left line has the cels evenly spaced out on the timeline, right holds the first cel for longer and the second cel slightly favours the last frame. It creates a more interesting rhythm to the animation! Rhythm is how I think of animation timing. Theres a beat like a song to every animation I make, and creating an interesting beat is what makes an animation fun to watch (for me, anyway):

2. Anticipation / Telegraphing

Before I animate a big change in movement, I like to telegraph that its coming. Usually this is doing a little counter movement in the opposite direction, but thats not the only way to telegraph a motion, e.g. eye movement can telegraph a head turn!

3. Follow-through / Overshoot / Inertia


Unless the movement is mechanical, it wont come to a hard stop and will have some level of bounce or easing out to it. How much "bounce" you add will have a big impact on how the animation feels, but a very subtle bounce will add a natural feeling to the end of a motion.

Secondary animations will use a lot of this, note that the head and the hand have a small amount of continuous motion (primary animation), and then the hair has a lot of bounce and inertia (secondary animation which reacts to the primary animation). Note the different amounts applied to the braid vs the sideburn vs the bangs
anyway! I hope this was insightful ❤️ if you like my art you can commission me by the by :)


First tutorial posted up for Patreon Supporters is now available for everyone! Please read the tutorial carefully. If you have a question that is not in the tutorial I’ll be happy to answer it. Want me to make more tutorials and even video walkthroughs? Support me on Patreon!
Deviantart || Twitter || Webcomic || Commissions


Cuddles reference sheet by *Kibbitzer
Cuddles for everybody! If you’re interested on Patreon you can find the complete series and all the normal and special reference sheets for 5$ per month! use it for your exercises if you need it XD Patrons or not, thanks for supporting me! ^A^/ <3 Facebook Deviantart
-
 beetle-ze-bub liked this · 4 months ago
 -
 cybernightart liked this · 5 months ago
 -
 raincloud-the-33rd-frog liked this · 7 months ago
 -
 cherrytheidiot liked this · 8 months ago
 -
 ghostygreed liked this · 10 months ago
 -
 arthalo reblogged this · 10 months ago
 -
 somehelpfulart-tutorials reblogged this · 11 months ago
 -
 deactivated20042025 liked this · 11 months ago
 -
 the-letter-horror-lover liked this · 1 year ago
 -
 houjitsun liked this · 1 year ago
 -
 velkins-lawn liked this · 1 year ago
 -
 crowdoesart21 reblogged this · 1 year ago
 -
 martialwriter liked this · 1 year ago
 -
 birbtails reblogged this · 1 year ago
 -
 reanimatedgh0ul reblogged this · 1 year ago
 -
 kami-orto liked this · 1 year ago
 -
 ouijab0redom liked this · 1 year ago
 -
 mar-chive reblogged this · 1 year ago
 -
 gresskar-0 liked this · 1 year ago
 -
 3ufhiuwguifh2iu liked this · 1 year ago
 -
 robotomy96 liked this · 2 years ago
 -
 blueatsbabies liked this · 2 years ago
 -
 clockworkclouds liked this · 2 years ago
 -
 cloverking003 liked this · 2 years ago
 -
 icedhoneylemonsoda reblogged this · 2 years ago
 -
icedhoneylemonsoda liked this · 2 years ago
-
 iwaioomi reblogged this · 2 years ago
 -
 anomalynina liked this · 2 years ago
 -
 mena-2001 liked this · 2 years ago
 -
 sentakbangun liked this · 3 years ago
 -
 art-reblogs-4-dumdums reblogged this · 3 years ago
 -
 art-ref-for-me reblogged this · 3 years ago
 -
 red-eater liked this · 3 years ago
 -
 gelatopistacchioecioccolato liked this · 3 years ago
 -
 chaotic-neutral-soul reblogged this · 3 years ago
 -
chaotic-neutral-soul liked this · 3 years ago
-
 essiestarr liked this · 3 years ago
 -
 weirdkiyoko525 liked this · 3 years ago
 -
 theywerebothgirls liked this · 3 years ago
 -
 mintandtea liked this · 3 years ago
 -
 nefarious-virgo liked this · 3 years ago
 -
 nanasartpractice reblogged this · 3 years ago
 -
 n0isetanks liked this · 3 years ago
 -
 lullacloud liked this · 3 years ago
 -
 miyanouta reblogged this · 3 years ago
