PART ONE: COLOR SELECTION.
can you give a run down on skintones?
PART ONE: COLOR SELECTION.
In painting skin tones, a lot of the time I see people choose colors that are over-saturated or unbalanced. There isn’t really an exact art to this that I can explain—you just need to get a feel for what saturation balance you need for that particular skintone. Here are some examples of what I usually pick.

As you can see, I used different base colors (orange, reddish, yellow) for the skin shades in all three examples. The reason for this is because all skin tones have a different base color besides just Light, Medium, and dark. Some people divide them into categories of “warm” and “cool.” Pantone has some really good examples and references for this.

PART TWO: COLOR VARIATION.
Another big part about drawing and painting skin tones that a lot of people forget is how skin thickness affects color variation. The presence of bone, blood, and muscle underneath the skin affects its colors. This is especially noticeable on the face.

The colors here are a little exaggerated to show my point, but with a little adjusting and blending…

Voila! Subtle, but more realistic.
PART THREE: DETAILS.
Our skin is the largest organ on our body, and as our body’s first line of defense against the outside world, it’ll be covered with tiny details and imperfections. Things like sunburns, tans, freckles, scars, and facial hair all add character to your subject matter. Here are some examples!
TANS: Everyone tans differently, depending on your ethnicity and skin tone. Fair skinned folks tend to burn more than tan, which means you’ll need a more startling, eye-catching red.If you have a skin type that tends to tan more, the color will be more brown than red. For black skin tones, the tan is less red. (And while we’re on the subject: black people DO tan, so it’s important for you to put on sunscreen and be careful in the sun, too.)

Those are the areas that the sun tends to hit the most—and things like goggles, hats, and masks can change the shape of that area.
FRECKLES AND MOLES: Freckles are also products of the sun. Some people have freckles that stay year-round, while others have freckles that fade in the winter and return in the summer. Moles are skin cells that grow in a cluster instead of being spread throughout the skin. When exposed to the sun, they tend to darken. (Another note on skin health: if you have any oddly-shaped/colored moles, moles that have changed color, size, or shape, or anything of the sort, please check with your doctor!)
Freckles like to cluster around each other, sort of like stars, and they vary greatly in size. You can have a few freckles in one place, or a lot of freckles in multiple places. Most commonly freckled areas are your face, shoulders and neck, back, and forearms.

FACIAL HAIR: Facial hair also affects the colors of the face. For simplicity’s sake we’ll be using black hair, as it is the most noticeable. Facial hair usually grows in these areas, and can make the skin look blueish/grayish because of the darker hairs beneath the skin. If your hair is red, this also very noticeable.

END NOTE.
There you go! That’s about all I can think of at the moment for skin tones. As always, references and practice are your best friend (and so is this neat little trick that pheberoni has.) Good luck with your arting!
More Posts from Arttuti and Others


How I study by Drawing explained in a few different techniques and what they’re most useful for.
Video Version
DeviantArt
Commission Info
Hey friends!
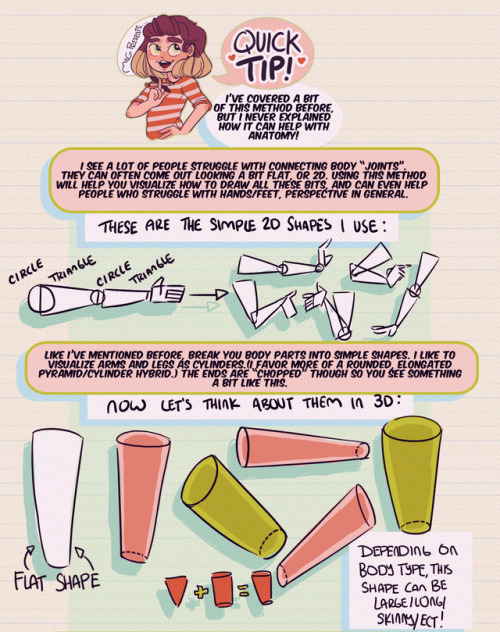
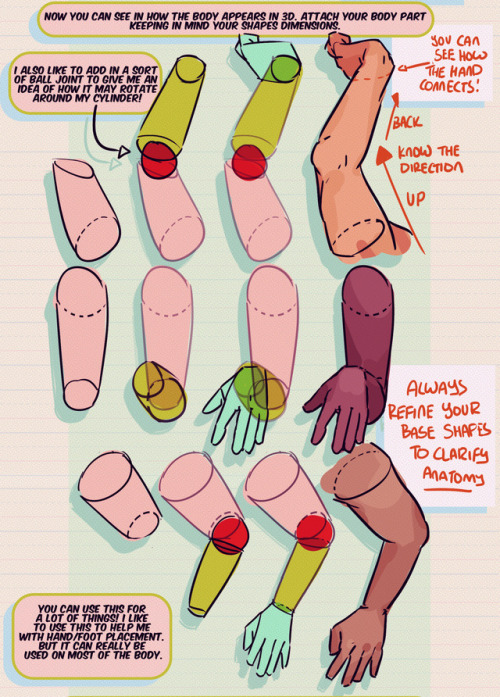
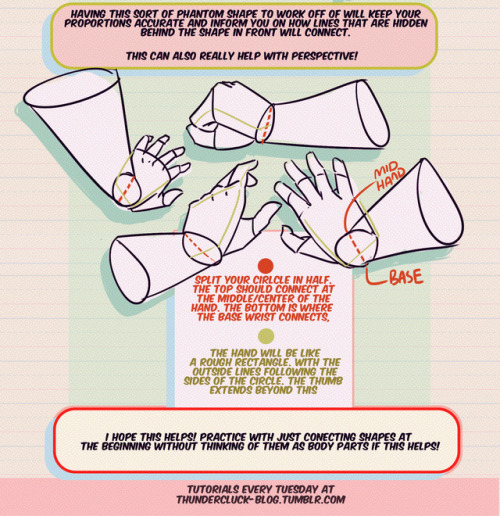
Meg here for this week’s TUTOR TUESDAY! This week I go over just a little trick that I like to use when drawing and connecting arms/hands/legs/feet ect. This helps me with foreshortening as well. I hope it helps you folks as well! I have tutorials that talk more specifically about hand/foot/leg anatomy here. If you have any tutorial recommendations send ‘em in here or my personal. Now go forth and I’ll see you next week!
do you by any chance have any art tips for how to connect arms/legs to the torso? It's something I've never seemed to be able to grasp and whenever I try it it looks a little forced and the movement doesn't flow and my art turns out a bit repetitive when it's just a bunch of head shots haha
It’s probably best to study a bit of anatomy! For arms at the very least you should be aware of the deltoid and pecs which will move with the arm

Leg muscles go all the way up to your pelvis and there’s a good number of them so it’s easier to group everything into sections. The section between the torso and thigh I guess kinda connect the two together from an artistic standpoint. Basically a GIANT COMMA starting from yer butt and wrapping around to your groin haha. When you move your leg you’ll likely see a crease following that shape

Hope that helps!!
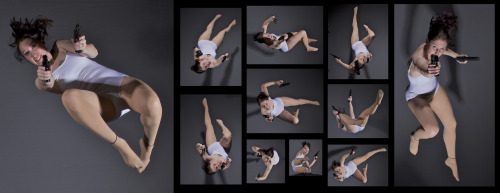
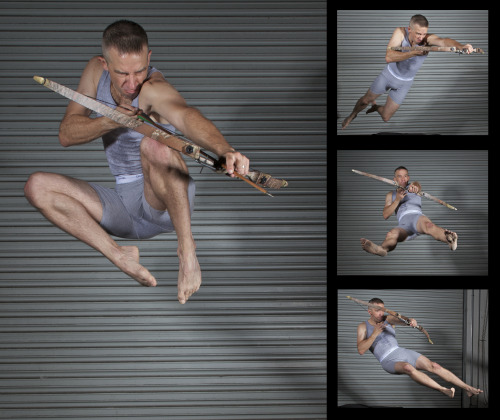
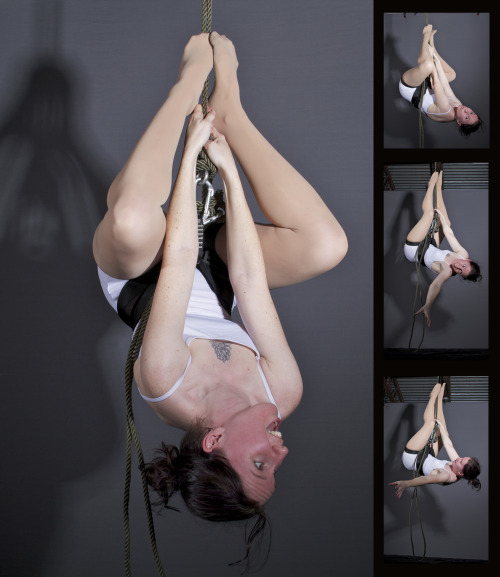
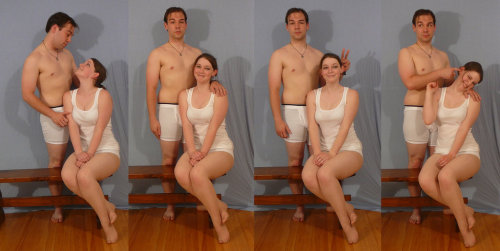
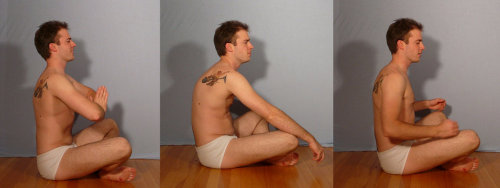
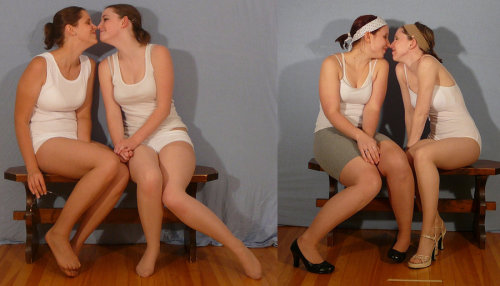
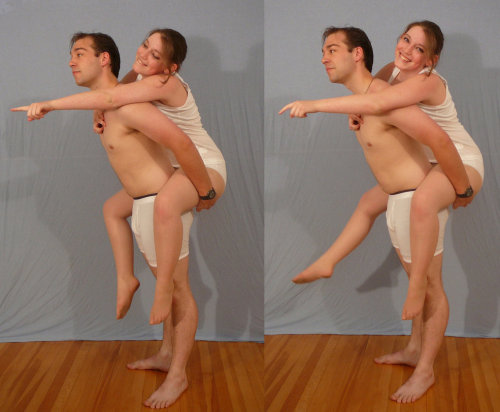
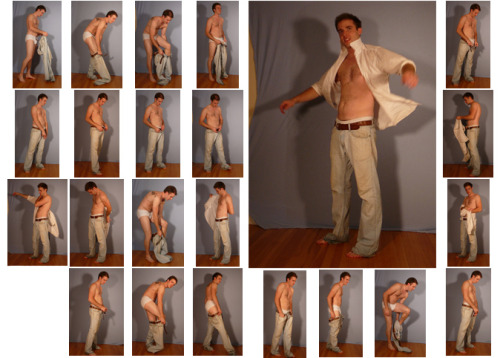
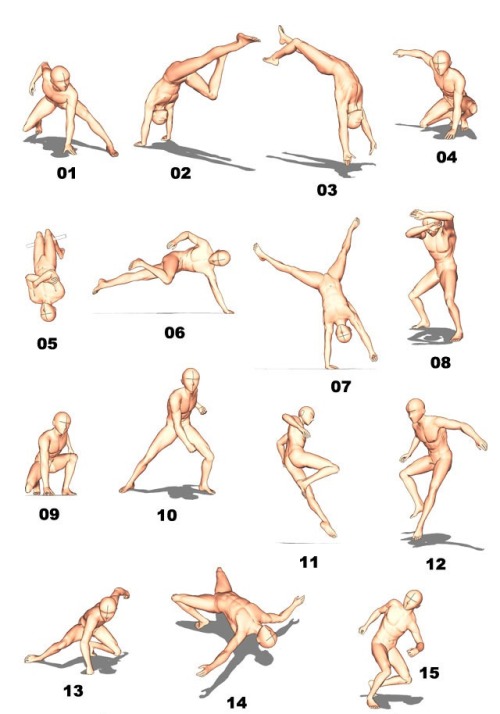
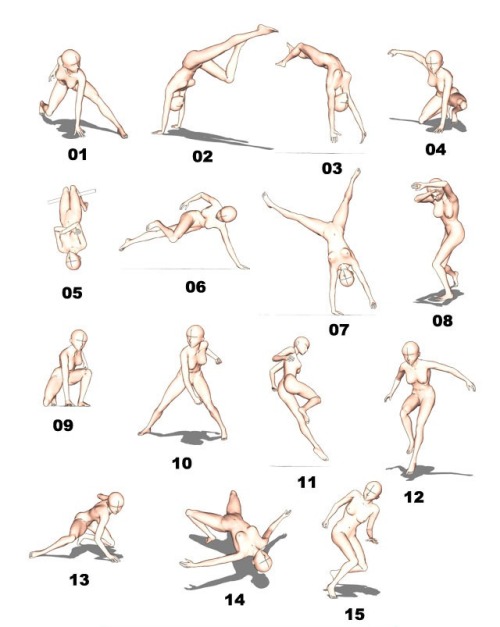
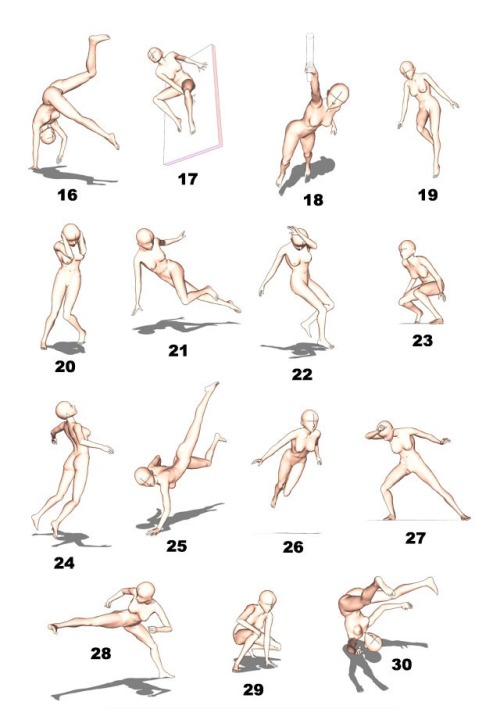
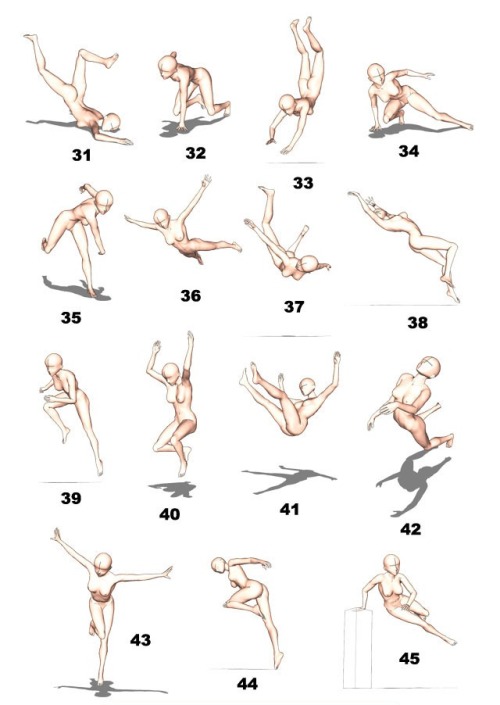
SenshiStock’s gallery consists of millions of pictures that are free to use as reference.
General Drawing Poses Sit and Kneel Dramatic and Reaching Drawing Poses Magic and Hogwarts Drawing Poses Staff Weapon Pose Reference Hammer, Axe and Bat Pose Reference Sword Weapon Drawing Reference Small Bladed Weapon Pose Reference Gun Weapon Pose Reference Bow and Arrow Archery Stock Foreshortening and Perspective Poses Dynamic Flying Falling Action Poses Deafeated or Laying Drawing Poses Magic Crystal Magical Girl Wand Weapon Transformations and Dance Cards Back Pose Reference Pin Up Inspired Poses for Drawing Performances Poses Life in General Poses Fights and Fighting Pose Reference Leaning Poses Classic Sailor Senshi Poses Wings Sailor Moon Villains Pairs Romance or Couples Pose Reference All the Male Stock Hanging Stock Drawing Reference Three or More Groups Instruments Mirrors Whip Technobabble
Hi! Idk if my qn got sent before (tumblr mobile yeesh) I wanted to say i really really love your blog and art style! I was wondering if you have tips to draw Dean's and Cas's hair??
REALLY LATE REPLY BUT UM Dean’s got a hair parting on either side but his hair kinda all comes out from a spot on the back of his head. Keep the sides short but flip up the hair in the front

And here’s Cas again! Recapping: part on one side and have the hair come out from the parting and flip up in front as well. He’s got a longer fringe than Dean’s

Hoi!! I saw a little bit of the process on your Instagram, but could you explain how you go about making a pattern? I absolutely love how that neato cactus/desert one you did turned out!
Alrighty!
So to make a repeating pattern:

1. Open a canvas and draw in the center WITHOUT touching any of the edges.

2. [Below: Light cyan lines] Divide your canvas into four equal parts.
Make four guides framing the canvas, and two across the middle.
For the ones in the middle, View > New Guide > Horizontal or Vertical for needed orientation > type in 50% to get the exact middle of your canvas. These are photoshop shortcuts, may be different on your programs.

3. [Above: Yellow arrows] Make sureyou have ‘Snap’ checked under View > Snap, then select each quarter of your piece > layer via cut > move diagonally to the other side.
After you’re done moving things diagonally, you can either turn off Snap so your doodling won’t stick to the center lines, or toggle the guide visibility off (Ctrl+;). Merge the layers back together.

4. Draw in the middle without touching the borders, color the entire thing if you plan on doing that.

5. Setting your image as a pattern After your image is done, merge all layers into one > select the entire canvas (Ctrl+A) > Edit > Define Pattern
Open a new canvas bigger than the one you made the pattern on, and paint bucket it in! (Instead of the Foreground button at the top when paint bucket is active, select Pattern then your pattern)
If you aren’t using a program that lets you define patterns, merge everything into one layer and duplicate & tile them manually.

Cheers!


-
 kisanekomew liked this · 9 months ago
 -
 wolfykit liked this · 1 year ago
 -
 twadi-gurl reblogged this · 1 year ago
 -
 scrapbox-in-the-attic reblogged this · 1 year ago
 -
 xxcringecake69xx liked this · 1 year ago
 -
 multidimensionalfang1rl reblogged this · 1 year ago
 -
 gore-worm liked this · 2 years ago
 -
 uponhumanzhill liked this · 2 years ago
 -
 yesireblogstuff reblogged this · 2 years ago
 -
 demoruu liked this · 3 years ago
 -
 kast-19 reblogged this · 3 years ago
 -
 p-p-panda liked this · 3 years ago
 -
 theworstbear liked this · 3 years ago
 -
 artdumppile reblogged this · 3 years ago
 -
 biblically-accurate-angel liked this · 3 years ago
 -
 bungermeal liked this · 4 years ago
 -
 gangtheway liked this · 4 years ago
 -
 giving-theworldthewreckeritneeds liked this · 4 years ago
 -
 thecryptidwizard liked this · 4 years ago
 -
 schlattssack liked this · 4 years ago
 -
 superredvelvetcupcakesworld liked this · 4 years ago
 -
 martialwriter liked this · 4 years ago
 -
 crowmakesart24 liked this · 5 years ago
 -
 valerian-chai liked this · 5 years ago
 -
 dorkydisk liked this · 5 years ago
 -
 tutoriarts reblogged this · 5 years ago
 -
 third-times-the-charm reblogged this · 5 years ago
 -
 tails-of-a-dragon-rider reblogged this · 6 years ago
 -
 sweetnsaltypotato liked this · 6 years ago
 -
 bluebells013 liked this · 6 years ago
 -
 museit liked this · 6 years ago
 -
 rakenrolrobin liked this · 6 years ago
 -
 tiredandfullofbees liked this · 6 years ago
 -
 abeloth reblogged this · 6 years ago
 -
 nilalunis16 liked this · 6 years ago
 -
 buter-s-maslitsem reblogged this · 6 years ago
 -
buter-s-maslitsem liked this · 6 years ago
