Do You By Any Chance Have Any Art Tips For How To Connect Arms/legs To The Torso? It's Something I've
do you by any chance have any art tips for how to connect arms/legs to the torso? It's something I've never seemed to be able to grasp and whenever I try it it looks a little forced and the movement doesn't flow and my art turns out a bit repetitive when it's just a bunch of head shots haha
It’s probably best to study a bit of anatomy! For arms at the very least you should be aware of the deltoid and pecs which will move with the arm

Leg muscles go all the way up to your pelvis and there’s a good number of them so it’s easier to group everything into sections. The section between the torso and thigh I guess kinda connect the two together from an artistic standpoint. Basically a GIANT COMMA starting from yer butt and wrapping around to your groin haha. When you move your leg you’ll likely see a crease following that shape

Hope that helps!!
More Posts from Arttuti and Others
can you give a run down on skintones?
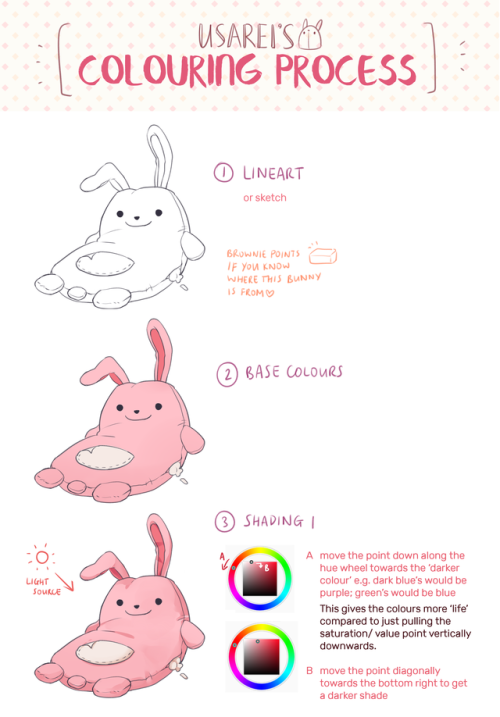
PART ONE: COLOR SELECTION.
In painting skin tones, a lot of the time I see people choose colors that are over-saturated or unbalanced. There isn’t really an exact art to this that I can explain—you just need to get a feel for what saturation balance you need for that particular skintone. Here are some examples of what I usually pick.

As you can see, I used different base colors (orange, reddish, yellow) for the skin shades in all three examples. The reason for this is because all skin tones have a different base color besides just Light, Medium, and dark. Some people divide them into categories of “warm” and “cool.” Pantone has some really good examples and references for this.

PART TWO: COLOR VARIATION.
Another big part about drawing and painting skin tones that a lot of people forget is how skin thickness affects color variation. The presence of bone, blood, and muscle underneath the skin affects its colors. This is especially noticeable on the face.

The colors here are a little exaggerated to show my point, but with a little adjusting and blending…

Voila! Subtle, but more realistic.
PART THREE: DETAILS.
Our skin is the largest organ on our body, and as our body’s first line of defense against the outside world, it’ll be covered with tiny details and imperfections. Things like sunburns, tans, freckles, scars, and facial hair all add character to your subject matter. Here are some examples!
TANS: Everyone tans differently, depending on your ethnicity and skin tone. Fair skinned folks tend to burn more than tan, which means you’ll need a more startling, eye-catching red.If you have a skin type that tends to tan more, the color will be more brown than red. For black skin tones, the tan is less red. (And while we’re on the subject: black people DO tan, so it’s important for you to put on sunscreen and be careful in the sun, too.)

Those are the areas that the sun tends to hit the most—and things like goggles, hats, and masks can change the shape of that area.
FRECKLES AND MOLES: Freckles are also products of the sun. Some people have freckles that stay year-round, while others have freckles that fade in the winter and return in the summer. Moles are skin cells that grow in a cluster instead of being spread throughout the skin. When exposed to the sun, they tend to darken. (Another note on skin health: if you have any oddly-shaped/colored moles, moles that have changed color, size, or shape, or anything of the sort, please check with your doctor!)
Freckles like to cluster around each other, sort of like stars, and they vary greatly in size. You can have a few freckles in one place, or a lot of freckles in multiple places. Most commonly freckled areas are your face, shoulders and neck, back, and forearms.

FACIAL HAIR: Facial hair also affects the colors of the face. For simplicity’s sake we’ll be using black hair, as it is the most noticeable. Facial hair usually grows in these areas, and can make the skin look blueish/grayish because of the darker hairs beneath the skin. If your hair is red, this also very noticeable.

END NOTE.
There you go! That’s about all I can think of at the moment for skin tones. As always, references and practice are your best friend (and so is this neat little trick that pheberoni has.) Good luck with your arting!


HOW THE SAUSAGE IS MADE Sketchbook and ancillary pieces of paper Scanned images arranged in a workable grid in PS Printed-out rough draft, drawn over/refined (this is usually where I mess with the word placement). I draw it 7″x7″. Lettering (I almost always do this separate) Final art on tracing paper, w pens used (a Micron and a PaperMate Flair) The final product after combining and coloring it in PS
why you should make a webcomic and why you can make a webcomic
why should you make a webcomic?
it’s regular drawing practice
you get to draw and develop the universe your OCs live in
you could draw your OCs making out with context
see number 3
how can you make a webcomic?
make a new tumblr
install this theme https://www.tumblr.com/theme/37061
post comics as you would on any other tumblr they show up on their own webcomic site
what if nobody sees my webcomic :(
too bad you got to draw your OCs making out and nobody can appreciate your artistic genius obviously the world is not ready for this webcomic genius

Hell yeah' more shitpost drawing studies'
I mostly to these scribbles/notes for myself, but sharing is caring and my brain simple won't acknowledge and comprehend how light works.
It's actually so simple doing shadows ( in theory ), still' i wanna rip and tear at my hair whenever i actaully have draw dynamic ones.
I have two questions! First: have you ever thought of doing a tarot card suit for your characters? I think it'd work really well for them! And two: help me how do I draw legs
@gravitality
Hi!! I’ve absolutely been thinking about that, yeah, in fact I recently talked about that to my boyfriend just recently. It’ll likely happen after october! And to answer your second question! I made a thing on legs that i hope you’ll find useful!!
So. I’ve already explained basics on legs here, but I don’t think it hurts to go through some extra details to help you understand legs some more.

The very basic thing is to imagine legs as teardrops. Again, this has already been covered in said tutorial above, but I figured it’s still good to mention even the most basic thing that I know of. I still highly recommend you check it out to get in more detail and to see some other examples and practices that you do. But basically, think of legs in the shapes of teardrops, when it comes to shape. If you need a simple stick-figure to connect the legs in the first place, make sure that they bend at the knees a bit so that the legs don’t come off as stiff and unnatural.

As you can see, this method works perfectly for realistic legs as it does for stylistic ones. Remember to use these as a guideline, never to be the exact base of the legs you will be drawing. If you draw traditionally, remember not to draw these guides too hard, or they will be hard to erase/do freestyle!

But how do you actually draw out the legs without drawing them perfectly straight, as shown to the left? The trick is to add volume to them, and how you do that can be winged to your own liking. The idea is to think in curves. As no leg is perfectly straight. You may make these curves minimal if you don’t want them to be curvy, but keep in mind, still, that not even your own bones are perfectly straight, so it is highly recommended that you make them bend, at least a little.

It all depends on how you draw them as well. Say you put your legs together, as shown in this picture, what happens to the fat and muscle? Naturally, they press together, much like how thighs squish on the surface when you sit down (I’m sure most people know what I’m talking about). Make sure this shows in your art! This is very important to keep in mind, because it makes it all look more natural and believable. Try to cross your legs or stand up and sit down again for real-life examples!


The same applies for stretching your legs, more or less, except they appear to become more ‘hollow’ and slimmer. They become less soft to the touch, too, and might show. Try stretching your legs and feel where the muscles tense and where it feels ‘hollow’. This is very helpful with your art.

Many leg tutorials talk about legs without mentioning the behind. It requires a tutorial on it’s own, in all honesty, but this is the most simplest way to draw it connecting to the legs. Remember that it comes in many different shapes, and this is just a super basic guide! Two circles overlapping, while following the line and flow of the legs. Remember the muscle/fat as mentioned above!

Okay, so we got the basics of leg shapes figured out? What if you want o draw them in a certain pose, or with a certain silhouette, but perhaps do not have the reference for it? Or you want to blend your style into it? The key is to not shy away from doodling the form. Make mess, draw lightly and don’t care about the anatomy. That way you’ll get everything down without it appearing stiff. You can clean up the sketch later, always, and if you can, use a reference after you have drawn your pose, to correct your drawing.

Remember that the hips do a lot to the pose of the legs! Make sure they are in flow with your legs, so that it can look more natural. Remembers that hips ‘rotate’ with the spine.

I’ve talked about this method before when it comes to posing, and the same applies for the legs. One way to make legs appear ‘steady’ is to picture them standing in a line, and one of those legs need not to stray from the lines too much, making it steady. If you want a dynamic pose despite the steady pose, you can always have the other leg stray from the line, since it only matters that one leg is steady. This method can create good, casual poses without making them appear boring. (also notice how the teardrop shapes are used here, despite the highly stylized legs)

Do you want a highly dynamic pose, or them to appear unsteady, then skip the line entirely and make both legs aim away from it completely. As you can see, the legs appear more moving, in action, as if they’re fighting, falling, or dancing. As you can imagine, this is not a pose that one could stay steady on, suggesting that it’s taken mid-movement. More about posing and this ‘line’ method is talked about in this tutorial.
Hope this helped you, if you have any questions let me know, and if you’d like to check out all my tutorials they can be found here!

-
 imspillingcoffee liked this · 1 week ago
 -
 sibaeug liked this · 2 months ago
 -
 mickeysartrefs reblogged this · 3 months ago
 -
 aquawsm reblogged this · 6 months ago
 -
aquawsm liked this · 6 months ago
-
 cremebrulee-69 reblogged this · 6 months ago
 -
cremebrulee-69 liked this · 6 months ago
-
 solluvsart27 liked this · 7 months ago
 -
 goldengopar liked this · 9 months ago
 -
 predwolfxx121 liked this · 10 months ago
 -
 payaso-pastel liked this · 10 months ago
 -
 sadmestuffs liked this · 11 months ago
 -
 drop-the-curtain-123 liked this · 1 year ago
 -
 compostboy reblogged this · 1 year ago
 -
 aizsavedforlater reblogged this · 1 year ago
 -
 aizhits reblogged this · 1 year ago
 -
 aizreblogs reblogged this · 1 year ago
 -
aizhits liked this · 1 year ago
-
 tf-rosesong liked this · 1 year ago
 -
 chickiefoo liked this · 1 year ago
 -
 raytoroinmybackpack liked this · 1 year ago
 -
 shyshitter reblogged this · 1 year ago
 -
 archetypalschematic reblogged this · 1 year ago
 -
archetypalschematic liked this · 1 year ago
-
 sahxyel reblogged this · 1 year ago
 -
 synthsdistantly liked this · 1 year ago
 -
 mickey-art-refs reblogged this · 1 year ago
 -
 clamorybus liked this · 1 year ago
 -
 twadi-gurl reblogged this · 1 year ago
 -
twadi-gurl reblogged this · 1 year ago
-
 thefcguy liked this · 1 year ago
 -
 finalpan liked this · 1 year ago
 -
 ink-feathers-and-paper liked this · 1 year ago
 -
 kate808 liked this · 1 year ago
 -
 bunnygirl101lover liked this · 1 year ago
 -
 rancidmouth liked this · 1 year ago
 -
 briefdreamerbasketballmuffin liked this · 1 year ago
 -
 voxxian liked this · 1 year ago
 -
 libr4baby liked this · 1 year ago
 -
 gema1900 liked this · 2 years ago
 -
 hiyahiyagi liked this · 2 years ago
 -
 afallenwolf liked this · 2 years ago
 -
 prussianvenom liked this · 2 years ago
 -
 thechucklefvck liked this · 2 years ago
 -
 bluebuckstallion liked this · 2 years ago
 -
 ryandidindoom liked this · 2 years ago
