Why You Should Make A Webcomic And Why You Can Make A Webcomic
why you should make a webcomic and why you can make a webcomic
why should you make a webcomic?
it’s regular drawing practice
you get to draw and develop the universe your OCs live in
you could draw your OCs making out with context
see number 3
how can you make a webcomic?
make a new tumblr
install this theme https://www.tumblr.com/theme/37061
post comics as you would on any other tumblr they show up on their own webcomic site
what if nobody sees my webcomic :(
too bad you got to draw your OCs making out and nobody can appreciate your artistic genius obviously the world is not ready for this webcomic genius
More Posts from Arttuti and Others
can you give a run down on skintones?
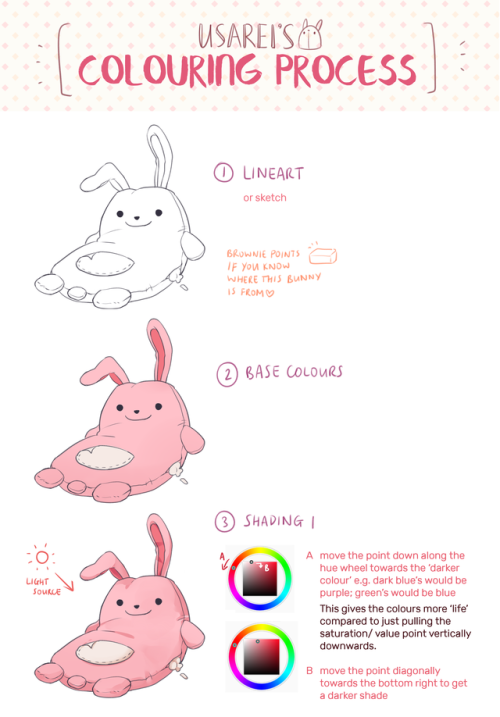
PART ONE: COLOR SELECTION.
In painting skin tones, a lot of the time I see people choose colors that are over-saturated or unbalanced. There isn’t really an exact art to this that I can explain—you just need to get a feel for what saturation balance you need for that particular skintone. Here are some examples of what I usually pick.

As you can see, I used different base colors (orange, reddish, yellow) for the skin shades in all three examples. The reason for this is because all skin tones have a different base color besides just Light, Medium, and dark. Some people divide them into categories of “warm” and “cool.” Pantone has some really good examples and references for this.

PART TWO: COLOR VARIATION.
Another big part about drawing and painting skin tones that a lot of people forget is how skin thickness affects color variation. The presence of bone, blood, and muscle underneath the skin affects its colors. This is especially noticeable on the face.

The colors here are a little exaggerated to show my point, but with a little adjusting and blending…

Voila! Subtle, but more realistic.
PART THREE: DETAILS.
Our skin is the largest organ on our body, and as our body’s first line of defense against the outside world, it’ll be covered with tiny details and imperfections. Things like sunburns, tans, freckles, scars, and facial hair all add character to your subject matter. Here are some examples!
TANS: Everyone tans differently, depending on your ethnicity and skin tone. Fair skinned folks tend to burn more than tan, which means you’ll need a more startling, eye-catching red.If you have a skin type that tends to tan more, the color will be more brown than red. For black skin tones, the tan is less red. (And while we’re on the subject: black people DO tan, so it’s important for you to put on sunscreen and be careful in the sun, too.)

Those are the areas that the sun tends to hit the most—and things like goggles, hats, and masks can change the shape of that area.
FRECKLES AND MOLES: Freckles are also products of the sun. Some people have freckles that stay year-round, while others have freckles that fade in the winter and return in the summer. Moles are skin cells that grow in a cluster instead of being spread throughout the skin. When exposed to the sun, they tend to darken. (Another note on skin health: if you have any oddly-shaped/colored moles, moles that have changed color, size, or shape, or anything of the sort, please check with your doctor!)
Freckles like to cluster around each other, sort of like stars, and they vary greatly in size. You can have a few freckles in one place, or a lot of freckles in multiple places. Most commonly freckled areas are your face, shoulders and neck, back, and forearms.

FACIAL HAIR: Facial hair also affects the colors of the face. For simplicity’s sake we’ll be using black hair, as it is the most noticeable. Facial hair usually grows in these areas, and can make the skin look blueish/grayish because of the darker hairs beneath the skin. If your hair is red, this also very noticeable.

END NOTE.
There you go! That’s about all I can think of at the moment for skin tones. As always, references and practice are your best friend (and so is this neat little trick that pheberoni has.) Good luck with your arting!
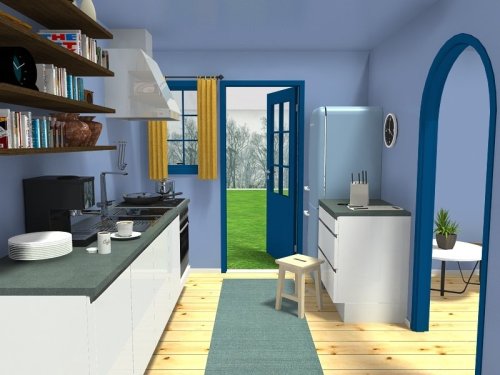
For artists who have problems with perspective (furniture etc.) in indoor scenes like me - there’s an online programm called roomsketcher where you can design a house/roon and snap pictures of it using different perspectives.
It’s got an almost endless range of furniture, doors, windows, stairs etc and is easy to use. In addition to that, you don’t have to install anything and if you create an account (which is free) you can save and return to your houses.
Examples (all done by me):


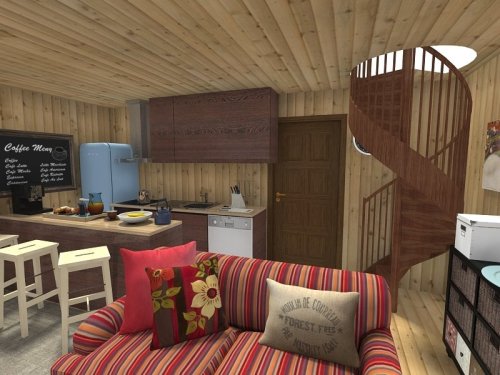
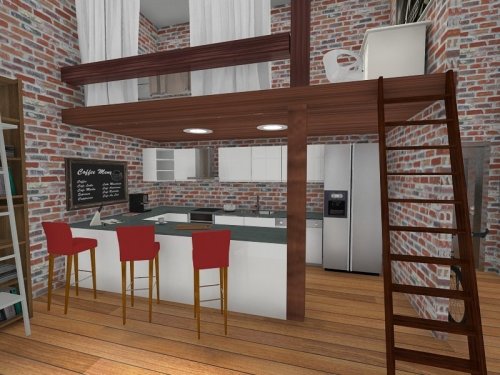
Here’s an example for how you can use it


Artist Resource: Bodies in Motion
I came across this site that (if you subscribe) offers high-res frame by frame photos of people jumping, flipping, kicking, dancing, etc, so you can easily analyze each position the body goes through to complete each movement. I think this can be an excellent resource for gesture drawing and reference for all manner of artmaking. It is $49 a year for the basic plan, and that gets you access to the high-res photos and a few other features.
https://www.bodiesinmotion.photo/
Hey just thought I'd let you know you have some of the best artwork I've ever seen! Congrats! Especially Chirrut, he's amazing in your style! I was also wondering if you had any advice on how to draw heads and eyes? They're one of my two biggest struggles and I'd love it if I could get your advice. Anything helps. Thank you and I hope you have a fantastic day!
*_* Thanks a bunch askdh and thanks for taking the time to write me! I had a lot of fun working on Chirrut ;;;
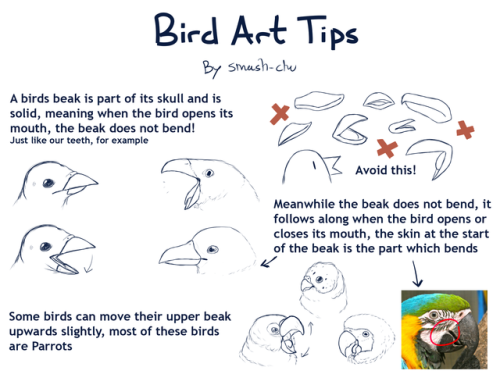
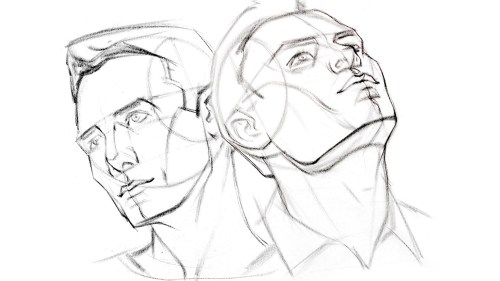
Hmmm I usually think it’s not useful to explain how I make eyes or noses, since the way to draw them changes depending on the pose… My advice would be practicing with ¾ heads. That view always force you to work volumetric shapes and also give a lot more of information. Also, I think it’s much more easy since you have more landmarks to help you.
I would also say consulting anatomy to identify the landmarks on the face (zygomatic and nasal bone , superciliary arch, mandible…) and practice on photos. Using references for drawing is not bad and drawing over photos when you need information of a face is a lot of fun. Is not necessary to draw all the bones, but knowing where the volumes and principal shapes are can help you learn. I.E:

I love that photo because it’s SO SO easy to see the volumetry of the face; just the line of the jaw gives you a lot of informacion about it. And it makes it easy to identify the elements and principal shapes of the head:

(I broke his nose, I’m sorry, but I made this quickly (??)) the point is, take your time to study the lines and understand the anatomy.Also:

that triangle is very helpful too and could help you placing the principal elements. The lines that make him look like he’s crying (?) are the relation between the eyes and the mouth and are very helpful when placing it.
Again, this is only a way to learn and understand how to build a face. That is always the key, even if you use a cartoon style. Rules can be broken, but I think it’s important to understand them first. It could help you make your style more solid.
And well, once you’ve studied it from photos, trying it on your own (even if you have references, that’s ok) and practice, practice u3u
Hope this helps and hope it’s not too technical ;;;


-
 skunkstripe liked this · 2 weeks ago
 -
 hounds-and-rabbits liked this · 4 weeks ago
 -
 thenerdycupcake liked this · 4 weeks ago
 -
 aspennntree liked this · 4 weeks ago
 -
 crappy-cat-the-tabby-cat reblogged this · 4 weeks ago
 -
crappy-cat-the-tabby-cat liked this · 4 weeks ago
-
 referencesandfunstuformeeeeee reblogged this · 1 month ago
 -
 neurvelist liked this · 1 month ago
 -
 samiamack reblogged this · 1 month ago
 -
samiamack liked this · 1 month ago
-
 inkysqueed liked this · 1 month ago
 -
 sm0o0ch liked this · 2 months ago
 -
 chameleoncoveartresources reblogged this · 2 months ago
 -
 neptoooon liked this · 2 months ago
 -
 itsa-pen liked this · 2 months ago
 -
 hopefullynotthere liked this · 3 months ago
 -
 ieatsoapdotcom reblogged this · 3 months ago
 -
ieatsoapdotcom liked this · 3 months ago
-
 apricotsnow liked this · 3 months ago
 -
 ciaxion liked this · 3 months ago
 -
 sezerzeppeli liked this · 3 months ago
 -
 maiumeni liked this · 3 months ago
 -
 gunswordfist reblogged this · 3 months ago
 -
 rnbwtrout liked this · 3 months ago
 -
 cj2accountlost liked this · 3 months ago
 -
 crunchycoven reblogged this · 3 months ago
 -
 crazycoven liked this · 3 months ago
 -
 mania-k liked this · 3 months ago
 -
 ellenthefox reblogged this · 3 months ago
 -
 diamondsheep reblogged this · 3 months ago
 -
diamondsheep liked this · 3 months ago
-
 verydazesheep liked this · 3 months ago
 -
 woofwoofs14 reblogged this · 3 months ago
 -
 cornerstone-of-my-heart liked this · 3 months ago
 -
 thegummidrotter reblogged this · 3 months ago
 -
 underpressure08 reblogged this · 3 months ago
 -
underpressure08 liked this · 3 months ago
-
 lokisarmyforevr reblogged this · 3 months ago
 -
lokisarmyforevr liked this · 3 months ago
-
 takofukkatsumi liked this · 3 months ago
 -
 rileyanorablackthorne reblogged this · 3 months ago
 -
 butchjo reblogged this · 3 months ago
 -
 megacarapa reblogged this · 3 months ago
 -
megacarapa liked this · 3 months ago
-
 newbie-i-guess reblogged this · 3 months ago
 -
newbie-i-guess liked this · 3 months ago
-
 salamanderapocalypse liked this · 3 months ago
 -
 levinssword reblogged this · 3 months ago
 -
levinssword liked this · 3 months ago
