Right now this is just anything that comes to mind since I'm a complete noob at tumblr. I've been hearing about it for years but I never really felt like I had anything to say. Well all that has changed now and I figured I'd see what all the hype about tumlr is really about. Anyway don't take anything I say too seriously for now...I'll probably change it later when I become more comfortable with this website.
168 posts
Latest Posts by risingstarling - Page 4

Below you will find my Academia FAQ. If you still can’t find something feel free to ask! My Study Tips page should be helpful, as well.
Study Strategies
How do you organize your notes?
How do you take notes in class?
Have any tips of binder organization?
How do you study before tests?
How do you write science papers?
I forgot everything from last semester… What should I do?
How do I deal when there’s so much to do but so little time!?
What is the “blank sheet method”?
How do you study for finals? x and x
Rewriting my notes works for me; how can I do it more effectively?
“How should I study for…?”
How should I study for chemistry?
How should I study for organic chemistry?
How should I study for calculus?
How should I study for [other specific class]?
How should I study to get 5s on my AP exams?
School Supplies
Do you have a basic list of study supplies? x and x
Where did you buy your book stand? | Is it good for heavy textbooks?
Do you buy physical textbooks or eBooks? | Where do you buy them?
What’s the hype with mini Moleskines? | Where can I buy some?
What should I put in the mini Moleskines?
Is there a better alternative to Moleskine notebooks?
Best books for bio/biochem/chem majors?
What do you use your colored pens for? | What pens do you use for notetaking?
What are your favorite pens?
Where did you get your laptop stand?
What are some good study apps?
Tablets or real notebooks?
Where do you buy your Cornell notebooks? | Are they helpful?
Do Bose Noise-Cancelling Headphones work?
Where is your desk from? & What is on your desk?
What kind of calculator would you recommend?
General College
Should I expect freshman year of college to be a breeze or really difficult?
How can I study more efficiently so I have time for friends and extracurriculars?
My professor doesn’t lecture well; what should I do?
What’s the most challenging part of college?
I have to work a lot to pay for college; any advice?
How do I get into a research lab?
How can I stay on top of studying, extracurriculars, work, and friends? x and x
How many clubs should I participate in?
How should I deal with mental illness in college?
What can I do to stay involved while still being able to maintain a good GPA?
How can I figure out my learning style?
What are the most important things you’ve learned in college?
College Majors and Pre-Career
Any advice for undecided majors? x and x
What kind of classes can I expect as a chem major?
I really love biology and chemistry; is biochem the major for me?
How do I choose between biochemistry and chemistry as a major?
I want to be a neurosurgeon; what major should I choose?
Why did you switch from pre-MD/PhD to pre-PhD?
Why did you decide against medical school?
My advisor said I don’t have the mind for chemistry. Should I switch majors?
I’m not that great at math… Should I give up on science?
What are the pros and cons of a double major?
GPAs and Grades
How do I recover from a bad exam grade?
How do I recover from a bad semester?
Can I get As without pulling all-nighters?
I’ve been giving 200% but only getting Bs; how can I fix this?
I’m average or low GPA; am I taking the right path?
Is my high school GPA a good indicator for university and career performance?
Studyblr
What studyblrs would you recommend? x and x
How can I become a successful studyblr?
Any tips for writing original posts?
3 Study Methods You Should Use More Often
This was originally for an article writing assignment, but I thought “why not write something I can also post on my blog?” so here are three study methods that I haven’t seen a lot of in the studyblr community but are definitely worth mentioning.
The Leitner System
Flash cards have remained one of the most popular ways to study. Some people use them to memorize vocabulary, remember answers to specific questions, or even associate dates with events. Although the use of flash cards is convenient, their effectiveness has been reduced due to most people’s habits of prioritizing each card equally and therefore spending too much time memorizing the information on them.
The Leitner System, created by a German popularizer of science named Sebastian Leitner, is a more efficient method of studying that implements the concept of spaced repetition. All the cards start off in one pile. You would first scan through these cards, then test yourself. Each card you answer correctly goes to a second pile, while those you answer incorrectly should be revised then placed at the bottom of the pile. When you review the cards in the second pile and get them correct, they will be promoted to a third pile. An incorrect card will always get demoted to the first pile, even if they had previously been promoted to the last pile.
The reason why this method is so effective is that you end up reviewing the first pile of cards more frequently—the cards you don’t know very well. Some people choose to review their Stack 1 cards every day, Stack 2 cards every other day, Stack 3 cards once every three days, and so on.
Once all your cards have been promoted to the highest box, study them thoroughly and then start over. The continuous revision trains your speed so that you may reach fluency, which allows you to recall the information faster.

Timed Memorization
The name tells it all: you memorize a certain text within a time limit, normally around five to ten minutes depending on your fluency and memorization abilities. When the timer starts, you begin memorizing. When time is up, you flip to the next page, even if you haven’t finished the previous page yet. Continue until you’ve gone through all your material.
Timed memorization helps you to discipline yourself because your brain thinks that there’s no time for messing around; you have to do this here and now. Make sure to repeat the things you missed and revise everything frequently. This method is actually one of the most effective for cramming as it gives a better coverage than if you spend a whole half hour memorizing one subtopic.
The Memory Palace or Mind Palace
Sound familiar? In BBC’s Sherlock, the ‘highly functioning sociopath’ uses this method to remember vital information and facts. A mind palace is a systematic arrangement of information, each detail corresponding to a specific object in a familiar place. To ensure that you really remember everything, the objects have to appear shocking and conspicuous.
Here’s an example: if I wanted to memorize “crimson, 11, delight, petrichor (the smell after rain)”, aside from imagining Amy Pond or the Doctor saying it, I would first choose a place, let’s say my school. I’d imagine myself walking up to the front gate and seeing that the entire building has been painted the color of blood—crimson. The building would then rise as though it were lifted from the earth and crumble into rubble, controlled by Eleven, the character from Stranger Things. Now, since I can’t really picture delight specifically, I’d probably end up visualizing a colossal sign that simply reads “delight” posted in front of my school. As for petrichor, I’d imagine curves rising out of the puddles on the asphalt after a rainy night, a visual representation of the smell of the rain. Of course, these visualizations have been created to suit my memory. (I wouldn’t know if you watched Stranger Things.)
I used this method when memorizing case studies for geography, although I chose to visualize fictional places from television series and cartoons. Some people do opt to create artificial places, but these often become blurry and are easily forgotten.
As with any study method, repetition is vital to storing the information in your long-term memory. Visit your “palace” as often as you can. Soon enough, you’ll remember the data as well as you remember the place associated with the data.
So there you have it, three lesser known methods of studying that have proven to be immensely efficient. Now, there is no “correct” way to study, but there are methods that can ease your learning process.

Japanese learning mistakes… There are TONS. Should you be worried and give up? NO! Because making mistakes and SCREWING UP is a NECESSARY part of learning. Only after you make a mistake and get corrected is when you get better!
So here’s a big list of Japanese Mistakes lesson for you. So that you get better at Japanese. Hope you enjoy!
Source – Taken from
For Learners: Top 52 Japanese Mistakes That Beginners Make
http://www.linguajunkie.com/japanese/japanese-mistakes-by-learners
1. Mistaking Particles Wa & Ga
は・が
This is one of the most common Japanese mistakes that learners make.
It is really hard to suggest a solution for this since even Japanese have moments where they doubt which one of these should be used. You really need to get used to it with time. But, let’s try anyway:
Solution: To put it simply:
は identifies the topic of the sentence
が identifies the subject of the sentence
2. Mistaking Particles Ni & De
に・で
Another common one. Both of these are connected with actions, but to make it a bit simpler let’s say that.
Solution…
に identifies and indicates “existence”, the location of the object.
で on the other hand indicates the location where the action is taking place.
3. Adjectives ending with い in the past tense
Yet another common mistake which pops up even if you’re not a beginner. Let’s take the word 寒い (cold). You see many learners who use 「寒いでした。」It’s wrong.
Solution:
The correct and polite way of saying “It was cold” is 「寒かったです。」.
It is important to pay attention to what type of an adjective you are using な or い.
4. Saying “You” in Japanese
あなた・君
Unlike English, one doesn’t really use the word you while talking to Japanese people.
Solution:
Instead we use the name of the certain person instead of saying you.「今日太郎に会えて良かった。」 is one example. Or, don’t say “you” at all. It’s kind of confrontational.
5. Saying “I” in Japanese
俺 – Ore (masculine)
僕 – Boku (masculine)
私 – Watashi (m/f)
あたし – Atashi (feminine)
There is a large number of personal pronouns in Japanese and the usage also depends on the gender, age, context, and of course your relation and the position of the person you are talking to.
Just be careful to use the gender appropriate pronoun, otherwise you might be frowned at.
Solution:
Say watashi for now. It’s safe and polite. Later, once you understand the full nuances, use them as you wish.
6.The Little Tsu
っ・ッ
Stop! Another one of the common Japanese mistakes here!
Okay this tiny little thing changes the pronunciation of your word and along with it most likely even the meaning. It basically is used to double the sound of the consonant. If you pay attention to your pronunciation, this shouldn’t be a huge problem.
7. Long vowels
Yet another pronunciation mistake pretty similar to the one above. More often than not the meaning of the word will change depending on the length of the vowel, for example:
おばさん (aunt)
おばあさん (grandmother)
8. Iru & Aru in Japanese
いる・ある
Mixing these up is a very common Japanese mistake.
These are words indicating existence of living beings and things respectively. It is common to see learners use ある when talking about animals, but you should keep in your mind that with animals and birds, and everything else that can breathe you use いる.
Solution:
Living Beings: Use いる
Inanimate Objects: Use ある
9. Katakana – カタカナ
For some reason many learners find it harder to remember katakana compared to hiragana and kanji. A
And yet another issue is we never seem to understand what the katakana words mean since they often do not match their English pronunciations. Hence, we too pronounce English words wrongly when we try to change them into katakana.
This would go on the “understandable” Japanese mistakes list. If you make it, I can sympathize.
10. The excessive usage of と
と is pretty much the equivalent of “and” in English. However it cannot be used in every situation. For example when you are connecting adjectives you can’t use と.
Solution:
Instead you will have something like this: 「可愛くて、美しくて、素敵だった」. In other words the form of the word itself changes.
11. Apologizing in Japanese
There are a lot of words in Japanese that can be used for apologizing, and they vary from situation to situation. However let’s concentrate on 「ごめんなさい」 and 「すみません」. They are quite interchangeable but to make it easier for you:
Solution
Let’s say that:
ごめんなさい is equivalent to “sorry”
すみません is “excuse me”.
Keep it simple and use them like that.
12. Japanese Greeting Mistakes
The most common greeting in Japan is 「こんにちは」. However when meeting close friends it is better to avoid this phrase, since it is formal.
Solution
You’d have better chances of bonding with your friends if you use おっす/hello for bye orおつかれ/otsukare for bye.
13. Dakara and Kara
だから・から
And again, learners tend to use だから even when から is supposed to be used. A simple example of this will be 「美味しいだから」.
Solution
だから is usually used with nouns and な type of adjectives, not with verbs or い adjectives.
14. Misusing Desu kara
~ですから
We often use this when we are explaining something, or pointing reasons for this or that. However to most Japanese this will sound like you are trying to find an excuse for your actions.
15. Calling someone “san”
~さん
Now 「さん」 is a suffix that we add when we are talking to somebody, but a lot of Japanese learners seem to add this even to their own names when talking about themselves. Just DO NOT ever do this.
16. Thanking someone in Japanese
ありがとう・ありがとうございます
Well the main difference here is informal/formal.
However you should be careful when using the informal version. If you are talking to somebody who is clearly above you, be it age-wise or position-wise, no matter how close you are there are situations when it’s better to use the formal version. For example, when you have asked them for a favor.
17. Keigo – 敬語 (formal speech)
Now, this is the opposite of the above above. Do not talk to your close friends in 敬語 (unless you have to ask them to do a big favor to you), because this will make them think you are trying to distance yourself from them and all of this can get in the way of your friendship.
18. Sorea, Are, Soko, Asoko
それ – Sore – That
あれ – Are – That (over there – further than sore)
そこ – Soko – Over there
あそこ – Asoko – Way Over there (further than asoko)
These mean that and there if you look for the English equivalents. However as in everything else with Japanese, the nuances matter. To put it simply それ indicates closeness to the person you are talking to, while あれ suggests that the thing is not close to either of you.
19. Gender appropriate
Japanese is a very gender specific language, like it or not. It’s not like you will become a social outcast but people will point out that you sound girly, or that you have a very dirty and boyish vocabulary for a young girl.
20. The Overall Mess of Kanji
We can turn this article into 1,000 Japanese mistakes if we expanded on this.
So!
If you have been learning Japanese for any period of time and do not have Chinese or Korean background, kanji has probably been a pain in the neck for you. You miss one tiny part and the meaning of the word changes. Not to mention there are hundreds and hundreds of them to memories.
21. Confusing words that have the exact same pronunciation
Okay, this might be a bit tricky, but you have to figure out the meaning out of the context or depending on the kanji and intonation. Not much else can be done.
Here are some examples:
地震・自身 – both are “jishin”
橋・箸・端 – all are “hashi”
22. ~してもいいですか・~してもよろしいでしょうか
They both basically mean “can i do this”, however the main difference is in the level of politeness. If you are talking to a senpai, teacher, professor, boss, somebody who is older than you, or somebody who is above you in any way, it is highly recommended to use the latter rather than the former.
23. Kawaiisou vs Kawaisou
可愛いそう – Kawaiisou
可哀そう – Kawaisou
When you try to describe something, you usually add ~そう at the end of your い adjective. To do this you cut the い and replace it with the ~そう. However, even though the difference is clear in written form thanks to kanji, a mistake in pronunciation will change the meaning from “cute” to “pitiful”.
24. Misusing Morau, Ageru, Kureru
もらう・あげる・くれる
I don’t know about you but learning the difference between these was a burning hell to me. もらう means to receive, while the other two mean to give.
However, depending on how you use these, the meaning can get pretty confusing, i.e. 「手伝ってくれてもいいですか。」 is offering your help to someone, so be sure to use もらう instead if you are looking for help!
This is one of those Japanese mistakes even the pros make at times.
25. The Particle No
の
A lot of people seem to misuse 「の」. For example, using a の in between an adjective and noun –「厳しいの先生」– Kibishii no sensei – strict teacher.
The 「の」here is redundant and there is no need to use it at all. Why? Because the adjective already modifies AND belongs to the noun. That’s the job of an adjective, to modify a noun. There’s no need to use の.
http://www.linguajunkie.com/japanese/japanese-mistakes-by-learners
Obito: “I always help the elderly!!!”
Obito: *helps the elderly take over the world*


水遁・水龍弾の術 || Suiton: Suiryūdan no Jutsu || Water Release: Water Dragon Bullet Technique || i’m sorry i couldn’t find the seal for yang water


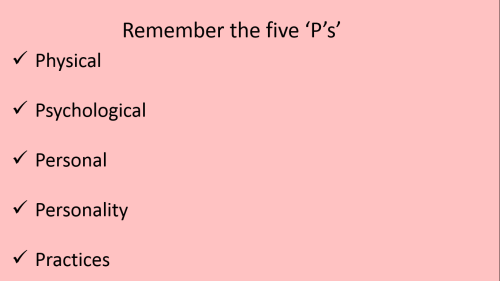
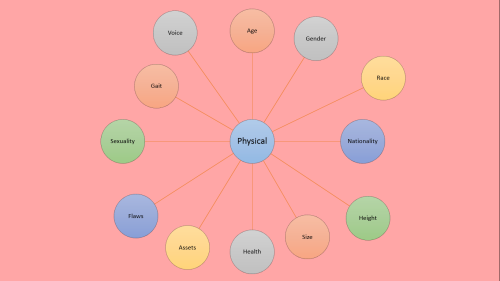


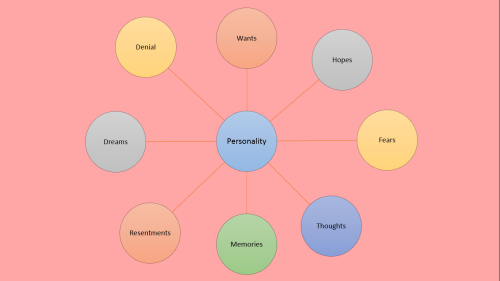
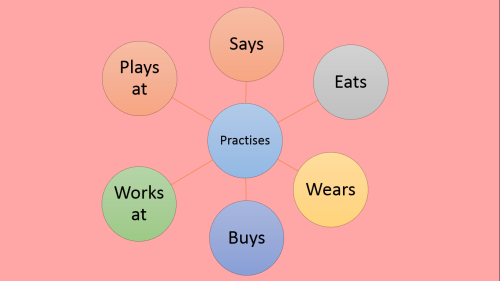
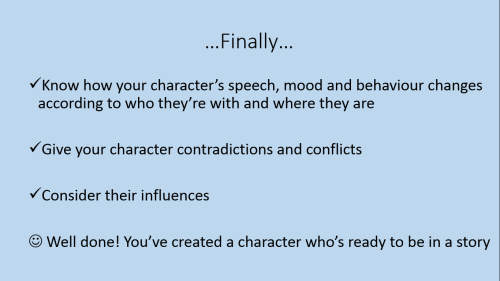
I made a slideshow about how to create a fictional character… I got most of the information from the ‘start writing fiction’ (free) course on the OpenUniversity website and found it incredibly useful so here’s a visual version for you :)
Bio help
CREATING AN OC
Building Fictional Characters
Creating an Original Character
Fiction Writing: Creating a Character
How to Create a Character
How to Create a Fictional Character From Scratch
WRITING A BIO
Character Creation Form
Character Personality Creator
Writing Tips
Found here. Bio layouts still to come.

Cleaning
clean bathroom tips
organize your closet
how to fix a leaky faucet
how to keep a clean kitchen
removing stains from your carpet
Money
how to coupon
what to do when you can’t pay your bills
see if you’re paying too much for your cell phone bill
how to save money
How to Balance a Check Book
How to do Your Own Taxes
Health
how to take care of yourself when you’re sick
things to bring to a doctor’s appointment
what to expect from your first gynecologist appointment
how to make a doctor’s appointment
how to pick a health insurance plan
a list of stress relievers
how to get free therapy
how to remove a splinter
how to avoid a hangover
Emergency
what to do if you get pulled over by a cop
a list of hotlines in a crisis
things to keep in your car in case of an emergency
how to do the heimlich maneuver
Food
recipes that take 30 minutes or less
Yummy apple thing
Brownie in a cup
Cookie in a cup
French bread pizza
Egg tacos
panera mac n cheese recipe
different salad recipes
harry potter recipes
healthy recipes
various cookie recipes
chocolate cupcakes w/ eggless cookie dough topping
s’mores pie
nutella hot chocolate
peanut butter nutella swirl cookies
cookie in a mug
starbucks holiday drinks
fruit leathers
brownie in a mug
how to make ramen 1000x better
eggless cookie dough (not to bake, just to eat)
make recipes using things you already have
how to put together a very fancy cheese plate
make different flavored lemonades
various desert recipes
make tiny chocolate chip cookies
20 dishes every cook should know
learn how to make your own tea
Macaroni and cheese in a mug
Study snacks (2)
40 on-the-go breakfast recipes
Home
what the hell is a mortgage?
first apartment essentials checklist
how to care for cacti and succulents
the care and keeping of plants
Getting an apartment
Job
time management
create a resume
find the right career
how to pick a major
how to avoid a hangover
how to interview for a job
how to stop procrastinating
How to write cover letters
Travel
ULTIMATE PACKING LIST
Traveling for Cheap
Travel Accessories
The Best Way to Pack a Suitcase
How To Read A Map
How to Apply For A Passport
How to Make A Travel Budget
Better You
read the news
leave your childhood traumas behind
how to quit smoking
how to get a book published
how to knit
how to use a polaroid camera
how to solve a rubik’s cube
how to stop biting your nails
how to stop procrastinating
how to stop skipping breakfast
how to stop micromanaging
how to stop avoiding asking for help
how to stop swearing constantly
how to stop being a pushover
learn another language
how to improve your self-esteem
how to sew
learn how to embroider
how to love yourself
learn how to do yoga
100 tips for life
learn how to make your own cards

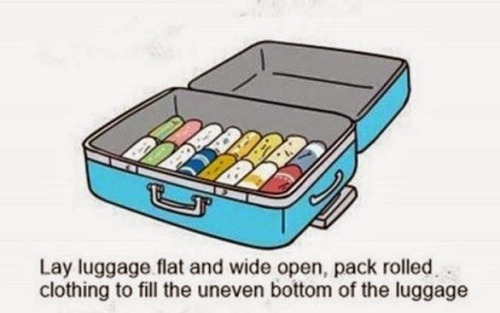
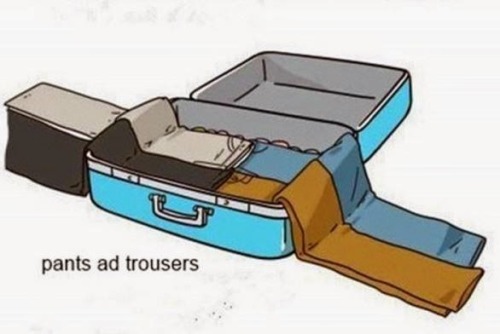
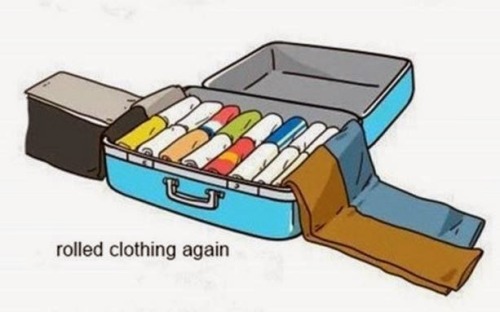
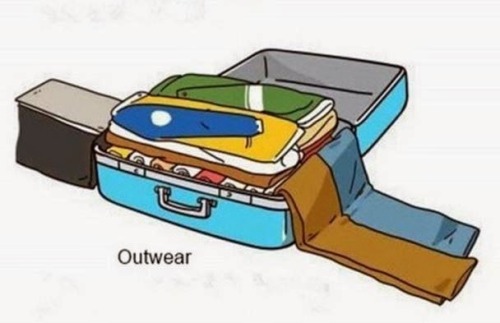
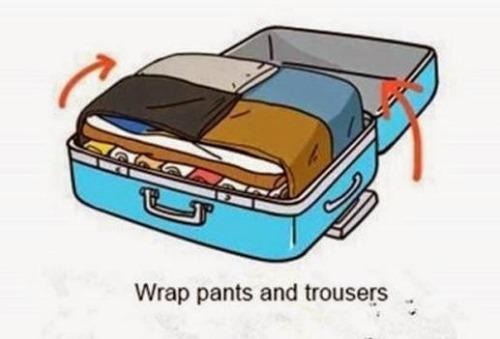
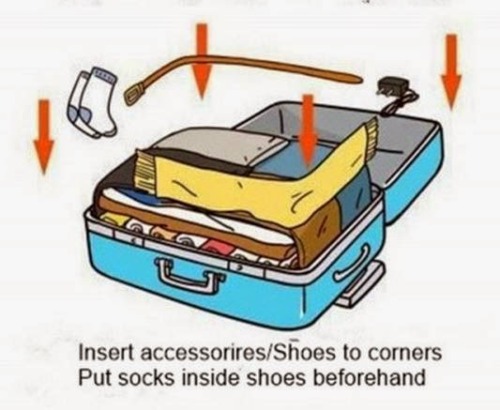

How to Pack Luggage?


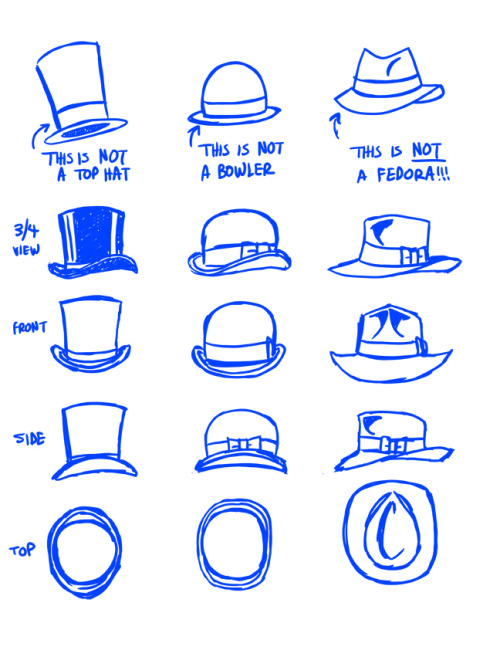
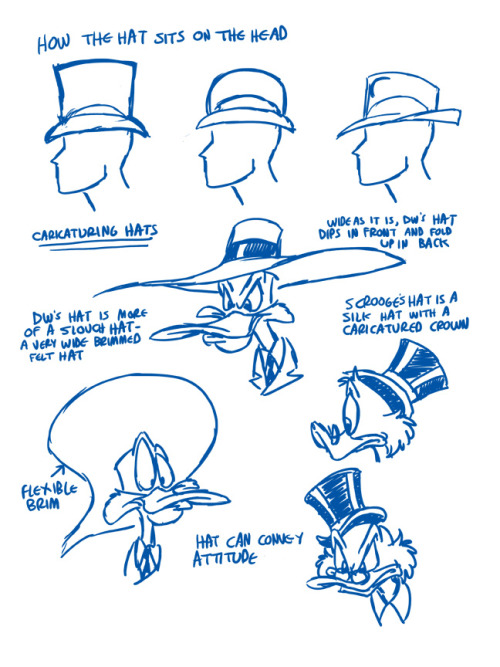
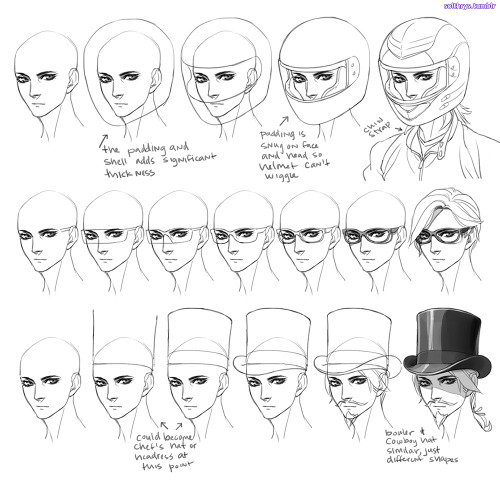
Quick and dirty hat drawing tutorial
One of my biggest pet peeves is the amount of artists (including many comics professionals) that do not draw hats properly. Since most of the characters I draw wear them I get a lot of practice. I thought I’d share the basics with you.
Basic Hat Structure- a hat is made up of a crown (the part that covers your head) and the brim (the part that shades your eyes). The crown should be bigger than the head you draw. Always draw the head shape first and work the hat around that. The brim of a hat is NEVER flat. Hats are meant to keep the head warm and the sun off of your eyes. The front of the brim will fold down to give the eyes as much shade as possible. A band or ribbon runs around the bottom of the crown with a faux bow on the left side, mostly for aesthetic purposes.
Top Hats- These are favored by rich ducks everywhere. A proper top hat is made of silk. A lot of top hat-styled hats that are made of wool or felt are more of a coachman’s hat. Fine for cosplay but rather gauche when you’re drawing the Penguin. The traditional top hat will not have a large band and will have a ribbon around the brim. Some top hats have a crown that will collapse flat.
Bowler Hat or Derby- A short brimmed hat. A ribbon also covers the brim. The crown is rounded and made of hard material.
The Fedora- Not the short brimmed, straw trilbys you see hipsters wearing on the back of their heads. A traditional fedora is made of fur felt and has a large crown with a pinch in the front. A larger brim dips in front and traditionally is worn up in back.
Next lesson- we learn about the Homburg!
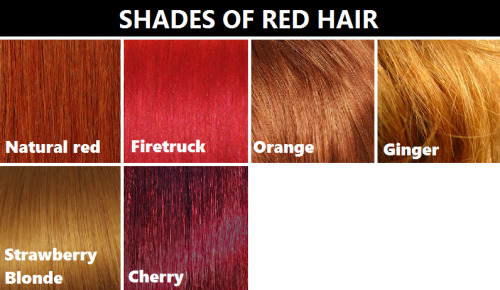
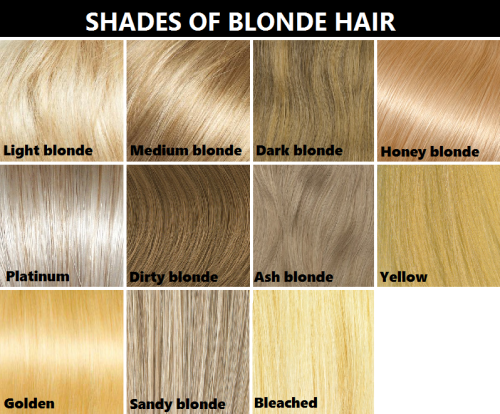
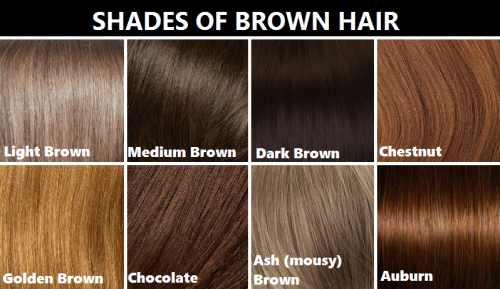


Hair color reference chart. It’s not perfect, but from what I could gather it’s pretty accurate.
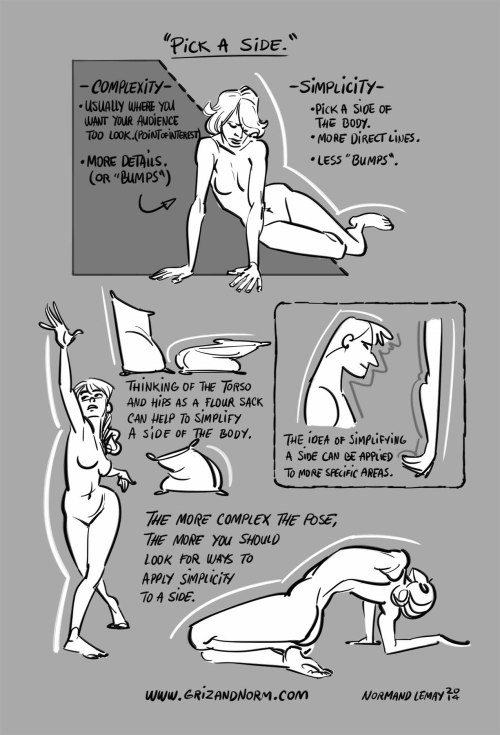
Tuesday Tips - “Pick A Side” To create appeal and clarity in your figure drawing (or any character drawing), try to simplify an overall side of the body and to keep the details (limbs sticking out, face profile, body compression) to the other side. Your posing will becoming much more dynamic and interesting to look at, creating an organic asymmetry to the overall silhouette of the body. -Norm

A visual glossary of braid types
More Visual Glossaries (for Her): Backpacks / Bags / Beads / Bobby Pins / Boots / Bra Types / Belt knots / Chain Types / Coats / Collars / Darts / Dress Shapes / Dress Silhouettes / Eyeglass frames / Eyeliner Strokes / Hairstyles / Hangers / Harem Pants / Hats / Heels / Jackets & Coats / Lingerie / Nail shapes / Necklaces / Necklines / Pants / Patterns (Part1) / Patterns (Part 2) / Plaid / Pleats / Puffy Sleeves / Scarf Knots / Shoes I / Shoes II / Shorts / Silhouettes / Skirts / Skirt Silhouettes / Tartans / Tops / Underwear / Veil Lengths / Vintage Hats / Waistlines / Wedding Gown Silhouettes / Wool
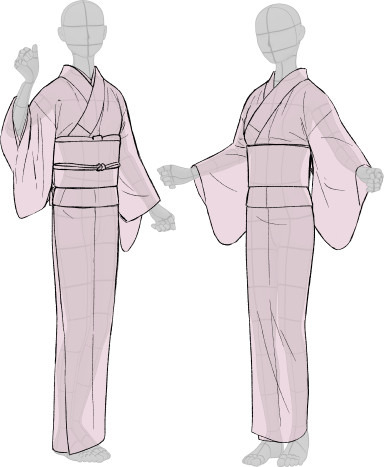
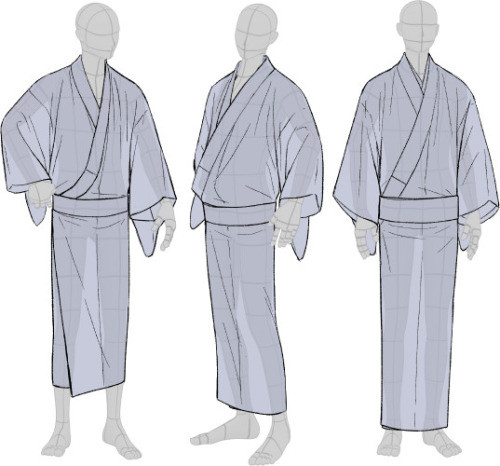
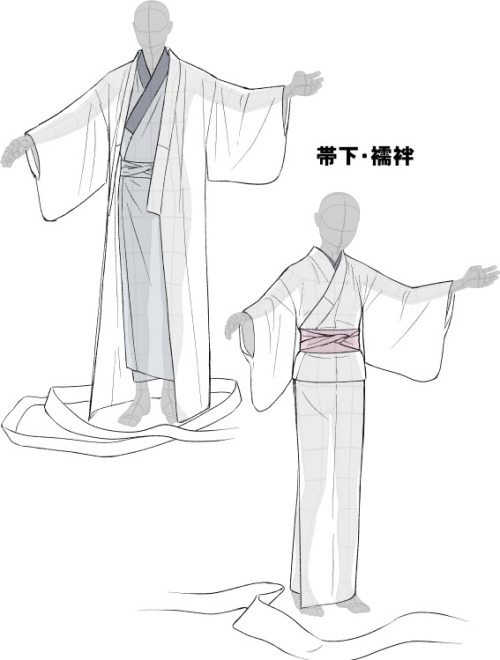
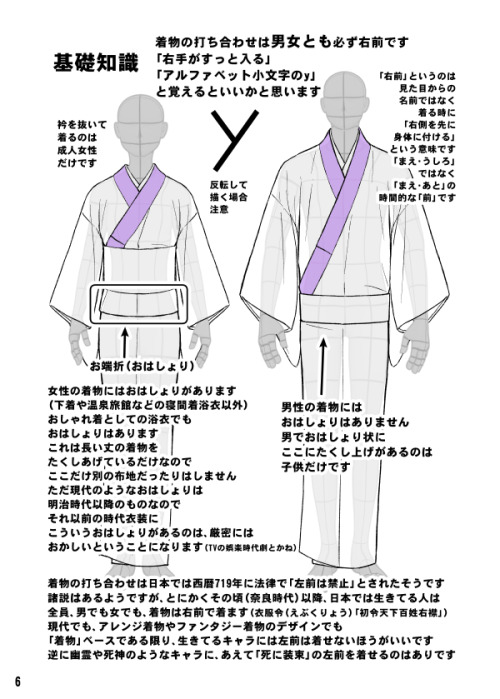
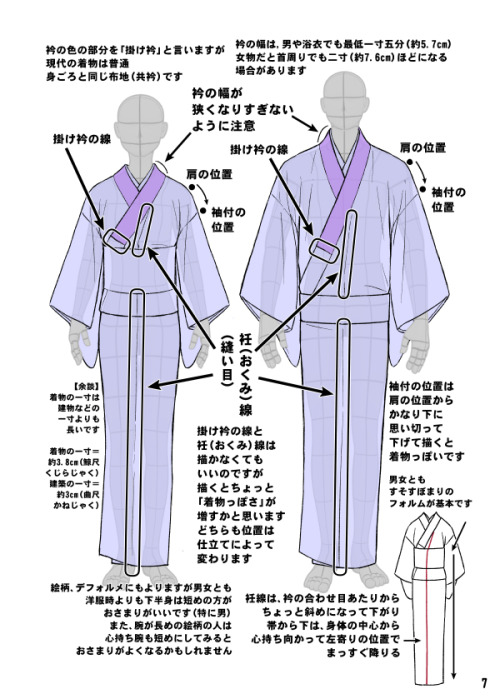
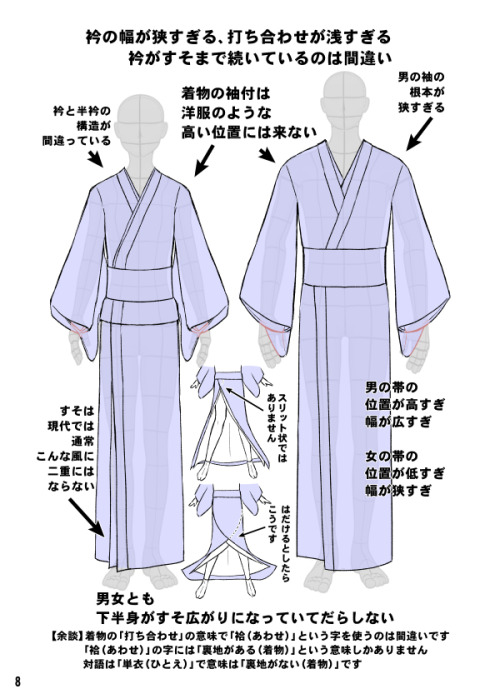
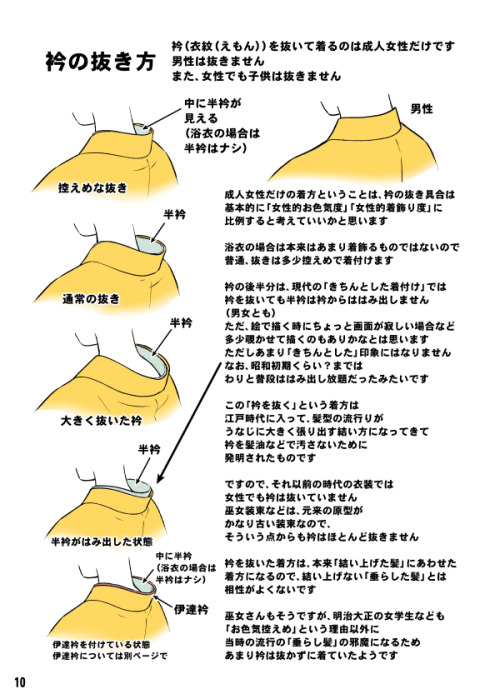

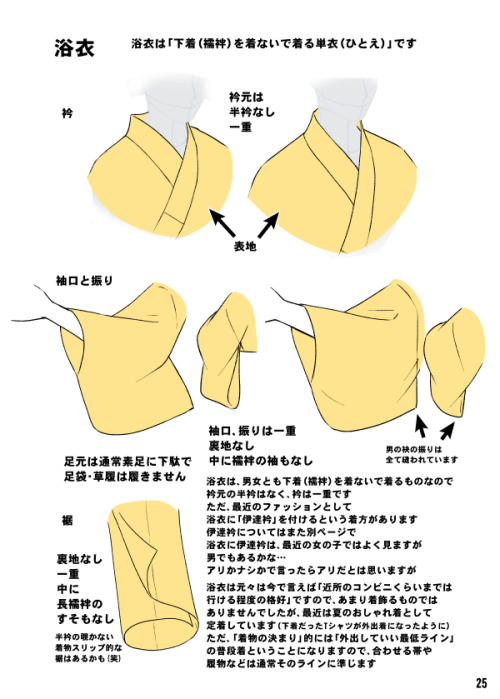
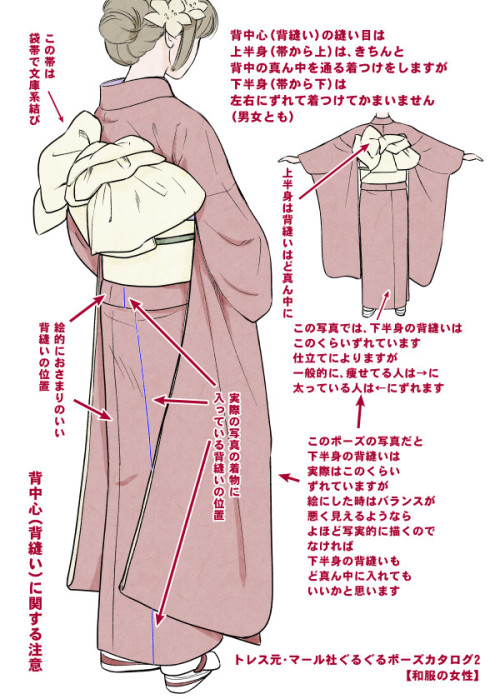
Kimono drawing guide ½, by Kaoruko Maya (tumblr, pixiv, site). Booklet is available in pdf for ¥ 900 here.
Here you can see:
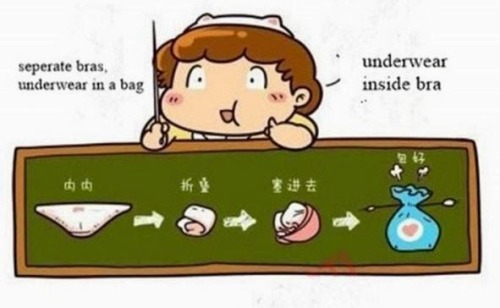
female kimono and yukata (note how the juban underwear peeks when in kimono + how belts differ)
male yukata and kimono (note how the juban underwear peeks when in kimono)
dressing up: male (kimono is not closed yet) and female (kimono closed with datejime belt and ready to put on obi)
differences between female and male kimono once dressed (note how the collars and belts set)
common drawing mistakes (compare with previous picture: shoulders lines are too defined, there is a double hem, collars are narrow, belt is not at the right place etc)
women back collar (the lower the sexier) and men back collar (close to the nape)
back and sleeves differences between men and women
collars and sleeves and view of how kimono drapes around body
Furisode back (long sleeves kimono) and formal furisode obi knot example
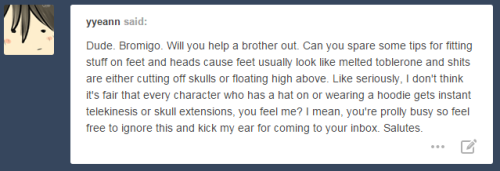
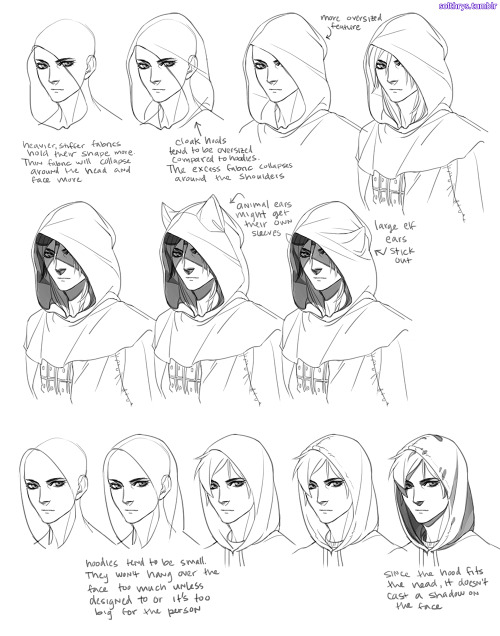
No more melted tomblerones or mising skulls, yyeann!
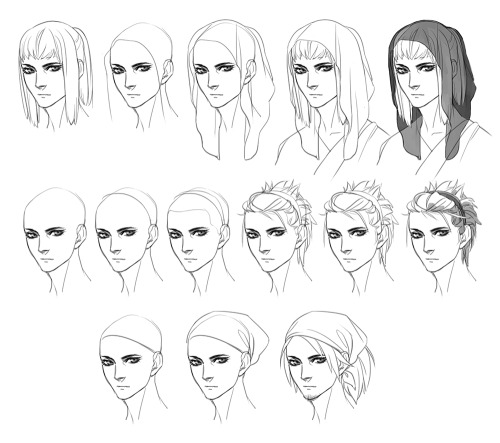
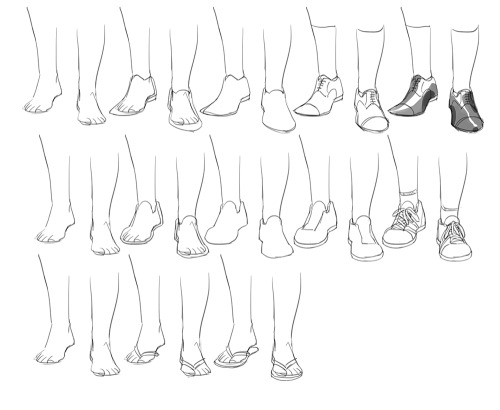
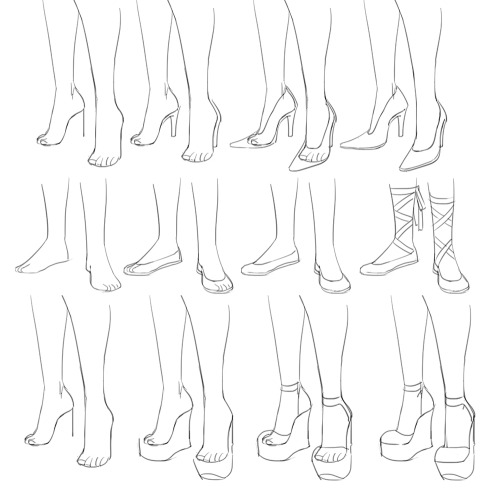
This is my basic process for pretty much everything I draw. The key is understanding the shape of the garment you’re trying to draw and the shape of the body part you’re putting it on.
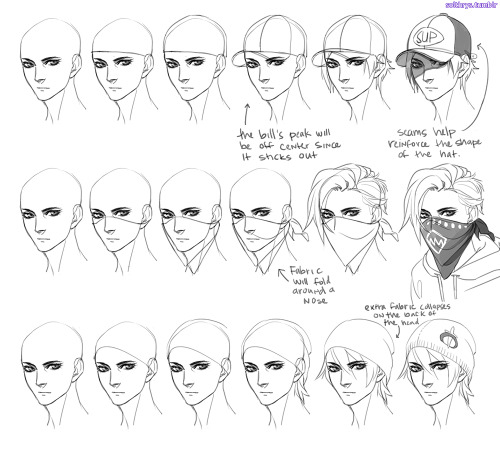
Drawing the body first forces you to make the shoe, hat, or clothes fit that body. With practice you’ll be able to skip some steps. This method works the same no matter the perspective or pose. It just relies on your knowledge of what a hat looks like from above, or what the bottom of a shoe looks like. When in doubt, just google refs. Don’t necessarily need the exact angle you’re trying to draw. Look at different pics to give you an idea of how it works in 3d.
Shoes are always a bit tricky because feet are a stupid ass shape.
It might help if you think of hats as a cylinder fitted to the person’s head to help you get the perspective right before you push in detail. note: heads aren’t circles. they’re kind of egg shaped if you look at them from the top.
I recognize that canon has made a decision. But given that it’s a stupid ass decision, I’ve elected to continue to ignore it.


“Who Are You”
“I’m You But Stronger”


Jason Todd didn’t get brutally murdered and claw his way out of his own grave to wear a helmet with a mouth on it


I’m sorry, apparently I have no impulse control.


Sailor Moon Meme Question 16:
Favourite Movie:
IT WOULD TAKE 30,000 NOVELS TO FULLY EXPRESS JUST HOW MUCH I LOVE THE R MOVIE YOU DON’T EVEN KNOW
Like seriously I had to think hard to find a scene I haven’t already made a gif(set) of. I love this movie so, so, so, so much. I love this scene so, so, so, so much. I LOVE THE R MOVIE.
…
*ahem* I mean, the R movie is okay I guess…


The Flash is gold
Lose Weight with These 4 Treadmill Workouts

- Interval Training
For a total of 5 minutes overall, this is a great routine. Begin with a 4% incline and set the speed to a slow jog; complete for a minute, then set the incline to 6% and adjust speed to a speed walk or run for another minute. For the next minute, go back down to the 4% incline and lightly jog for a minute, then adjust it back up again to 6% and a higher rate of speed. Complete the final minute back down on the 4% incline and walking/slow jog level.
- The 30 Minute Routine
Warm up for 5 minutes by walking at a fairly brisk pace with a minimal incline. After the first 5 minutes, continue switching for the remaining 25 minutes by performing a speed walk or jog at a 2 to 3% incline for a minute; for the next 2 minutes slow down slightly to a faster walk with no incline. Repeat until you complete 20 minutes, then cool down for 5 minutes with a regular-paced walk with no incline.
- Intense 20 Minutes
If you want something that will get your heart revving, set the speed to a level that has you running for the first 5 minutes; halfway in, set the incline to 3% for one minute. The next 2 minutes, perform a full-out run while keeping the incline at zero. For the next minute slow down to a brisk jog and raise the incline to 6%. For the final 2 minutes, maximize your speed as much as possible.
- Hill/Mountain Workout
This is a great exercise to build endurance: for the 2 minutes, set to a walking pace, and adjust incline between 9 to 12% based on your skill level. For 2 minutes following this, keep speed the same but raise the incline to 15%. The following 3 minutes, raise your speed but adjust incline to 0%. For the final 3 minutes, set to a fast walking pace again, but raise the incline to 15%, then lower it to 9% to finish out.
These are some excellent workouts to use with a treadmill. It would also serve you to check out some treadmill reviews online, in order to figure out what particular brand would meet your training needs. Have any other favorite treadmill routines? Let us hear about them!

A Beginner’s Guide To At Home Workouts

Keep reading

Top 10 Muffin-Top Burning Exercises
If you would like some help losing weight, we have compiled a list of the best weight loss products and services that have helped millions of individuals lose weight faster and more successfully.
www.fitbodymag.com/shop-weight-loss