Anatomy Tips By zephy.fr


Anatomy Tips by zephy.fr
Support the artist and follow them on Instagram!
More Posts from Nastysynth and Others


high quality expression references with varied facial types
Can you give any tips on how to draw big bulky people like Hazel/Muriel/Gretchen?
I hope this can be helpful to you!

I don’t really think about how I draw characters with different body types at this point because I’ve practiced it so much but these are some rough notes on what I do.
The core of it is to just draw using thicker shapes. Don’t worry too much about exaggeration as it’ll help get you out of the mould of drawing smaller characters by default. The neck, the arms, the torso, the legs, just draw them thicker.
Study references of fat or muscular to see how the definition changes but in principle, it isn’t that much different to drawing any body type.
I draw Hazel and Gretchen to be quite bulky but because they’re teenagers when I draw them, they’re still quite soft and lack extreme definition or sharp lines, unlike when I draw Muriel who’s meant to be extreme and musclebound. Changing how soft you draw the character or how much detail you draw changes whether they look bulky from fat or muscle.
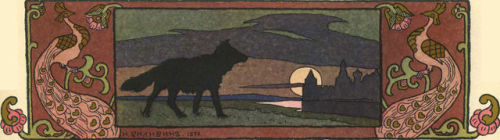
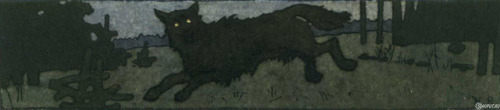

Wolves by Ivan Bilibin.


Seriously, where did Steve find that armor? I hope he didn’t steal it from an aggressive warrior or something…I don’t want him to get in trouble, ya know? It’s been a year since this tutorial is on Patreon, so I’ll post it for everyone now! (I have to work on a reptile scales or transparent materials tutorial one day tho)
Underwater tutorial: https://darhak.tumblr.com/post/642964456883765248/steve-why-is-he-always-like-this-metal-tutorial
Fire tutorial: https://darhak.tumblr.com/post/186828219798/thats-my-first-and-probably-not-last-art


tusky business
Hey got any tips of drawing in the cr style?
Well first off, study the sprite sheets of the characters. They can all be found on the Cookie Run wiki.To draw in a style it helps to study the style too and figure out the elements of how the characters are put together. For Cookie Run it goes hand in hand with my style because a lot of it is very Geometric. Even with cookies who are oddly shaped.

I talked about this with my Discord once about how basic shapes can really go into making the character design solid and this seems to largely be the basis of how CR renders it’s characters.

Even characters build like Purple Yam and Milk Cookie use this more basic geometry when building the foundation of the character. It all comes down to a more simplistic style based on shapes.

That being said, When I build characters I use basic shapes to do it. That’s why a lot of my earlier drawings of the CR OCs look so different compared to now, because back then I was learning it. The easiest way to do it is to try drawing a CR character, build them as you see them, and then adapt that into how you draw.

And obviously cookies aren’t all the same shape! Shapes really can go into how people will interpret your character and their personality! So don’t be afraid to think outside of the box and look at different shapes for different characters!
That’s about as many tips as I have for now, but that’s the fundamentals over how I go about it.
i literally love how your color and shade if it’s ok do you have any tips on digital coloring? you don’t have to answer this if you don’t feel like it :) thanks!!
hello friend!! i have a tutorial i made on twitter a while ago which is more or less how i make my colours more interesting. i still use the technique and in general it’s just a lot of colour adjustment nothing too special LOL here!!


I have two questions! First: have you ever thought of doing a tarot card suit for your characters? I think it'd work really well for them! And two: help me how do I draw legs
@gravitality
Hi!! I’ve absolutely been thinking about that, yeah, in fact I recently talked about that to my boyfriend just recently. It’ll likely happen after october! And to answer your second question! I made a thing on legs that i hope you’ll find useful!!
So. I’ve already explained basics on legs here, but I don’t think it hurts to go through some extra details to help you understand legs some more.

The very basic thing is to imagine legs as teardrops. Again, this has already been covered in said tutorial above, but I figured it’s still good to mention even the most basic thing that I know of. I still highly recommend you check it out to get in more detail and to see some other examples and practices that you do. But basically, think of legs in the shapes of teardrops, when it comes to shape. If you need a simple stick-figure to connect the legs in the first place, make sure that they bend at the knees a bit so that the legs don’t come off as stiff and unnatural.

As you can see, this method works perfectly for realistic legs as it does for stylistic ones. Remember to use these as a guideline, never to be the exact base of the legs you will be drawing. If you draw traditionally, remember not to draw these guides too hard, or they will be hard to erase/do freestyle!

But how do you actually draw out the legs without drawing them perfectly straight, as shown to the left? The trick is to add volume to them, and how you do that can be winged to your own liking. The idea is to think in curves. As no leg is perfectly straight. You may make these curves minimal if you don’t want them to be curvy, but keep in mind, still, that not even your own bones are perfectly straight, so it is highly recommended that you make them bend, at least a little.

It all depends on how you draw them as well. Say you put your legs together, as shown in this picture, what happens to the fat and muscle? Naturally, they press together, much like how thighs squish on the surface when you sit down (I’m sure most people know what I’m talking about). Make sure this shows in your art! This is very important to keep in mind, because it makes it all look more natural and believable. Try to cross your legs or stand up and sit down again for real-life examples!


The same applies for stretching your legs, more or less, except they appear to become more ‘hollow’ and slimmer. They become less soft to the touch, too, and might show. Try stretching your legs and feel where the muscles tense and where it feels ‘hollow’. This is very helpful with your art.

Many leg tutorials talk about legs without mentioning the behind. It requires a tutorial on it’s own, in all honesty, but this is the most simplest way to draw it connecting to the legs. Remember that it comes in many different shapes, and this is just a super basic guide! Two circles overlapping, while following the line and flow of the legs. Remember the muscle/fat as mentioned above!

Okay, so we got the basics of leg shapes figured out? What if you want o draw them in a certain pose, or with a certain silhouette, but perhaps do not have the reference for it? Or you want to blend your style into it? The key is to not shy away from doodling the form. Make mess, draw lightly and don’t care about the anatomy. That way you’ll get everything down without it appearing stiff. You can clean up the sketch later, always, and if you can, use a reference after you have drawn your pose, to correct your drawing.

Remember that the hips do a lot to the pose of the legs! Make sure they are in flow with your legs, so that it can look more natural. Remembers that hips ‘rotate’ with the spine.

I’ve talked about this method before when it comes to posing, and the same applies for the legs. One way to make legs appear ‘steady’ is to picture them standing in a line, and one of those legs need not to stray from the lines too much, making it steady. If you want a dynamic pose despite the steady pose, you can always have the other leg stray from the line, since it only matters that one leg is steady. This method can create good, casual poses without making them appear boring. (also notice how the teardrop shapes are used here, despite the highly stylized legs)

Do you want a highly dynamic pose, or them to appear unsteady, then skip the line entirely and make both legs aim away from it completely. As you can see, the legs appear more moving, in action, as if they’re fighting, falling, or dancing. As you can imagine, this is not a pose that one could stay steady on, suggesting that it’s taken mid-movement. More about posing and this ‘line’ method is talked about in this tutorial.
Hope this helped you, if you have any questions let me know, and if you’d like to check out all my tutorials they can be found here!


All images are used purely for educational purposed and are credited to their sources and owners. Any image without credit was created by me.
-
 alaric-mothy liked this · 3 weeks ago
 -
 sourgummy reblogged this · 3 weeks ago
 -
sourgummy liked this · 3 weeks ago
-
 glitchyycatt liked this · 3 weeks ago
 -
 idkjustamherelol liked this · 3 weeks ago
 -
 railway323 reblogged this · 3 weeks ago
 -
railway323 liked this · 3 weeks ago
-
 maximates liked this · 1 month ago
 -
 keyokayo liked this · 1 month ago
 -
 axolotl-00997 liked this · 1 month ago
 -
 imjustarandom940 liked this · 1 month ago
 -
 one-eyed-imp liked this · 1 month ago
 -
 lildips liked this · 1 month ago
 -
 thatsubwayrat reblogged this · 1 month ago
 -
 miauskers liked this · 1 month ago
 -
 cherrytheidiot liked this · 2 months ago
 -
 pancakesfordinnertime liked this · 2 months ago
 -
 tritail-art-resources reblogged this · 3 months ago
 -
 halflingandhalf reblogged this · 3 months ago
 -
 lilyfoxis liked this · 3 months ago
 -
 skulleatermetalhead liked this · 3 months ago
 -
 m00nv4ll3y liked this · 4 months ago
 -
 fabulouspotatosister liked this · 4 months ago
 -
 artmotivationer reblogged this · 4 months ago
 -
 user1234554 liked this · 4 months ago
 -
 uwutastic liked this · 4 months ago
 -
 poiuygtfdxcvb liked this · 4 months ago
 -
 finowild liked this · 4 months ago
 -
 euridycee reblogged this · 4 months ago
 -
 girl-of-boredology-inactive liked this · 5 months ago
 -
 lolita7d liked this · 5 months ago
 -
 chthonicmoth liked this · 5 months ago
 -
 gay-foxxo reblogged this · 5 months ago
 -
gay-foxxo liked this · 5 months ago
-
 artrefvalley reblogged this · 5 months ago
 -
 couchkitty liked this · 5 months ago
 -
 lavenderblocktops reblogged this · 6 months ago
 -
 bubbles-62 liked this · 6 months ago
 -
 freedomisscaryshit reblogged this · 6 months ago
 -
freedomisscaryshit liked this · 6 months ago
-
 somebodynew1guess reblogged this · 6 months ago
 -
 spacetimeaccordionfolder reblogged this · 6 months ago
 -
 cri-cricket liked this · 6 months ago
 -
 jamiegeode reblogged this · 6 months ago
 -
jamiegeode liked this · 6 months ago
-
 silly-lil-scribbles liked this · 6 months ago
 -
 red-velvet-0w0 reblogged this · 6 months ago

Sylwester | i will mostly post sketches, because i'm too lazy to end them
196 posts