Tusky Business


tusky business
More Posts from Nastysynth and Others
Gradient Textures + Simple Ocean Simulation (Blender)
something that i like to do when im strapped for creativity is to open up Blender and make a little stylized ocean wave sim, like these


they’re super simple, nice to look at, and if you add in a little something extra, like a boat or some fish or even some particle effects, it can turn into something really special.
it also takes like three minutes to make, so let’s get started.
Czytaj dalej
need refs/inspo for period clothing?
here you go:
Medieval (9th-15th century):
10th century and earlier
Romance (1000-1250)
11th century
12th century
13th century
more 13th century
14th century
more 14th
15th century
and more 15th century
Gothic (1150-1550)
Renaissance (1520-1650)
16th & 17th century
16th century
more 16th
Tudors (1500-1550)
more Tudors
Elizabethan Period (1558-1603)
Jacobean Era (1603-1625)
17th century
more 17th century
and again
and even more
this won’t stop
Baroque (1600-1750)
Georgian Period (1714-1830):
18th century
more 18th century
18th century women’s fashion
18th century men’s fashion
Rococo (1720-1770)
Classicism (1770-1790)
children 18th-19th century
Regency Preiod (1811-1820)/ Empire (1800-1820s):
1790-1820s
more stuff on regency and georgian era
even more
that’s not enough regency
and more
how is there so much
early 19th century men’s wear
early 19th century women’s wear
Victorian Period (1837-1901):
Romantic Era (1820-1840s)
Civil War Era/1850-1860s
1870-1890s
more victorian
Edwardian Period (1901-1910):
1900-1910s
Belle Epoque (1880-1910s)
more edwardian/belle époque
Modern:
1910s-1920s [Fashion between the World Wars]
1920s
more roaring 20s
so much 20s
1920s hairstyles
1930s
1930-1940s
1930-1950s
1950s
more 50s
1960s
1960-1970s
1980s
lots of periods in one spot/fashion through centuries:
here, here, and here is almost everything (and properly ordered)
also here with lots of historic fashion magazines
100 years of beauty (includes lots of other cultures too!)
historic fashion
costumes of antiquity
more historical clothing
history of fashion
more history of fashion
“vintage” clothing
historic costumes
children’s historical fashion/toys
details
historic wedding dresses
historic assecoires (hats, shoes…)
hats
masks
parasols
lots of embroidery/jewlery
Short disclaimer: Most pictures show clothes of royalty, aristocracy, and burgoisie as their clothes weren’t worn as much and especially not for labour, which is the issue with farmers/workers’ clothes, which also were reused quite often, whether to sew new clothes or have rags. So please keep this in mind!!
It really is very European-centric as I am European as well, and I apologise for it if you expected more from it. I definitely lack the knowledge to determine what are accurate portrayals of other cultures, and to find content for them is really difficult as well. This is why I would encourage you to submit any resources you have to my blog! If you have any book recs or know good pages, please let me know!
Another edit/note: Pinterest has changed a lot since I made the post, so you need to be signed in now to see more than the first row of the boards, I’m really sorry about that! (Also I tested all the links and on my original post they still work, if you’re having isues with that.)
color blob effect in clip studio paint


hey! >this post< got a some attention and i saw a tag asking for the tutorial, so i decided to go through with it. here’s that tutorial!
tutorial below the cut!
Czytaj dalej
Quick art tip - child proportions
Ok this is a real quick one but let me show you how to get more-or-less accurate sizes for child characters. Kids are tricky to draw, they are - from toddler up to about teens people change radically almost every year so pinpointing character’s size during those years is pure hell.
What you need to do to make everything super easy for yourself is to check their Head Proportion. What makes kids look like - well, kids, is that their heads are proportionally large in comparison to their body.
Average adult is about 7,5 heads tall in comparison to their own body, however with children under 10 that number is just under 6 heads with about 1 head shorter the younger you go down to 3 heads as an infant.
Easiest way to figure the so-so head-height of a certain age is to find images of said age group and do a quick count on them

at which after you can replicate it in your own works - don’t mind if it’s not 1:1 with reference, finding images that are actually of the age you need is tricky and kids in general vary a lot so someone might be a lot taller than others. You have a bout 0,5 -1 heads of wiggle room before it starts to look way older.


Proportions are super important in art and i lovingly recommend everyone to figure out basics of them - it’s the easiest way to get notifically better with art. I could go on about proportions but let’s wrap this up. Need to note however that head proportion is not same as character height - a character can be 15 feet tall but still have head-height of 6, HH is simply a way to scale out the body.
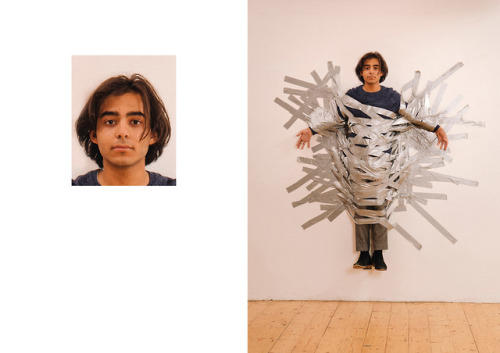
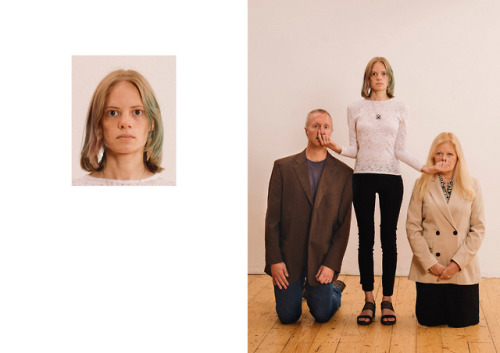

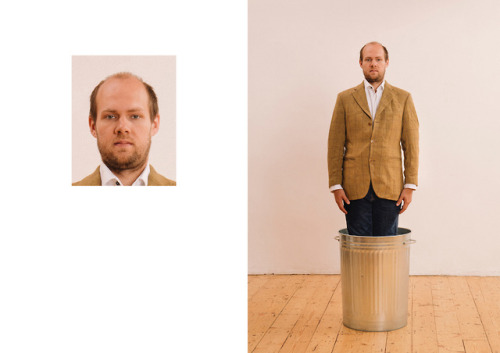
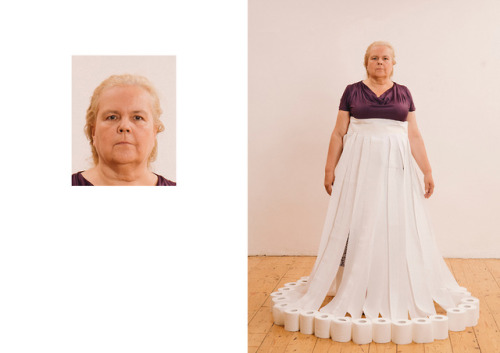

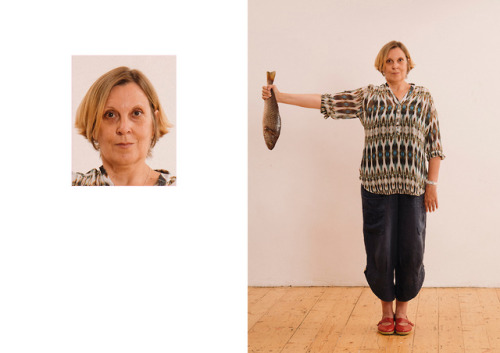
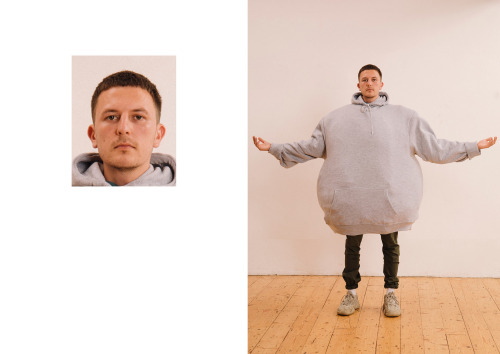
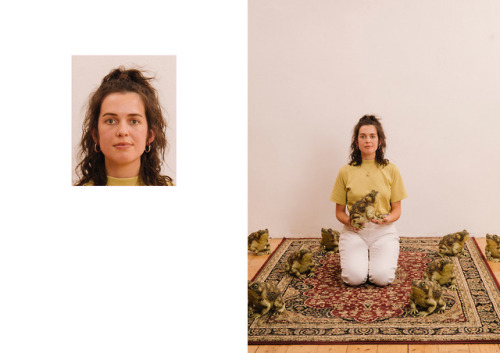
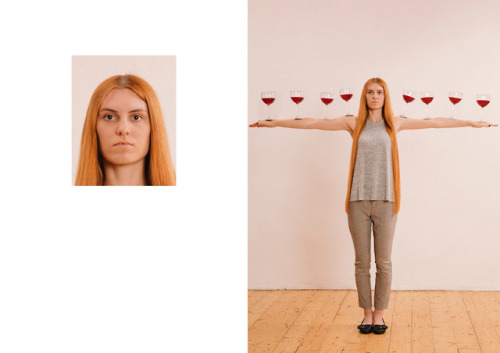
Passport Photo Series London-based visual artist Max Siedentopf recruited a cast of friends and strangers to sit for passport photos. Above the shoulders the participants are straight-faced and rigid, yet below they are balancing full wine glasses along their arms, taped to a wall, or even on fire.

i am SO sorry for the super long response, but i thought this might make a nice little tutorial opportunity, since soft body physics can be… frustrating, to say the least. i’ve noticed that it tends to respond better to spherical meshes than most others, so getting it to work with something with a lot of hard edges and flat planes can be a little tricky (at least in my experience).
so! to get started, here’s my basic setup

the only thing i’ve done so far is place my object in the scene, along with a plane to act as the ground and a camera to record everything.
next you want to select your object, and in the properties menu on the right, select the physics tab (should be the very last one, the icon looks like a bouncing ball)

and for your object, you want to apply a collision and a soft body modifier (some people use rigid body instead of collision, so if you have issues with one there’s a chance the other might work out better. as for me, i usually stick to collision)

then select your plane and apply the collision modifier only.
now when you hit the play button at the bottom of the screen, this happens

it’ll just kinda float in place.
so to fix that, you select the object, go back into the physics menu, and look at its soft body settings

now uncheck the box that says “Soft Body Goal” (this’ll let gravity do its thing)

now when you press play after that

poor dude just kinda dies.
so there are a couple things i like to do to help it not… do… whatever that is.
go back into your object’s soft body menu and click on the tab that says “Soft Body Edges”

now underneath where it says “Collision:” you want to make sure that you have either “Edge” or “Face” (or both, why not live a little) applied to the object (this can help prevent clipping!)

we’re trying to make it wiggle n’ jiggle while still maintaining its shape, so what usually works for me is to crank up the “Bending” spring as high as it’ll go (which is 10) and enabling “Stiff Quads”

and we’re left with this!

and that’s how i do it! there are probably more efficient ways to get this effect, but for me

Free to use textures, credit optional.


Not the same Anon, but hyacinths please
Hi friend, thank you so much for your interest! I’m going to go over how I draw these flowers, but I realized midway that I’m actually very terrible at drawing these in particular, haha. There’s a reason I’ve lowkey avoided doing them so far, and I think it enabled me to highlight a bit more, the way I choose my arts.
It’s quite hard to teach just “how to draw a specific flower” mostly because I myself don’t know - the most important thing I can emphasize is using references!

I personally dislike drawing these flowers in my art, and I couldn’t figure out why until I started this tutorial.
One thing I tend to notice when I look at reference pictures is how flowers move as a ‘whole’ and their relative ‘flexibility’. I pay attention to that because the way I do art, I choose the flower in part based on appearance and how natural they will look in a specific composition.

I tend to like flowers that sprout outwards and have a kind of ‘loose’ appearance. The red lines here show the ‘direction’ I want the flowers to go in.

This is where these flowers pose a bit of a problem. Because arranged in clumps, they are very stiff. It’s not a bad thing if that’s what you’re looking for, but it’s not what I wanted, exactly, for this image.

They just stick straight up, because they have very stiff leaves and a tight packed pattern. (They sometimes tilt though, mine always did). At this point, I could decide the form isn’t right, and this isn’t the flower I want. But there’s also another thing I could do, which is altering it’s appearance when I draw it, slightly.

Left is a simplified version of the shape, while the middle is a more detailed image. The furthest to the right is a close-up of a single flower. Depending on what you want to portray, you can choose to alter what you want your flowers to look like.

As you can see, when drawn closer up, the flower has a lot more flexibility!

So with this, I ended up drawing the batch of flowers a lot larger than how it would be normally, while still retaining the recognizable flower and leaf shape.
So what I’m trying to convey is that sometimes you have to study references, but then know you can pick and choose what aspects to highlight in your art. That’s I think, how you can get your flowers to look extra ‘dynamic’ in your work - by accentuating their specific shapes to work to your advantage! And also playing with their colors and such! But hyacinths come in so many colors that any would work!
I hope this is helpful to you, anon!
how do you make ur art look like its glowing?? it's gorgeous!!
I’ll give you a weird secret. After you put the glowing object on a dark background, surround the white parts with a halo of highly saturated color. Observe:

It doesn’t have to be that blatant- smaller outlines of color, blended properly with the background, can make an equally effective glow-y look :)

-
 monkeyqueen2012 liked this · 1 month ago
 -
 kayayayayayayay liked this · 1 month ago
 -
 aegirocassis-stan liked this · 1 month ago
 -
 did-ya-hear-somethin liked this · 1 month ago
 -
 1st-lil-poet liked this · 1 month ago
 -
 pokeycub liked this · 2 months ago
 -
 trickylittle-nightmares liked this · 2 months ago
 -
 inkycorvid liked this · 2 months ago
 -
 thehourone liked this · 3 months ago
 -
 orcenjoyer3000 reblogged this · 3 months ago
 -
 edwarddono liked this · 3 months ago
 -
 nikahearts liked this · 4 months ago
 -
 sunshineandlabyrinth liked this · 4 months ago
 -
 dashampi41 liked this · 4 months ago
 -
 frogwithhumanteeth reblogged this · 4 months ago
 -
frogwithhumanteeth liked this · 4 months ago
-
 abarraojay liked this · 5 months ago
 -
 dinflu-blog liked this · 6 months ago
 -
 cinnabun-eepy liked this · 6 months ago
 -
 silver-birds liked this · 6 months ago
 -
 miscpipa liked this · 8 months ago
 -
 cora-artlab liked this · 9 months ago
 -
 brothenjoyer liked this · 9 months ago
 -
 pera-tune liked this · 10 months ago
 -
 cold-breadcrumbs liked this · 11 months ago
 -
 deanbabygrl liked this · 11 months ago
 -
 zzconfusedbylifezz liked this · 11 months ago
 -
 explosiveal liked this · 11 months ago
 -
 nighttimenarcotics reblogged this · 1 year ago
 -
nighttimenarcotics reblogged this · 1 year ago
-
nighttimenarcotics reblogged this · 1 year ago
-
nighttimenarcotics liked this · 1 year ago
-
 artking-4 reblogged this · 1 year ago
 -
 prometheusascendant liked this · 1 year ago
 -
 theautistichalflinghole reblogged this · 1 year ago
 -
theautistichalflinghole liked this · 1 year ago
-
 solaritys-world liked this · 1 year ago
 -
 thewanderingrogue209 liked this · 1 year ago
 -
 creeperstorm103 liked this · 1 year ago
 -
 goblin-enjoyer reblogged this · 1 year ago
 -
goblin-enjoyer liked this · 1 year ago
-
 oberonworshipper liked this · 1 year ago
 -
 teaontoasty reblogged this · 1 year ago
 -
teaontoasty liked this · 1 year ago
-
 arachnidprincess liked this · 1 year ago
 -
 greenteaandtattoos liked this · 1 year ago
 -
 scvlly liked this · 1 year ago
 -
 nightmare669 liked this · 1 year ago

Sylwester | i will mostly post sketches, because i'm too lazy to end them
196 posts