Idk I Will Probably Change Some Other Stuff Later, But… LATER, That’s It For Now


Idk I will probably change some other stuff later, but… LATER, that’s it for now
-dies-
More Posts from Arttuti and Others
I know I asked this before but honestly i’m desperate, how do you draw folds? I understand pressure points and everything but I still can’t draw them. T^T
ACK! So sorry! Anyway. Tbh it’s a bit hard? But not to the point where you’ll get super frustrated. That’s why I didn’t emphasize this. Also it’s hard to explain but here are the rules I gathered:
- Remember direction. Observe real clothes and understand the type of objects that will push or pull the cloth.

- practice on random lines/ziggy zags and make them the fabric. After you make random shapes or lines, give them the folds. Limit the folds! Large fabric and small objects, MORE folds. Small fabric and large objects, LESS folds. Equal, only NECESSARY folds.

- The type of the fabric will always also limit your drawing of folds.

- KNOW YOUR OBJECTS. BE PATIENT. Don’t just copy references of folds all the time. Try to understand the objects first that will affect the clothe and make folds. So in any angle you’ll make folds you don’t need to worry. But do lots of observing. There’s so much pictures in Google that’s easier to determine folds. Good luck!


why you should make a webcomic and why you can make a webcomic
why should you make a webcomic?
it’s regular drawing practice
you get to draw and develop the universe your OCs live in
you could draw your OCs making out with context
see number 3
how can you make a webcomic?
make a new tumblr
install this theme https://www.tumblr.com/theme/37061
post comics as you would on any other tumblr they show up on their own webcomic site
what if nobody sees my webcomic :(
too bad you got to draw your OCs making out and nobody can appreciate your artistic genius obviously the world is not ready for this webcomic genius
Your art is so good !!! How do you color the skin its soo smooth
Thank you very much Anon ( ̄ε ̄@)hehehe!!Well I have some shots of one of my recent drawings so I’ll try to explain it a little bit hhahahah


Basically what I do is: 1. Put on base color2. Add some light shadows (They don’t even have to look very smooth, like the images above) 3. Then I start adding some darker shades of color and different skin tones to give it the correct shape, at this point I start adding some brighter tones, so yeah, they usually look very messy at this point. My brushstrokes also look like crosses or some sort on this step I think (I do it like that ‘cuz I think it’s easier to merge the colors later, at least for me hehehe) 4. Aaaand at the end, to merge the colors and make them look smoother I use a soft brush with low opacity to add some light shadows and brighter tones on bigger areas, I also try to use almost the same tones I used on the step three so it can merge nicely.So yeah, I think that’s about it (〜 ̄△ ̄)〜I hope I helped you out with that <3
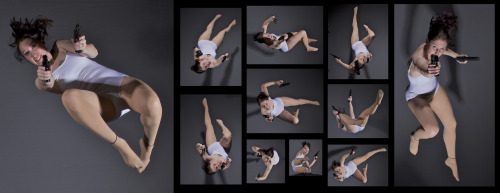
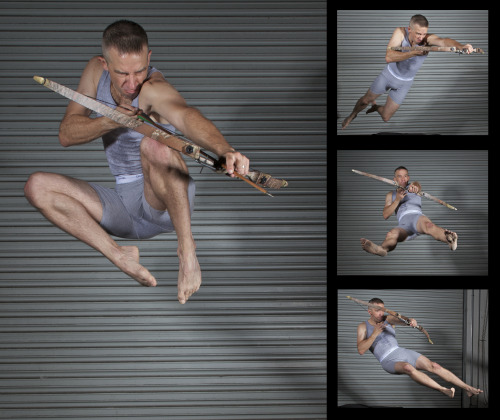
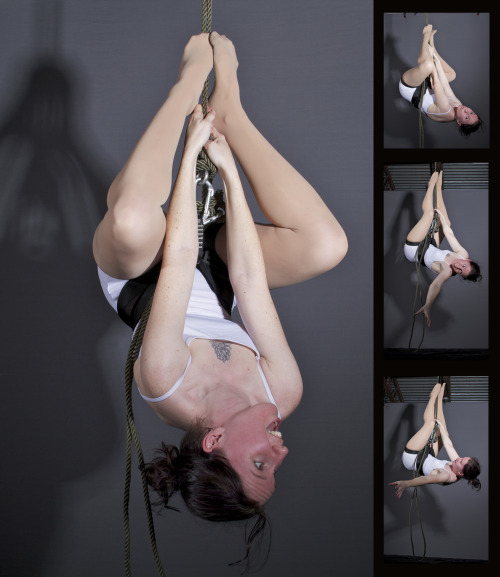
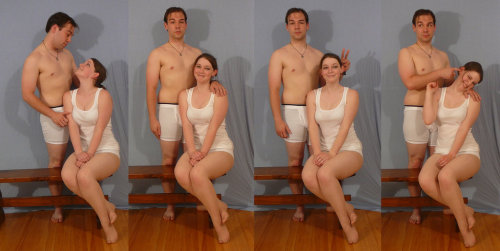
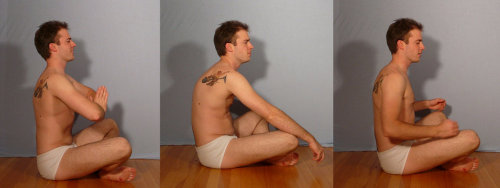
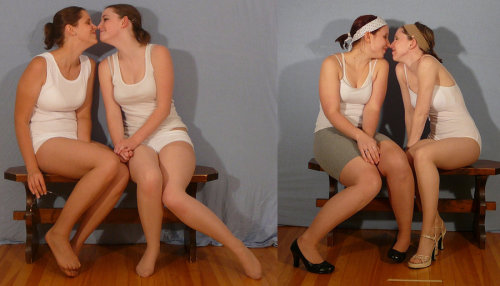
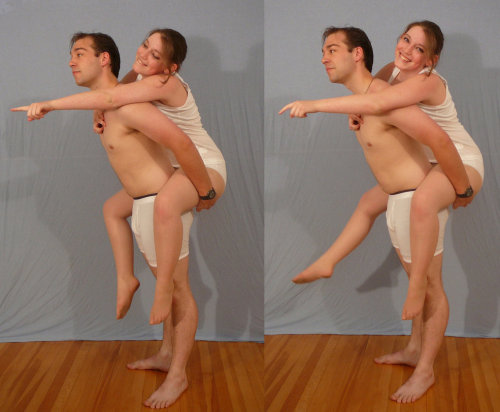
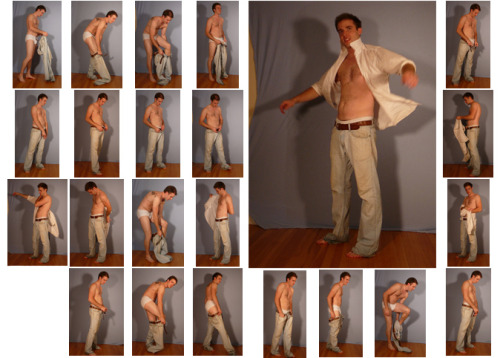
SenshiStock’s gallery consists of millions of pictures that are free to use as reference.
General Drawing Poses Sit and Kneel Dramatic and Reaching Drawing Poses Magic and Hogwarts Drawing Poses Staff Weapon Pose Reference Hammer, Axe and Bat Pose Reference Sword Weapon Drawing Reference Small Bladed Weapon Pose Reference Gun Weapon Pose Reference Bow and Arrow Archery Stock Foreshortening and Perspective Poses Dynamic Flying Falling Action Poses Deafeated or Laying Drawing Poses Magic Crystal Magical Girl Wand Weapon Transformations and Dance Cards Back Pose Reference Pin Up Inspired Poses for Drawing Performances Poses Life in General Poses Fights and Fighting Pose Reference Leaning Poses Classic Sailor Senshi Poses Wings Sailor Moon Villains Pairs Romance or Couples Pose Reference All the Male Stock Hanging Stock Drawing Reference Three or More Groups Instruments Mirrors Whip Technobabble
Do you find drawing environments overwhelming? I did too, for a really long time. I started out drawing characters, and making the switch to painting environments was really hard at first! In my latest patreon tutorial, I break down the process into the most basic and essential steps, so that you don’t get lost in the details and know exactly what to focus on. Find it here for just $5: patreon.com/loish

I'm so excited to announce Loish's Digital Art School! I've been working on this for a long time and I'm so glad I can finally share it with you all. This is for those of you who are looking for brushes, tutorials, and other super helpful learning content!
Loish's Digital Art School is a collection of resources for digital artists that includes video tutorials, brushes, palettes, challenges, and more. Most importantly, it’s free! I know how important it is to have access to helpful information, especially if you’re self-taught. To get access, just head on over to Loish.School ❤️
I have two questions! First: have you ever thought of doing a tarot card suit for your characters? I think it'd work really well for them! And two: help me how do I draw legs
@gravitality
Hi!! I’ve absolutely been thinking about that, yeah, in fact I recently talked about that to my boyfriend just recently. It’ll likely happen after october! And to answer your second question! I made a thing on legs that i hope you’ll find useful!!
So. I’ve already explained basics on legs here, but I don’t think it hurts to go through some extra details to help you understand legs some more.

The very basic thing is to imagine legs as teardrops. Again, this has already been covered in said tutorial above, but I figured it’s still good to mention even the most basic thing that I know of. I still highly recommend you check it out to get in more detail and to see some other examples and practices that you do. But basically, think of legs in the shapes of teardrops, when it comes to shape. If you need a simple stick-figure to connect the legs in the first place, make sure that they bend at the knees a bit so that the legs don’t come off as stiff and unnatural.

As you can see, this method works perfectly for realistic legs as it does for stylistic ones. Remember to use these as a guideline, never to be the exact base of the legs you will be drawing. If you draw traditionally, remember not to draw these guides too hard, or they will be hard to erase/do freestyle!

But how do you actually draw out the legs without drawing them perfectly straight, as shown to the left? The trick is to add volume to them, and how you do that can be winged to your own liking. The idea is to think in curves. As no leg is perfectly straight. You may make these curves minimal if you don’t want them to be curvy, but keep in mind, still, that not even your own bones are perfectly straight, so it is highly recommended that you make them bend, at least a little.

It all depends on how you draw them as well. Say you put your legs together, as shown in this picture, what happens to the fat and muscle? Naturally, they press together, much like how thighs squish on the surface when you sit down (I’m sure most people know what I’m talking about). Make sure this shows in your art! This is very important to keep in mind, because it makes it all look more natural and believable. Try to cross your legs or stand up and sit down again for real-life examples!


The same applies for stretching your legs, more or less, except they appear to become more ‘hollow’ and slimmer. They become less soft to the touch, too, and might show. Try stretching your legs and feel where the muscles tense and where it feels ‘hollow’. This is very helpful with your art.

Many leg tutorials talk about legs without mentioning the behind. It requires a tutorial on it’s own, in all honesty, but this is the most simplest way to draw it connecting to the legs. Remember that it comes in many different shapes, and this is just a super basic guide! Two circles overlapping, while following the line and flow of the legs. Remember the muscle/fat as mentioned above!

Okay, so we got the basics of leg shapes figured out? What if you want o draw them in a certain pose, or with a certain silhouette, but perhaps do not have the reference for it? Or you want to blend your style into it? The key is to not shy away from doodling the form. Make mess, draw lightly and don’t care about the anatomy. That way you’ll get everything down without it appearing stiff. You can clean up the sketch later, always, and if you can, use a reference after you have drawn your pose, to correct your drawing.

Remember that the hips do a lot to the pose of the legs! Make sure they are in flow with your legs, so that it can look more natural. Remembers that hips ‘rotate’ with the spine.

I’ve talked about this method before when it comes to posing, and the same applies for the legs. One way to make legs appear ‘steady’ is to picture them standing in a line, and one of those legs need not to stray from the lines too much, making it steady. If you want a dynamic pose despite the steady pose, you can always have the other leg stray from the line, since it only matters that one leg is steady. This method can create good, casual poses without making them appear boring. (also notice how the teardrop shapes are used here, despite the highly stylized legs)

Do you want a highly dynamic pose, or them to appear unsteady, then skip the line entirely and make both legs aim away from it completely. As you can see, the legs appear more moving, in action, as if they’re fighting, falling, or dancing. As you can imagine, this is not a pose that one could stay steady on, suggesting that it’s taken mid-movement. More about posing and this ‘line’ method is talked about in this tutorial.
Hope this helped you, if you have any questions let me know, and if you’d like to check out all my tutorials they can be found here!

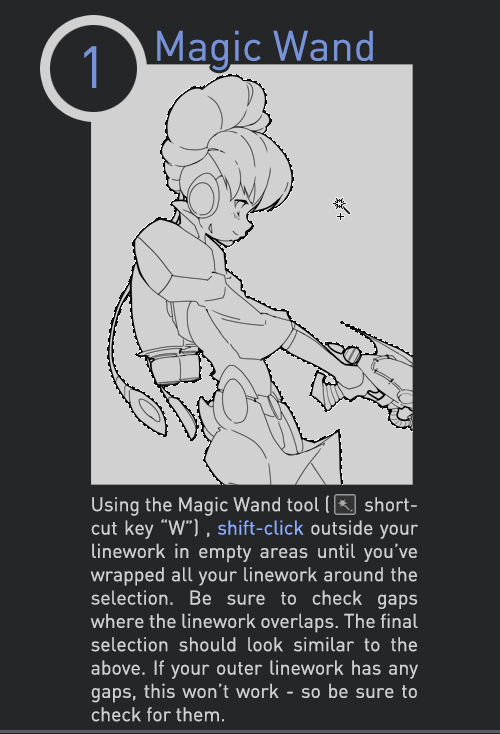
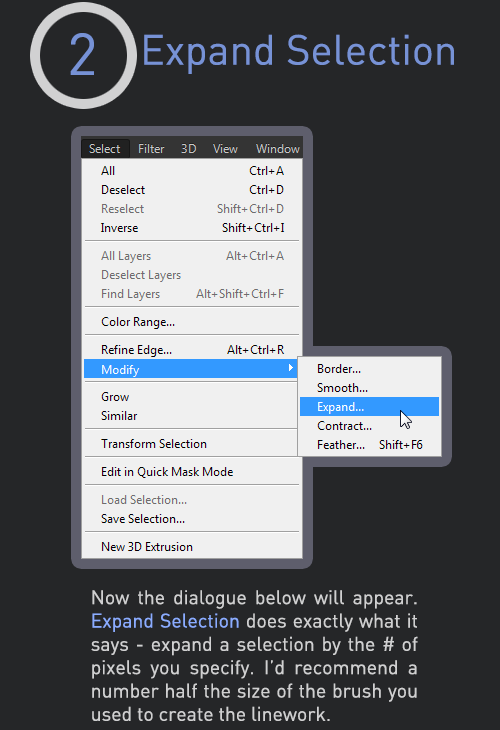
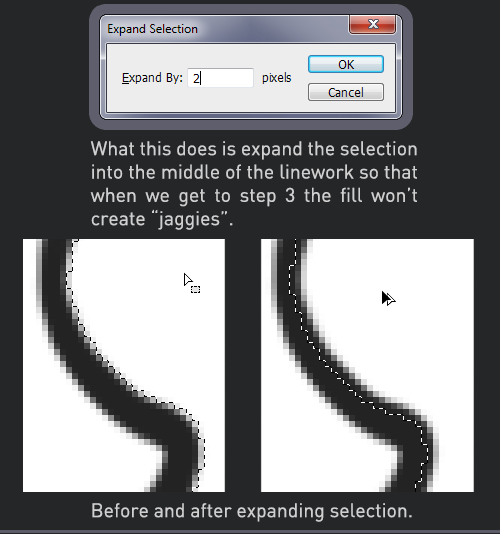

Late last year I wanted to start a series of short tutorials called Tip Jar, as a way of saying thanks to my fans and giving back to my patrons. This is the first of the series I have made, showing my technique on quickly filling in lineart so you can get to painting without coloring outside the lines faster.
Someday I hope to turn these into video tutorials when I have the income and the time, but for now I hope that I will be able to share useful tips in this infographic format.
Full tutorial image
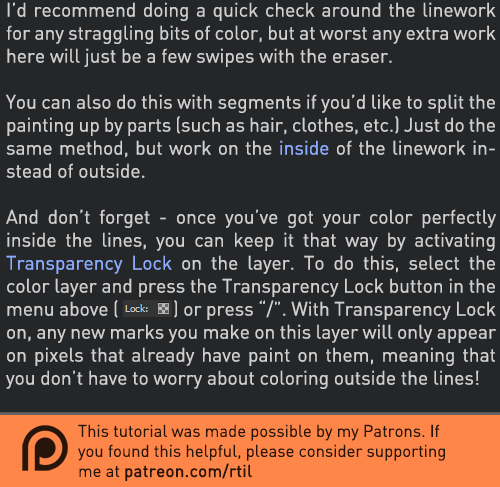
Support me on Patreon
-
 tomboyfromhell liked this · 6 years ago
 -
 carry-on-my-wayward-hunter liked this · 6 years ago
 -
 randomizationsposts liked this · 6 years ago
 -
 kabi-kinoko reblogged this · 6 years ago
 -
 aunthandsy liked this · 7 years ago
 -
 gorgonzollashow liked this · 7 years ago
 -
 tiredturtle7 liked this · 7 years ago
 -
 biolotea liked this · 7 years ago
 -
 4oska-blog liked this · 7 years ago
 -
 euncc liked this · 7 years ago
 -
 jilltheswill liked this · 7 years ago
 -
 bila-panda liked this · 7 years ago
 -
 billcipher951 reblogged this · 7 years ago
 -
billcipher951 liked this · 7 years ago
-
 merothunder liked this · 7 years ago
 -
 dreenicorn liked this · 7 years ago
 -
 birbitch liked this · 7 years ago
 -
 palacekrab-blog liked this · 7 years ago
 -
 inactiveafsworld liked this · 7 years ago
 -
 mikkyin-blog liked this · 7 years ago
 -
 closetgeekasaurus-art reblogged this · 7 years ago
 -
 kviknar-von liked this · 7 years ago
 -
 ccp327 liked this · 7 years ago
 -
 chocobunny-13 liked this · 7 years ago
 -
 julenarose liked this · 7 years ago
 -
 nounuoo liked this · 7 years ago
 -
 kishiakabane23-blog liked this · 7 years ago
 -
 dizzycon-blog liked this · 7 years ago
 -
 katsukitaku-blog liked this · 7 years ago
 -
 cervine-salad liked this · 7 years ago
 -
 s0raaaaaa liked this · 7 years ago
 -
 cmc1357 liked this · 7 years ago
 -
 saturn992 liked this · 7 years ago
 -
 lally-pops liked this · 7 years ago
