Little Commission I Did A While Ago #characterdesign #illustration #drawing #artistsofinstagram #autodesksketchbook

Little commission I did a while ago #characterdesign #illustration #drawing #artistsofinstagram #autodesksketchbook #art #conceptart #commission #artcommission #pirate #sketchbookpro #drawingmen #drawingcommission #artistsoftumblr
More Posts from Anavsky and Others

Inktober day 2: drunk girl. . . #inktober #inktober2016 #drawing #drawinggirl #electionfeels #IdontKnowHowToInkYet #ImLearning #ThisIsFun
can you show us how you make gifs ? gimp is confusing ahh
Sure! ill try to make it as simple and quick as possible
I’ll explain how I do the blinking since it’s what i do most,
this is just how I do it, there are many other ways but i found this to be the best for me :)
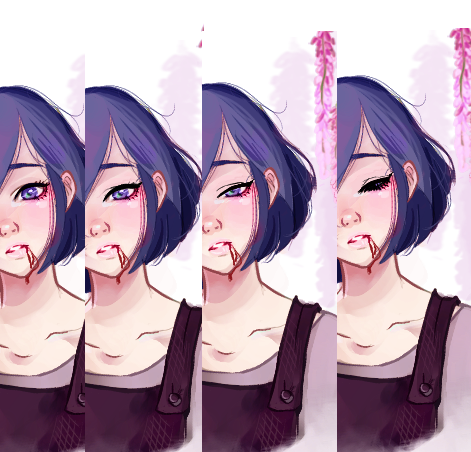
so to achieve this blinking touka…. (ignoring the red ghoul eye)

We are gonna first need to draw the “base” image on whatever program you prefer (photoshop, Krita,SAI.. doesn’t matter) , mine are always the subject with the eyes open. Also, try to not have TOO much detail, I usually don’t spend much time on the hair, but rather focus on the skin and features.

Now that we have that exported as a .PNG file, we are going to create the movement of the blinking, i usually do four frames consisting of the eyes open, slightly closed,¾ closed and closed (i just draw over my base drawing and save as i go). you should end up with four drawings with everything except the eyes being the same! >>
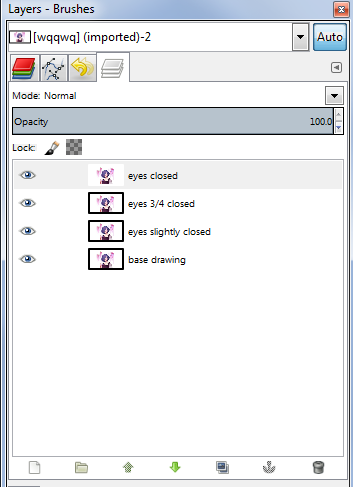
Now let us jump to GIMP,open up your base image, then “file>open as layer” for all the other frames, you should have something like this on the layers tab to the left of the screen.
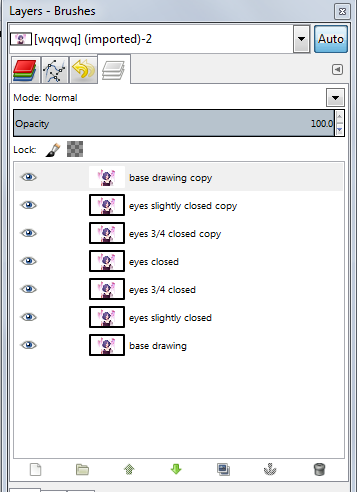
Now to achieve a natural blink, simply right click layer “3/4 closed” and copy it then paste it on top of “eyes closed” repeat that to the remaining layers, I hope this picture makes it much clearer >>
Ok, now go to filters>animation>playback, this will show you a demo of how your animation loops (this is where to do changes to your drawing if you don’t like how the eyes blink)

you should now get a nice blink! like this>

following this concept, you can copy and paste more “base drawing” layers to get a longer pause between blinks, or add two blinks close together then one blink after a few second pause (pretty common and gives a natural effect)
keep using the playback button to check on how your image blinks until you’re satisfied with the number of blinks and how long the pauses are.
alright, now that you have your desired blinking animation, do you just save? nope! for your drawing to load faster on tumblr you need to get your drawing to the smallest possible file size.
to do that you need to go “to filters>animation>optimize (for gif)”, this great tool cuts your file size from 2 MB to 90 KB!! (with compromising a little bit of quality)
after optimizing GIMP will open a new window with the now smaller file sized drawing, simply save that by going to “file>export as..>” and save your file as a .GIF file, a new window will pop up and it should look like this>>
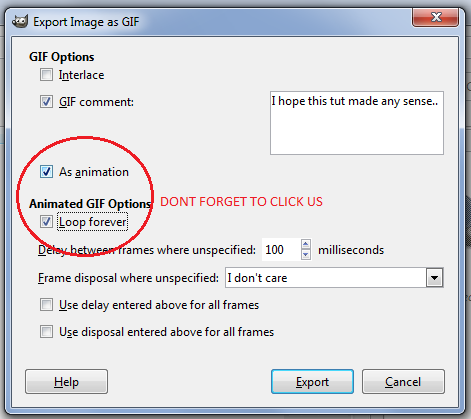
click on the “as animation” button and the “loop forever” button, THESE ARE IMPORTANT. now just click export and you are done!!
of course this is just the very simple basics of how I use GIMP to get blinking effect, If you want another tutorial on glowing effects or changing colours please let me know! I hope this was helpful :)
*dies slowly since there's no way to send an anon message* Would it be a bother if I asked how you make your sprites? ((Or whoever makes them, sorry!)) they look amazing and I'm really curious by the style!
Aww, thank you! It’s not a bother at all! I do the same process I use for my non-pixel art drawings: I sketch something, then I do the lineart using only one color, then I paint the drawing using flat colors, after that I add the shadows and the lights, and then I recolor the lineart so the lines blend better:

I’m pretty amateur with pixel art, so I only know a few things, but one of the most important things to consider is to avoid messy/jagged lines, here’s an example from this thread:

Also, one of the best pixel art tutorials in my opinion would be this one. There are a lot of tips on how to properly shade sprites in order to avoid “pillow shading” and bland color palettes.


Wand Wars
System: PC
Year: 2016
Status: Released
Developer: Moonradish
Website: wandwars.com / wandwars.tumblr.com / Steam
Video: Trailer
Description: “Wand Wars is a fast-paced, top-down, local multiplayer magical sports game. Players ride brooms over ancient arenas, cast arcane spells, turn opponents into adorable chickens and try to control a deadly magical sphere that bounces around the arena, increasing in speed and size over time, driving intensity through the roof.”


Make Some Pocket Extenders for Your Pants
So I don’t know about you, but I’m often frustrated by the ridiculous smallness of girls’ pockets. At a bare minimum, I need to be able to shove my cellphone in there - come on, pants companies! So what I started doing was making myself pocket extenders. I’ve done this several times, for pants and shorts. It’s great.
I just got this pair of jeans, so I thought I’d show you how to do it. I kind of feel like it just hasn’t occurred to some of you that this is an option, so maybe now it will. All you need is your pants, some fabric (I just took a random piece from a scrap bin), a needle, and some thread (thread doesn’t even need to match the fabric since literally no one will see it).

See? Ridiculous. Like, half a cellphone, or only 2.5″. Useless.

So turn those inside out to expose the pockets.


Figure out how big you want your pockets to actually be. I kinda go by whatever looks like might be right. I didn’t really measure them. Fold the fabric in half, so you have a pocket, and then fold it in half again so you can have two equal ones.

Try to get the edges to line up enough, pin it in place, then sew up the sides! Are your stitches crazy uneven and wonky looking? Doesn’t matter; nobody’s going to see it. These are in the inside of your pants. The only thing that matters is that it holds up. So I double-did the corners, since those tend to get the most stress.

Cut open the bottom of the existing pockets.

Pin it in place, then sew around, joining the new pocket to the old pocket. I did this by keeping my hand on the inside, so I wouldn’t accidentally sew through the other side. Again, I reinforced the corners, and didn’t worry about what it actually looks like. Then I turned it in side out to make sure the inside was all joined properly.

Yay all done! And the pockets are so much bigger now!

Whaaaat I can fit my entire phone and entire hand and probably something else now, are girls’ pockets even allowed to do that?! Heck yeah they are.

-What's it that they've sent us? -Hope I watched Rogue One and had a really hard time trying not to cry :'( #RogueOne #starwars #princessleia #digitalart #drawing #art #carriefisher #showyourwork #artistsofinsta #sketchbookpro #sketchs #autodesksketchbook

Background 101 #traditionalart #drawing #illustration #sketch #sketches #art #tree #pencil #fabercastell #pencildrawing
-
 anavsky reblogged this · 8 years ago
Personal blog where I share art tutorials I find on this website and occasionally, maybe, something I might do.
132 posts