Itz-offline - Itz_Offline

More Posts from Itz-offline and Others
![[Bang!!]](https://64.media.tumblr.com/d734eecd6e9f6f4ca7d60169e711755d/ef2611a30976197d-91/s500x750/d462313d6ab634eedb182ebd1c20233f6bc69fa9.jpg)
[Bang!!]
I have a pretty much fun doing this artwork, plus i really love how the hand turn out
(1)Learn the rules before you break them + Gather proper references

(2) Understand what you want to break and how


(3) Can't do it? Find someone who can

(4) It's going to look really bad for a while
(5) Have fun with it!

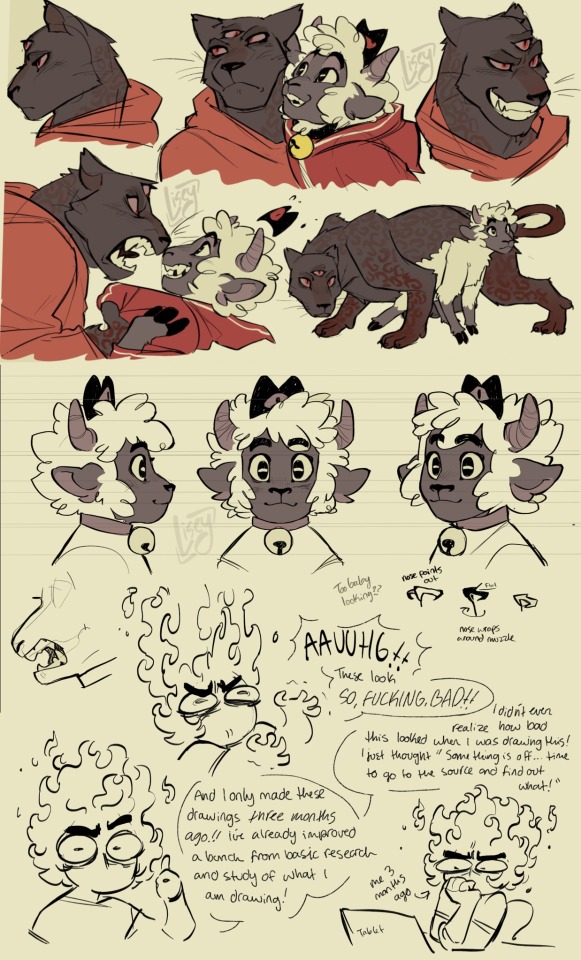
(1) -Yes, I am that kind of artist. Yet, not in the conventional way. I encourage people to go in guns blazing when it comes to drawing something new, then coming out analyzing what they know, and what they need to learn more of right away.
-Here, I broke down the anatomical pieces of Nour and Narinder's face with the same labels so you guys can understand this weird invisible pattern that I follow in my work. Doing this with any animal you're attempting to draw greatly improves your line confidence when drawing different face shapes. Also understanding the biological function for why animals look a certain way helps you keep consistency.
(3) Time to throw any artistic guilt you have for heavily referencing people's art OUT THE WINDOW and start ANALYZING PEOPLE'S WORK YOU WANT TO BE LIKE✨ I've always done this, having a reference of someone else's amazing work right next to my own drawing so I can try and understand how they make their magic work! No shame, no embarrassment, nada. Pure, unadulterated will and spite that I would be just as good as the artist who made me so motivated and happy with their work! I couldn't figure out how to make Nour's face both sheep-like, and humanly expressive, so I looked at a LOT of Zootopia and old Disney art for help!
(2) With how I draw narilamb, I'm still working on it (as you can see) but I wanted to break Narinder's face to be fluffier and slimmer, while Nour's face would be shorter and flatter. If you look at it for too long, it's absolutely going to look weird, in the way that if you look at Anna from Frozen for too long she starts looking really weird. The anatomy isn't meant to be correct or consistent, it's meant to convey the emotion and energy I want out of the characters in that moment. If you're able to properly get that across, then you don't need to think about how broken something looks, as long as your eye is happy enough to trick your brain into thinking what you're seeing is canny.
(4) Yeah, I hate this part too. It's going to look like shit at first. I can't even look at my art from a few months ago when I was figuring out their designs... God, so fucking ugly. If it weren't for the shittiness of those drawings, I would have never gotten here! Wading through the "trust the process" stage always really sucks, but it's absolutely worth the relief of when you finally get something to look right.
(5) Art is work, yes. It's stressful, it's long, it's straining, its draining, it's exclaiming, blah blah blah. But, I try to keep my art FUN. If I find my artwork becoming slow as I depressingly drag my pen over my tablet, I'm failing. You MUST keep spirit and life in your work. The spirit of emptiness or the life of sadness can have a very meaningful place in art, but those can only exist with keeping work light, easy, and fun! If you're stressing how a specific thing looks or how you can't get something to look right no matter what, FUCK IT. Draw something to bring the flavor back in your work! I'm kind of rambling, but just, HAVE FUN!✨️ Be messy, scream, laugh, slash canvases, throw paint, smash sculptures, tear apart books, GO CRAZY


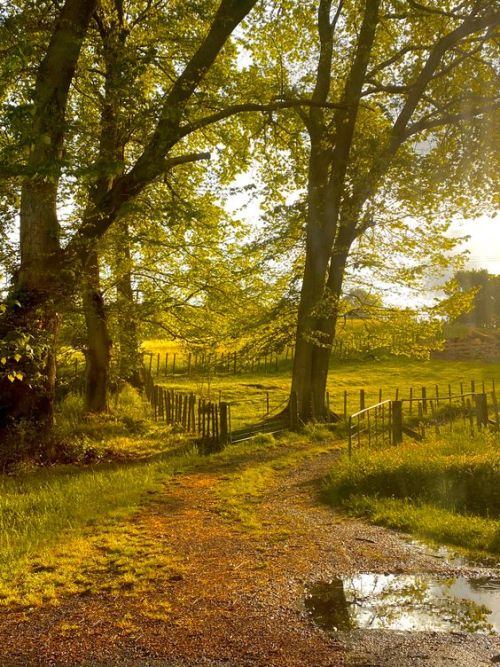
King Lycaon famously challenged Zeus to see if he was truly omniscient by serving the god roasted human flesh. In retaliation for this hideous act, Zeus turned King Lycaon into a wolf and then proceeded to kill the king’s fifty sons with lightning bolts in retaliation of the cruel trick. The constellation Lupus depicts King Lycaon after his transformation.
My piece for Light Grey Art Lab’s COSMOS show that exhibited the past weekend. I drew the constellation “Lupus”.
(In the shop)
How to show emotions
Part VII
How to show pride
standing tall
expanded posture, opening of the torso
lifted chin, head held high
big and confident smile
looking around to see if people recognize and admire what they are proud of
How to show enthusiasm
big smile and laughter
wide radiant eyes
raised eyebrows
jumping up and down or bouncing
clapping hands
big hand gestures
loud and high pitched voice
speaking quickly
How to show anxiety
not holding/breaking eye contact
fidgeting
heavy breathing
twitching in their face
often a blank stare or looking away
rigid posture
sweaty palms
bouncing their knees
rubbing palms against each other or clothing
How to show playfulness
laughing
giggling
grinning
using a playful tone
making a silly face
touching the other person teasingly
e.g. tickling, nudging, bumping into them
How to show being offended
stiffening up
hard line around the lips
frozen stare
narrowing of the eyes
Part I + Part II + Part III + Part IV + Part V + Part VI
If you like my blog and want to support me, you can buy me a coffee or become a member! And check out my Instagram! 🥰
Book binding 101: Materials
I’ve decided to do a series of posts on how to book-bind since I talk about it a lot, and I think it’s a really fun process. These posts will include various inexpensive alternatives to “professional” supplies, many of which you will have at home. Not everyone can afford a cricut and that’s ok! I will also be listing more expensive materials for people who want to invest a bit more into the craft, but they absolutely are not a must.
This first post will focus on a list of supplies you can use to make books, but will not yet get into the instructional part of it. That will come later!
Anyway…
Bookbinding Materials: Essentials
These are items you need to bind, but many you can find around your house!
Sewing thread: Any thread will work for bookbinding, though waxed threads can help reduce tangles. You can also double up thread as another way to prevent tangling if you so choose. Waxed thread is definitely more expensive, so it can be good to use what you have starting out. Here’s a link to the waxed thread I used for those that are interested. You can buy it in a lot of different colors! (White is good if want an “invisible” thread).
Sewing needle: A lot of people say to use a curved needle for binding, but I’ve never found it to be much different from using a regular needle. If you have one, I would recommend a larger needle, however, since it’s better for piercing through signatures (aka the stacks of pages you bind together). In other words: there’s no special needle you need to bind books.
Ruler: I’d recommend any metal ruler since it’s better to use as a straight edge for cutting. There’s a good chance you already have one. It’s just used for measuring and being a straight edge. Nothing fancy.
Paper: Any paper will work. What you wanna use depends on your project really: if you’re binding together a work of text you’ll want to use some kind of printer paper (of course). If you’re making a sketchbook, you can fold up some sketching paper. I like to get sketchbooks with perforated edges so I can tear them out easily if I want to use a blank page for bookbinding. You can also buy large sheets of paper made for any medium. For example, if you want a sheet of water color paper, just search “large watercolor paper sheet”.
Awl (or all alternative): An awl is a tool used to poke sewing holes. It’s nice because it’s sharp and ergonomic, but you can totally also use a pushpin or even a sewing needle.
Bone folder (or a bone folder alternative): A bone folder creates sharp creases when you fold your pages, making them lay flatter. It also helps define the hinge gap on finished books, making it open easier. You can use a ruler if you don’t have one.
PVA glue: PVA glue is what to look out for when it comes to binding glue. There are some designed specifically for bookbinding, which spread out a bit faster than ones that aren’t. You can also use tacky glue which IS a PVA glue.
Book board: Also sometimes called chip board, Davey board, or mat board. This is what you’ll use for hard cover books. It is important to use book board specially, as cardboard will warp. You can buy book board directly, or you can cut the covers off of old textbooks or binders, unwrap the paper/plastic around the board, and use that!
Box cutter or utility knife: for cutting the board
Decorative paper and book cloth: For wrapping around cover boards and for endpapers. Book cloth can also be used to cover boards. You can also draw your own designs on Bristol paper if you want (or any paper with a similar thickness/durability). When it comes to decorative paper I like to either get scrapbook paper or rolls of fancy handmade paper (you can get those on Etsy, through paper source, or through bookbinding websites).
Bookbinding materials: Optional (and not crazy expensive)
These are supplies that you don’t need for binding but that can make the process easier and/or help with the decorative elements of your books. I’d recommend these things for when you’ve been binding for a while and feel these things could be helpful!
Paper trimmer: can cut a few sheets of paper evenly—I find it really helpful for endpapers
Stencils: Super helpful if you want to add text on the covers
Stamps: Good for adding text and also great for adding illustrations if you’re not able to draw them on your own. You can buy ink pads for them or use markers by coloring over the stamp lightly and using the stamp immediately so it doesn’t dry (I’ve tested this with alcohol markers and it works very well)
Paint markers: great for drawing directly on the cover. Since they’re opaque they can imitate the look of vinyl. You can also get them super painterly if you want. The internet usually talks about poscas but there are tons of different brands. Do some research, figure out what you like & can afford.
Hot foil pen & heat transfer foil: Perfect if you want to add foil to your covers but don’t want to spend a ton of money on a cricut. A lot of binders uses the foil quill brand, but there are ones that cost less and work the same (I have both a cheaper one & an actual foil quill because I wanted some nib variation. As long as the pen has good reviews that aren’t from bots you should be good). Also remember: don’t use foil designed for going through laminators (I.e. decofoil) . It doesn’t work the same way.
Bookbinding Materials—Expensive
These are materials I’d recommend for people who have been bookbinding for a while & feel that it’s something they really want to invest in. To be fully transparent, I’m a college student and don’t own these and have little personal experience with them. However, I know a lot of binders who love them!
Cricut machine—Cricuts are cutting machines that can make precise cuts into paper, wood, bookboard, or vinyl. A lot of binders will cut designs out of vinyl and apply them to the covers using a heat press.
Book press—What it sounds like. The pressure helps the pages lay flat and stay even. That being said you can stack heavy books on top of your projects, it just may not have the same even pressure. I also know some people will DIY these, so if you’re skilled with power tools you can give it a go!
Paper guillotine—like a paper trimmer but bigger and can cut more sheets of paper at once. I believe really good ones can also be used to cut bookboard!
Those are all the materials I can think of! Hope this can work as a good starting point for those interested in the craft. I’ll definitely be posting more info about bookbinding for people who are interested :)
-Zoë💗

I used to have meaning.
I used to be someone that others could depend on.
I used to have value.
Now all I have is myself.
I’m tired.
I want to rest.
I wanted to believe that I would not be forgotten.
But I’m not sure they remember the man I used to be.
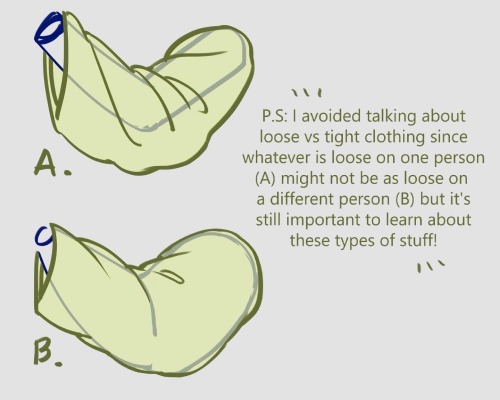
I forgot I have to be active here so here’s my Twitter tutorial on how to draw folds I made a while back to help a friend!


They make me feel single in a good way🧌
-
 imlikemoony reblogged this · 1 month ago
 -
imlikemoony liked this · 1 month ago
-
 kismetconstellations liked this · 1 month ago
 -
 eleenth liked this · 1 month ago
 -
 art-in-architecture liked this · 2 months ago
 -
 atyayam liked this · 2 months ago
 -
 radbeardtastemaker liked this · 2 months ago
 -
 purplefishies007 liked this · 2 months ago
 -
 xanthos-nereid-blog liked this · 2 months ago
 -
 sukei-dot-exe liked this · 4 months ago
 -
 duckyface27 liked this · 5 months ago
 -
 ggreeeenheart liked this · 6 months ago
 -
 archarmadillo reblogged this · 7 months ago
 -
 nori-and-the-stranger liked this · 8 months ago
 -
 jan-pjtarts liked this · 8 months ago
 -
 pokemonpixelbypixel liked this · 8 months ago
 -
 thereisthebefore liked this · 9 months ago
 -
 sad1sociopath liked this · 9 months ago
 -
 onevoxiegirl liked this · 11 months ago
 -
 arosebyothernames reblogged this · 11 months ago
 -
 persa-tra-i-miei-pensieri liked this · 11 months ago
 -
 tricornking liked this · 11 months ago
 -
 chrystalwynd liked this · 11 months ago
 -
 juanmanueljs liked this · 11 months ago
 -
 crypt-teeth liked this · 1 year ago
 -
 walk2574 liked this · 1 year ago
 -
 chimerzec liked this · 1 year ago
 -
 cuttyclowngirl liked this · 1 year ago
 -
 tsundoku78 reblogged this · 1 year ago
 -
tsundoku78 liked this · 1 year ago
-
 luciferslittleprince liked this · 1 year ago
 -
lobstersatan liked this · 1 year ago
-
 spic3d-chai liked this · 1 year ago
 -
 the-child-defenestrator liked this · 1 year ago
 -
 painthepope liked this · 1 year ago
 -
 fuento liked this · 1 year ago
 -
 mili-morsh liked this · 1 year ago
 -
 seawvvw liked this · 1 year ago
 -
 bee-bee-serious liked this · 1 year ago
 -
 a-dude-named-r liked this · 1 year ago
 -
 gpcboston liked this · 1 year ago
 -
 peachhada liked this · 1 year ago
 -
 vkylocifer liked this · 1 year ago
 -
 jediwizard liked this · 1 year ago
 -
 laeuwilllife liked this · 1 year ago
 -
 mydogbarkswildly liked this · 1 year ago
 -
 quitschekaetzchendebugging reblogged this · 1 year ago
