I've Been Watching Playthroughs Of This Game Called Bully: Scholarship Edition. I Never Played It Myself,
I've been watching playthroughs of this game called Bully: Scholarship Edition. I never played it myself, but I know it was very popular when it first came out. I kinda want to buy the game on Steam or the PlayStation once me and my brothers figure out which one to buy. I'm quite curious to know who else saw playthroughs of the game or played it for themselves.
More Posts from Galaxygirl1106 and Others
Did you ever just feel so lucky for knowing someone you met online? Like.. I was one click away from not following you. I was one second away from never even knowing of your existence.I would never have been this happy!!!...

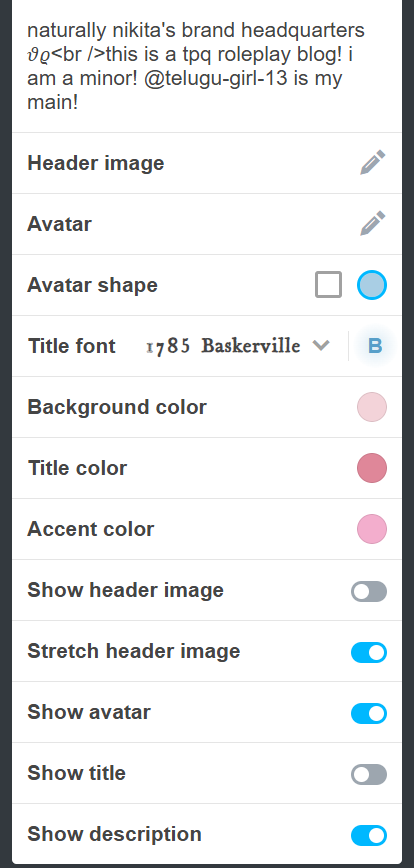
@bookworm-fangirl1 here's a guide to putting up the website of your sideblog if you or anyone else needs it
my main website my rp website
go to blog settings
switch on "enable custom theme"
click "view website"
locate the icons at the top and click the paint palette icon
click "browse themes"
scroll past all the themes that cost money until you find the free ones. (or just click the dropdown on "all themes" at the top and select "free themes". i just realized you could do that.)
select a theme you like and click "use" at the top. (it doesnt have to match the colors of your blog, its only the format that matters!)
scroll down a bit and see options like "back ground color" "accent color" etc. there, you can change the colors of the theme to match your blog colors.
save and exit and stare at your nice pretty website!!
ref images below vv

(step 2 and 3)

(step 4)

(step 5)

(step 7, this is the theme i have)
(step 8)
hope this helped to anyone who needs it!

@wild-moss-art Hi there! I'm more than happy to share art philosophy about lineart! You are correct, I am definitely spending less time than usual on my lineart to get these requests done, but I'm still glad with the final results. :3
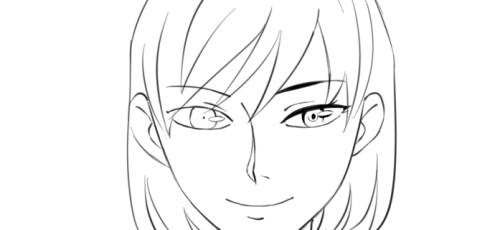
Here are the three stages that I take to achieve clean and polished lineart.

1) The Rough Sketch is used to figure out what the final product may look like. No fine details yet, only guidelines and basic shapes. I make sure the proportions, alignment, and composition is correct. The completed Rough Sketch gives me a good idea of what the rendered lines may look like, but is a bit too messy to follow. While I do have the option of erasing all of the guidelines and cleaning up the lines, what I usually do is lower the opacity of the rough sketch and start on a new layer.

2) The Under Drawing is done in a non-black color on top of the rough sketch. Here is where I get into finer detail with expression and anatomy. However, because we are following the messy lines of the rough sketch, the Under Drawing will still look a little unpolished. It is still very suitable for coloring if you plan to render all of the details in the painting stage, or if you are going for a more sketchy style.
In order to get sharp, detailed, finely rendered lines however, an additional stage is required.So lets lower the opacity and start a new layer using black ink this time.

3) When Rendering Lines, I carefully follow all of the details provided by the Under Drawing, which shows exactly where each line should be placed. I take my time going over each line, using the zoom tool and rotating the canvas when needed to get the best angle.

Because the final product should have a sharp and clean look, it can be very time consuming and pain staking to go over all the details. That said, I have a few tips that will help this stage go along faster while adding visual appeal to the final product.
Let's use an example. Suppose you place down your lines and end up with something that looks like this.

It's not bad, but it could use a little work. The expression and level of detail that we want isn't there yet, but it's actually a good starting point. If you are new to line art or still practicing, you may wish to aim something like the drawing above so that we can take it a step further using the steps I will demonstrate in the tutorial below.
So how do we make clean lineart into something even greater?

Here is what I mean by line weight. Lines of lower weight are lighter and thinner. Lines of heavier weight are darker and thicker. Then there are modulated lines, which gradually increase or decrease in weight.
In the example drawing, all of the lines are of equal weight. We can make the line art less monotonous by increasing the weight of certain lines. For demonstration purposes, I will only make changes to the right side of the drawing so that you can see the difference.
To start, we will add another line to the upper eyelid and fill in the gap, creating a new, bolder line.


We will also build up the iris, pupil and highlight, adding details as we go. Already, it is looking more expressive.
Lets build up the nose and mouth lines while keeping the ends nice and thin.
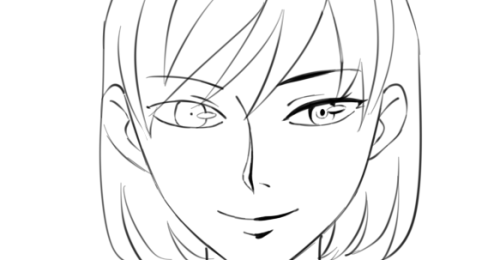
Then, we can add weight to the face and ear lines. For the hair outline, we want to make the lines heavier closer to the roots while keeping the ends thin. Hair lines on the inside can be left alone.

Finally, we make the outside line of the character heavier. With these small changes, we have a much more expressive, detailed, and visually appealing product.

Here I've highlighted in red where the lines remained unchanged. You will definitely want to leave some lines alone while building up others. As a rule, outlines should be thicker while the detail lines on the inside should be thinner.

If you increase the weight of all lines with the same amount, it will remain flat.

So, you should aim to have a variety of light lines, heavy lines, and modulated lines. You may wish to use the eraser to lighten up heavy lines or create modulated ones.

If you can do all the steps above, then a lot of detail and expression will be preserved even when the image is shrunk down

Hope that helps :3 Let me know if there are any other questions I can answer.
Day 6 of Disney Dreamlight Valley
Okay, so we're going to pretend I was consistent with this and don't have a month backlog of photos I still need to post- 😅
And happy 2024! 🥳
Pictures taken under the cut! (Date taken at 11/30/2023)
Like Mickey, poor Merlin suffered the same fate-

I just thought this was adorable! I was glad I caught it before Mickey stood up!

Since I was doing so much of Ursula's quests, I thought it would be best to take a picture with her!

I finally got around to do Vanellope's Dreamsnap challenge, and I really liked how it turned out!

Not only did I managed to welcome Vanellope to my valley, but I also got to plant candycanes, which looked so cute!


Somehow, I gave Kristoff the soap, yet it was still prompting me to give it to him. I know someone else that got this bug, but it was still annoying. Thankfully, I don't think I lost much progress.

I was trying to plant my crops, and Maui thought it was the perfect time to dance on top of the area I was planting them in the first place. 😒

This line got a chuckle out of me. 🤭

Day 3 of Disney Dreamlight Valley
I mostly cleaned up the plaza and the Peaceful Meadow areas, but I still managed to take some screenshots! Pictures under the cut! (Date taken at 11/24/2023)


I'm in love with this Ariel-themed hairstyle! It's so cute! 🥺

Managed to find Skull Rock!

Me in February and March. 🤣

Day 10 of Disney Dreamlight Valley
We reached double digits, baby! 🥳
Pictures are under the cut! (Date taken at 12/6/2023)
Now, it was Anna's turn to have a catch-up lunch with Olaf!

I finally got Stitch! I rewatched the movie a couple of months ago, and I forgot how good it was! Stitch needs to be protective at all costs. 🥺

As soon as I found out this was Stitch's drawing of Donald Duck, I had to keep it in my Valley. The guy is trying, okay? 😅

Day 2 of Disney Dreamlight Valley
I had some time to play before I had to go to my grandparents' house for Thanksgiving, and I had a blast! Pictures under the cut! (Date taken at 11/23/2023)

Every time I see this picture, it just makes me laugh. 🤣

This one too. I didn't mean to take the picture while Remy was blinking, but I was glad I did!


I originally was taking a picture with Goofy, and then Scrooge came out of nowhere and decided to get into the picture! I didn't even know you can take pictures with multiple characters!

I didn't expect to get Mirabel so early! She's in the Peaceful Meadow for now since I only had either that biome and the Plaza area by the time I took this photo, but I'll eventually move her house since it's so massive!

I just think this is so wholesome. 🥺
Day 11 of Disney Dreamlight Valley
Pictures are under the cut! (Date taken at 12/7/2023)
Toy Story 2 was one of my favorite movies as a kid, so I was glad to finally unlock the Toy Story realm! Don't ask me why Woody wouldn't look at the camera. I think Buzz was right there, and he rather look at his friend than the camera. 😅


It's just funny seeing how short I was! I'm only 5ft 2in myself, but sometimes, I feel that small. 🤣

I know someone else got the glitch where Woody king of glitches out during this scene, so there's two of him. It's still hilarious, though-

I got them to come to my valley! Minnie decided to show up when Buzz came over.


And of course, as soon as Woody decided to live in my valley, the first thing he did was play dead. I love his idle animation so much. 🤣

-
 istoleaheartfromaschooldance liked this · 2 years ago
 -
 galaxygirl1106 reblogged this · 2 years ago
