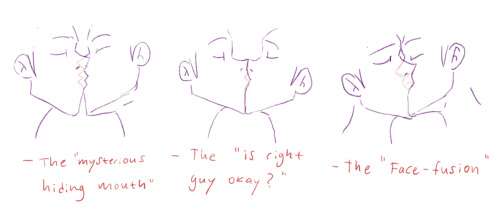
Mouth
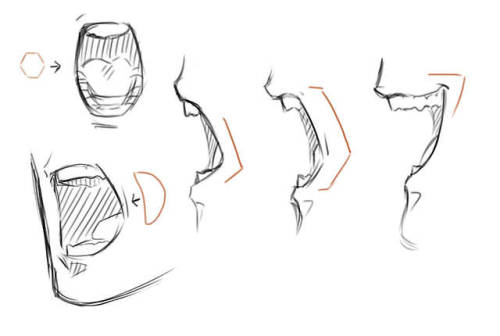
Mouth
I almost forgot about it… Ow.
More Posts from Arttuti and Others
do you by any chance have any art tips for how to connect arms/legs to the torso? It's something I've never seemed to be able to grasp and whenever I try it it looks a little forced and the movement doesn't flow and my art turns out a bit repetitive when it's just a bunch of head shots haha
It’s probably best to study a bit of anatomy! For arms at the very least you should be aware of the deltoid and pecs which will move with the arm

Leg muscles go all the way up to your pelvis and there’s a good number of them so it’s easier to group everything into sections. The section between the torso and thigh I guess kinda connect the two together from an artistic standpoint. Basically a GIANT COMMA starting from yer butt and wrapping around to your groin haha. When you move your leg you’ll likely see a crease following that shape

Hope that helps!!
For artists who have problems with perspective (furniture etc.) in indoor scenes like me - there’s an online programm called roomsketcher where you can design a house/roon and snap pictures of it using different perspectives.
It’s got an almost endless range of furniture, doors, windows, stairs etc and is easy to use. In addition to that, you don’t have to install anything and if you create an account (which is free) you can save and return to your houses.
Examples (all done by me):


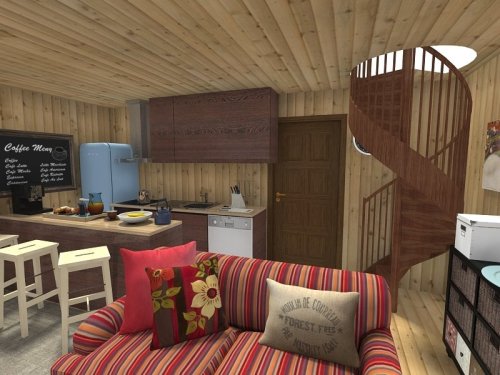

Here’s an example for how you can use it

How I draw kisses!
A quick tutorial/cheat sheet on how I draw kisses!! I’m going to assume you already know how to draw a head and how to angle it, because that’s an entire procedure in itself. I’m going to focus on mainly the lips and also try and tackle some common mistakes when you’re first starting out.
Pursing the lips

So this is boring but crucial. If you don’t purse, their is no real kiss (take notes) bc placing your lips on top of someone else’s is not how you kiss… The most important part are the corners of the mouth, especially from the side view, because that’s what changes the most.
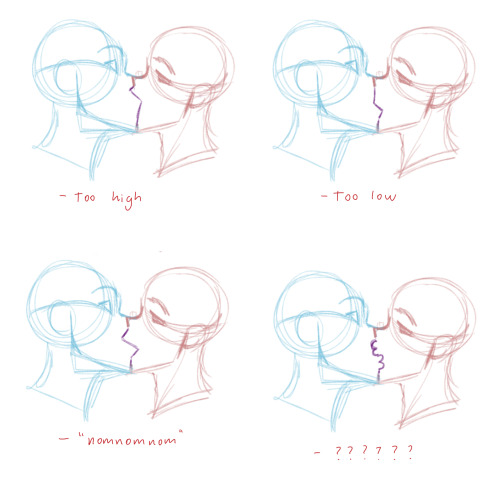
The actual kissing yeee
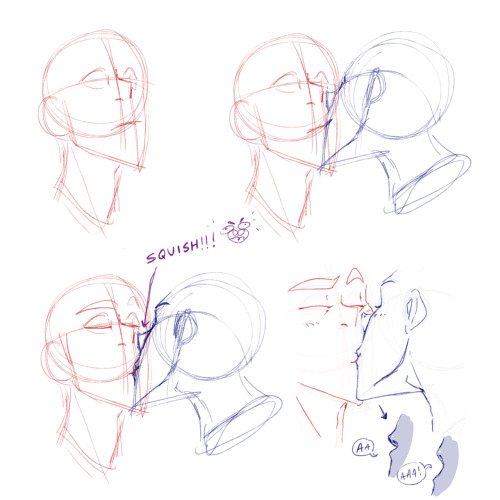
Let’s start do a basic side view kiss on the lips. And believe it or not, I think this one is the hardest!

Think about which parts of the face are going to be in front of the other! This can take some time to get the hang of, but once you get that down it’s easy. Also, focus on getting the heads at the right distance and angle. A common mistake is drawing them too close.
The Lightning Shape:

Still keeping in mind which part of the line is “Red’s” upper lip and which part is “Blue’s” lower lip, play around with the shape of the lightning. Very subtle changes can have a very strong impact! I usually go by feel, so take your time, but here are some things to look out for:
Details squishing etc.
So yeah once the lightning shape looks good, I usually add details and squish parts of the face that will touch. Which usually includes the noses, but from this angle they won’t squish unless you intend on making nice big noses <3. By now it should look something like this:

You don’t have to add the corners of the mouth! I usually do when I want to show that the character is smiling.
One technique used a lot in anime/manga + other cartoony art styles, is fading lines where two soft-ish objects press hard against each other. The picture above explains it.
Common mistakes
Getting down the crucial kissing part of fanart is hard and you will mess upp SO MANY TIIIIIIMES, but you learn from your mistakes, so don’t be discouraged. There are some things though that I frequently see when people draw kisses that makes it look awkward and stale, many of which I used to do myself. Here are some examples:
Try your best to avoid these. Most of the mistakes have little to do with the lips and more to do with the angle of the head. So getting that down before you move on to the lips is important.
¾ view Kissing
There are not a lot of angles where you actually see the lips meet (or at least not that I can draw…). Depending on how the heads are placed in relation to each other, you may or may not see the lips in a ¾ view. The way I have demonstrated is done in a way that the nose will bump into the other’s upper cheek.
Aaand that’s about it! These things will make more and more sense the more you draw them. At first it can seem very hard with so many things to keep track of, and it is, but practice makes perfect!
Rule of thumb: does the angle and position of the heads make sense? How are the lips going to align? What parts of the face are going to be in front of the other? How much will the lips purse? And finally, what is going to squish?
Thank you for reading! 😘

(☞゚∀゚)☞ now draw kisses
I am so envious of your fabric folds <3 Teach me senpai?
ALL RIGHT I’LL TRY!Note: This is how I personally work with folders, i’m not right neither wrong, different artists have different ways to do the same thing. Remeber to check for more than one as refference!

The shame is HEAVILY influenced by the wind or movement on the character/object, so are the folds that follow the flow of whatever is influencing them!


Always consider the fabric you’re planning to use, a heavy one won’t have as many folds, but will have more bumps, meanwhile thin ones tend to have A LOT of folds and not so many bumps, and often fold over themselfs


If you don’t plan how the object/dynamic/wind whatever will influence the fabric, you may come up with this:


The tip of the arrows will have LESS folds because it’s where the wind is blowing, meanwhile the back of the arrows will have a lot of folds, since it’ll curl and bump on itself!
You can’t just toss folders around without planning how they will be affected, works very similar as hair does!
It ended up so long i really hope it helps omgg ;w;If you want to support me and help me to make more tutorials, you can always tip me! (Not mandatory, don’t feel pressured!)
Hoi!! I saw a little bit of the process on your Instagram, but could you explain how you go about making a pattern? I absolutely love how that neato cactus/desert one you did turned out!
Alrighty!
So to make a repeating pattern:

1. Open a canvas and draw in the center WITHOUT touching any of the edges.

2. [Below: Light cyan lines] Divide your canvas into four equal parts.
Make four guides framing the canvas, and two across the middle.
For the ones in the middle, View > New Guide > Horizontal or Vertical for needed orientation > type in 50% to get the exact middle of your canvas. These are photoshop shortcuts, may be different on your programs.

3. [Above: Yellow arrows] Make sureyou have ‘Snap’ checked under View > Snap, then select each quarter of your piece > layer via cut > move diagonally to the other side.
After you’re done moving things diagonally, you can either turn off Snap so your doodling won’t stick to the center lines, or toggle the guide visibility off (Ctrl+;). Merge the layers back together.

4. Draw in the middle without touching the borders, color the entire thing if you plan on doing that.

5. Setting your image as a pattern After your image is done, merge all layers into one > select the entire canvas (Ctrl+A) > Edit > Define Pattern
Open a new canvas bigger than the one you made the pattern on, and paint bucket it in! (Instead of the Foreground button at the top when paint bucket is active, select Pattern then your pattern)
If you aren’t using a program that lets you define patterns, merge everything into one layer and duplicate & tile them manually.

Cheers!

Can you make like a little color picking tutorial, my drawings always look so out of place when i color them >.<
Okay so this is probably not the best coloring tutorial and I’m sorry ahead of time because I’m not the best at explaining colors nor am I any expert lol. I don’t actually use color palettes but I highly recommend them, esp to keep a whole artwork consistent with color schemes. You can easily just google “aesthetic color palettes” or “90′s anime color palettes” which is my go to types of colors heh.
Anyway, I made an explanation/tutorial on how I usually achieve the colors on my art. There are plenty of other ways but this is some basics on filtering.


And after that, if I’m not satisfied with the colors I just go to Filter -> and adjust the Hue of the opacity or the multiply layer.
Once I’m satisfied, I just merge all the layers and clean the art up, sometimes I add even more colors and blend them. (This probably deserves an explanation on it’s own but I wouldn’t mind explaining how I paint! ><)
And here’s somewhat of the finished art lol;;; (sweats)


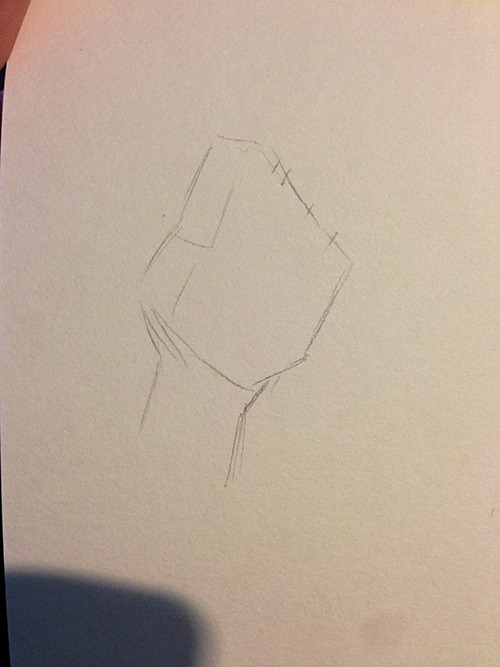
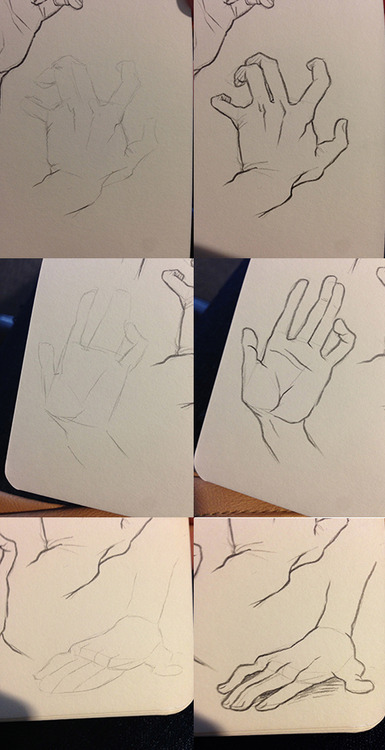
hi! you draw really nice hands, could you give some tips/make a tutorial?
sure!! this is quick and i dont have much of a method so?
i kinda start out with a box shape for the palm and make some tic marks to plan out where the fingers go
then box out some fingers
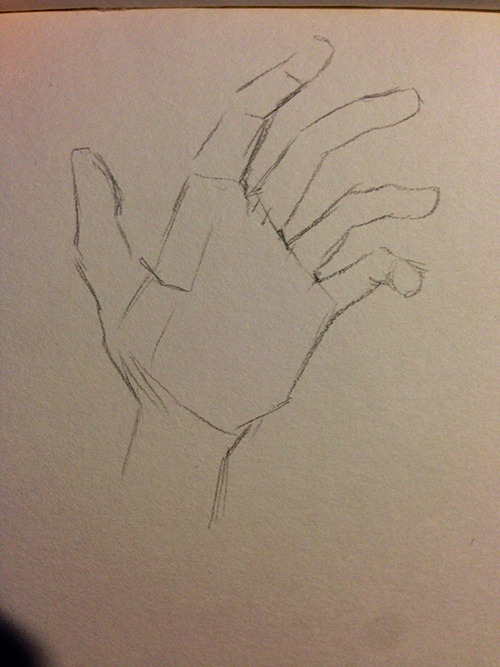
and darken out the details!
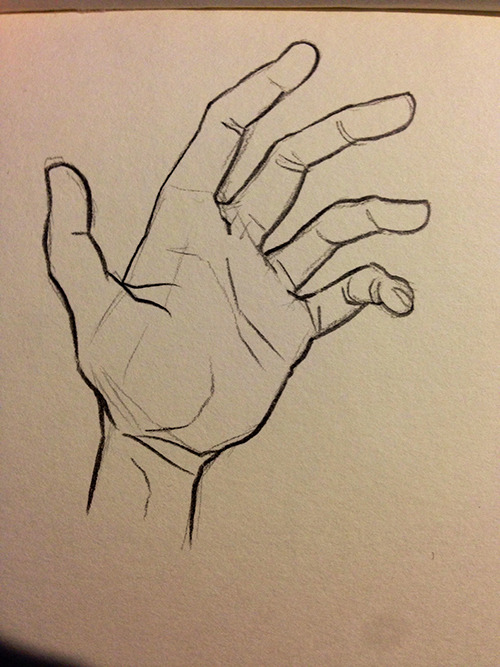
here’s some more examples too!! i always like to exaggerate the position of the thumb and pinky to make the pose of the hand more interesting?? give it more character? it’s a hand
-
 tamobomb001 liked this · 6 months ago
 -
 to157537 liked this · 9 months ago
 -
 mar-chive reblogged this · 10 months ago
 -
 thegluttonus liked this · 1 year ago
 -
 ethereal-originate liked this · 1 year ago
 -
 imaginationcenter liked this · 1 year ago
 -
 tupapupa liked this · 1 year ago
 -
 insomnideer reblogged this · 1 year ago
 -
 never3am liked this · 1 year ago
 -
 abbyjones177 liked this · 1 year ago
 -
 star-spotted liked this · 2 years ago
 -
 valor-0512 liked this · 2 years ago
 -
 strix-brigade liked this · 2 years ago
 -
 zombiemayday liked this · 2 years ago
 -
 sunflowers-and-sims liked this · 2 years ago
 -
 thetruescout reblogged this · 2 years ago
 -
 junaslagoon liked this · 2 years ago
 -
 cola-fiend liked this · 2 years ago
 -
 the-queen-of-pastels reblogged this · 2 years ago
 -
 oracle-sasha liked this · 2 years ago
 -
 sunnyqup reblogged this · 2 years ago
 -
 ladyofmisfortune liked this · 2 years ago
 -
 lukestarlight liked this · 3 years ago
 -
 ammomancer liked this · 3 years ago
 -
 nathancartz liked this · 3 years ago
 -
 wyvern-of-whimsy liked this · 3 years ago
 -
 karlachfan87 liked this · 3 years ago
 -
 griancraft reblogged this · 3 years ago
 -
griancraft liked this · 3 years ago
-
 tragicallybeautifultiger reblogged this · 3 years ago
 -
 rina-inab liked this · 3 years ago
 -
 salezmanradioz liked this · 3 years ago
 -
 10667512 liked this · 3 years ago
 -
 dazatris liked this · 3 years ago
 -
 rambler-in-limbo liked this · 3 years ago
 -
 drsquee liked this · 3 years ago
 -
 box-of-watermelon reblogged this · 3 years ago
 -
 iveneverhadboba liked this · 3 years ago
 -
 dirtychocolatechai liked this · 3 years ago
 -
 wingedghostpepper reblogged this · 3 years ago
 -
wingedghostpepper liked this · 3 years ago
