Anonymous Said: Thanks For Your Tutorials, They Are So Simple To Understand Even For Someone Quite Dumb


Anonymous said: Thanks for your tutorials, they are so simple to understand even for someone quite dumb about arts (me)! If you’ll have time and mood, can you, please, create tutorial for making lineart. I’m fairy bad at that.
Thank you! That’s really great to hear that! :D If you browse my gallery you’ll notice that lineart isn’t something I use often (so that’s why I digged in my old drawings a bit to get some examples u_u) Anyway, I think there are more competent and skillful people out there whom you can ask about it but this is what I do. Just study other artists’ art, it’s helpful. Try to use different brushes and see what works best. Also things I think are important: ⁎ use bigger canvas (mistakes are less visible) ⁎ don’t use smal brushes with smooth but very defined edges because the lines will seem very jerky and ragged ⁎ vary thickness of your lines to make everything more dynamic but try to make it natural (it’s a little bit like calligraphy) ⁎ practice! lines will be smooth and flowy if you make your hand confident: - draw traditionaly - excercise with drawing straight lines and curves - make quick, long strokes instead of drawing short lines (they’ll look sketchy) or doing painfully precise, slow moves - don’t zoom in too much - turn off the stabiliser (at least sometimes)) (Aaaand… you can always use vector drawing tools as a last resort :))
More Posts from Arttuti and Others

Webcomic tips
In the conclusion for now, some things I’d really recommend doing if you’re seriously considering making a webcomic (or really a comic in general). Some of these don’t really apply to strips or gag-a-day type of comics, but I’m not talking about those here.
1. Write down ideas\sketch stuff, LEGIBLY. “I’m gonna remember it later” NEVER works. And if you scribble it somewhere on a piece of paper, you’d better scan it or retype in one doc later, because tiny notes always get lost among other doodles in my skethbooks.

(i know it’s hard to keep everything clean and organized, but this mess is just not productive)
If your project is a collaboration, save your conversations. If you’re working alone, make a blog for your ramblings. You have no clue what tears of relief I cry when I open that blog and rememeber I don’t have to painstakingly look through my heaps of sketchbooks and folders for a tiny idea I’m not even sure I wrote down a few months ago.
2. Inspiration folders, or even better, inspo blog with tags also help with collecting and remembering ideas. Color schemes, landscapes, style inspirations, atmospheric stuff, maybe some photo references, all those neat things.

3. Basic tier: character design sheets. Top tier: common poses, expressions. God tier: outfits they wear throughout the comic. Holy cow tier: turnaround sheets for all those outfits.

(I’d die trying to find good pages for references without these)
4. If you haven’t finished detailing the plot, don’t even think about moving on to drawing the comic. You’re gonna regret it when you come up with a really cool plot element that can’t be incorporated anymore because you’ve already drawn all the parts you could’ve tweaked.
5. Don’t just define the plot, make a script. Writing down the lines and the brief description of the actions serves me fine:

(notice that I approximately divided the pages & the text that’d go to each panel on a page)
6. Hard mode: make thumbnails for all the pages, if possible. At least whenever a new chapter starts.
7. If your story involves some convoluted chronology shenanigans, you’d better write down the events of your timeline in the chronological order.
8. Backgrounds. You can’t avoid them, bro. Like half of the comics are backgrounds, especially if your story involves a lot of adventuring and looking around. I know it hurts, but you’ll have to become friends with them. Read some tutorials, practice on photos, go out and sketch some streets, use 3d programs (like Google Sketch) to understand the perspective, use sites like houseplans to visualize your buildings better, I don’t know. Just be prepared for their imminent evil.
9. If you’re drawing digitally, pick a brush size for the lines and stick with it. You don’t want your lines and detail levels to look all wonky and inconsistent in different panels. And I don’t mean the cool stylistic varying lines, I mean this:

Also, things on the background should have thinner and/or lighter lines to avoid distraction. Usually less details too, unless you’re making a busy background with a simple foreground to help it pop out. Or wanna draw the attention to an object on the bg.

10. Readable fonts. Even if you chose to ignore people with poor sight or dyslexia, the majority of your readers aren’t gonna be excited about struggling to decypher this:

Also, as much as I love my black speech bubbles, colorful text on black still kinda hurts the eyes. I wouldn’t recommend doing that for all the characters. Black speech bubbles are usually used for creepy, inhuman voices. And yes, having a colorful outline in this case helps.
11. Probably newsflash, but did you know that panels have their place, order and functions? They do! My favourite thing ever is how I used panels when I was like 12:

(comics ain’t rocket science, but this one is)
The composition of the panels and word balloons always serve for a better reading experience. They guide your eyes over the page, so that you never feel lost or confused. The images in the comic equal frames in a movie, so it’s pretty damn important in what order you look at things and how quickly you can understand what’s going on!

(Eric Shanower & Scottie Young’s Wizard of Oz)
12. One update a week is fine for testing waters. Don’t overestimate yourself, especially if you have a pretty busy life outside it. A stable comic that updates slowly, but regularly is better than an unpredictable erratic one. You can always pick up the pace later, if you feel confident enough.
13. Try to always have a buffer - a couple of pages in reserve. If you’re making the pages much faster than you’re updating, this shouldn’t be a problem. But if those paces are equally the same, it’s goddamn HARD. But on the other hand, if something happens and you skip an update, those come in handy.
If you’re looking at this list and thinking “wow that’s a LOT of work”, you’re totally right. And it’s okay to be intimidated at first! But that’s why it’s important to start with something small. Once you get the formula down, these things will be natural to you.


Hey just thought I'd let you know you have some of the best artwork I've ever seen! Congrats! Especially Chirrut, he's amazing in your style! I was also wondering if you had any advice on how to draw heads and eyes? They're one of my two biggest struggles and I'd love it if I could get your advice. Anything helps. Thank you and I hope you have a fantastic day!
*_* Thanks a bunch askdh and thanks for taking the time to write me! I had a lot of fun working on Chirrut ;;;
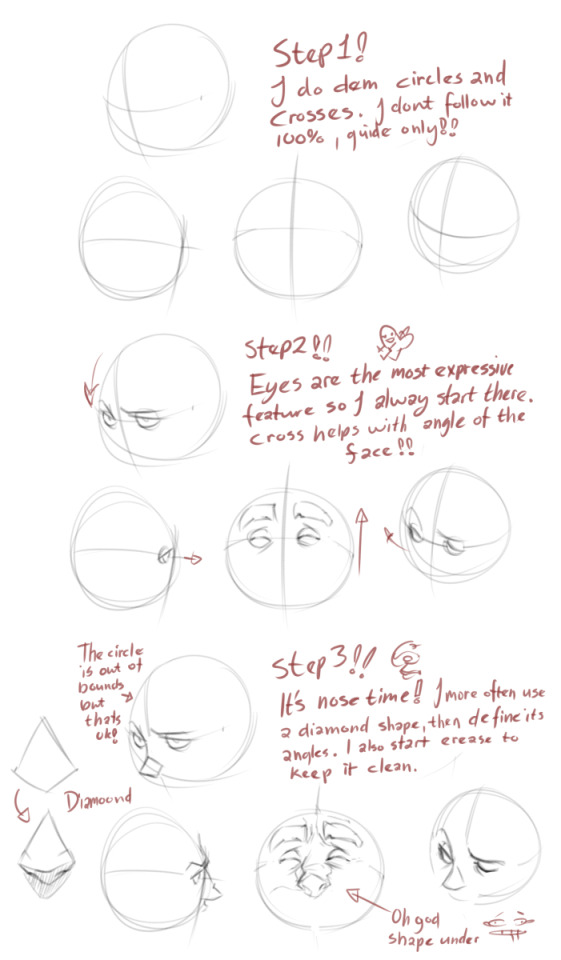
Hmmm I usually think it’s not useful to explain how I make eyes or noses, since the way to draw them changes depending on the pose… My advice would be practicing with ¾ heads. That view always force you to work volumetric shapes and also give a lot more of information. Also, I think it’s much more easy since you have more landmarks to help you.
I would also say consulting anatomy to identify the landmarks on the face (zygomatic and nasal bone , superciliary arch, mandible…) and practice on photos. Using references for drawing is not bad and drawing over photos when you need information of a face is a lot of fun. Is not necessary to draw all the bones, but knowing where the volumes and principal shapes are can help you learn. I.E:

I love that photo because it’s SO SO easy to see the volumetry of the face; just the line of the jaw gives you a lot of informacion about it. And it makes it easy to identify the elements and principal shapes of the head:

(I broke his nose, I’m sorry, but I made this quickly (??)) the point is, take your time to study the lines and understand the anatomy.Also:

that triangle is very helpful too and could help you placing the principal elements. The lines that make him look like he’s crying (?) are the relation between the eyes and the mouth and are very helpful when placing it.
Again, this is only a way to learn and understand how to build a face. That is always the key, even if you use a cartoon style. Rules can be broken, but I think it’s important to understand them first. It could help you make your style more solid.
And well, once you’ve studied it from photos, trying it on your own (even if you have references, that’s ok) and practice, practice u3u
Hope this helps and hope it’s not too technical ;;;
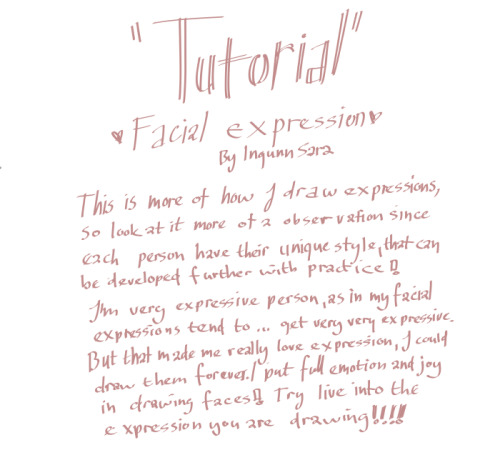
How to show expression with the mouth!
This was a request and at first I wasn’t sure if I had anything to provide with, but as it turn out it got a little longer than I expected because there were actually things I had to say!! Wow!!
Anyway, this is some guidelines I follow when I try to make the face expressfull, more specifically the mouth! It is often neglected, since it’s actually pretty hard, I’ll admit. But I’m here to help (hopefully…)! A mouth expression tutorial as per request. Enjoy and hopefully it will help some a little. ʕ•ᴥ•ʔ
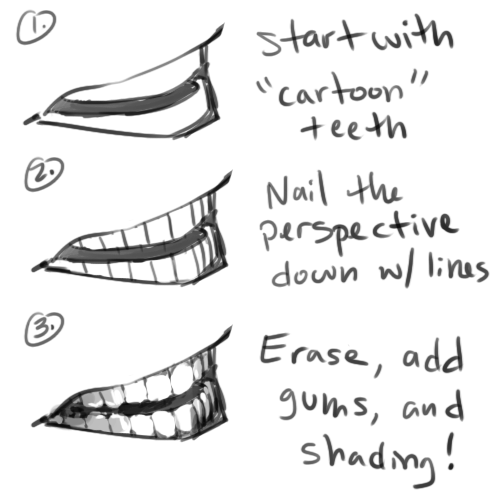
Draw the teeth at the right angle.
This is super important. The upper jaw follows the angle of the head, and the lower jaw will depend on how open it is. Make sure you have a rough estimate of where the teeth are, and how much of them you’re going to see!
The lips will VERY roughly follow the same angle as the teeth. It really depends on the character, but it gives you a sense at least.

If you DON’T do this, you’re going to lose so much volume and the mouth is going to end up looking unrelatable. I showed this example in this tutorial:

It’s not just the lips!
The cheeks, chin, and tongue play a role too!

Try look at your own mouth or references! I have a very pliable and large mouth, so that’s one reason why my characters have it too lmao.
ASYMMETRYYYYY (ง ͠° ͟ل͜ ͡°)ง
I cannot emphasize how important asymmetry is when drawing expressions. It applies not only to the eyebrows to achieve the Dreamwork Face™, but also the mouth. Seriously if you draw a symmetric mouth I will deliver myself to your mailbox and then shout at you until you fix it.
Look at the difference between these two for example: which one has more “life”?

I think you get the idea.
Push and squish - give it flow
Here’s an old drawing I have but it illustrates how I think when I squish the mouth, and use folding and wrinkles to my advantage.

Look at your own face and see where skin bundles up, where it creases the most and when bumps appear on your chin. Subtle details makes all the difference!
One VERY effective detail is illustrated in the first sketch, where I pull upwards on one side, and downwards on the other. That’s a good detail to use when the character is making a skewed expression, or is extremely frustrated. I encourage you to play around with that concept bc it’s ~super effective~!
EXAMPLES:
Happy: Your entire mouth is pushed upwards, not just the corners of your mouth!

I tend to draw a :3 mouth bc I’ve been drawing Lance too much….. You don’t have to but it’s basically imprinted in my motor memory by now.
Pouting/frowning: corners are pushed down, middle pushed slightly up. Sometimes, there’s a slight dip in the middle too. It can give a sense that the character is biting their lips.

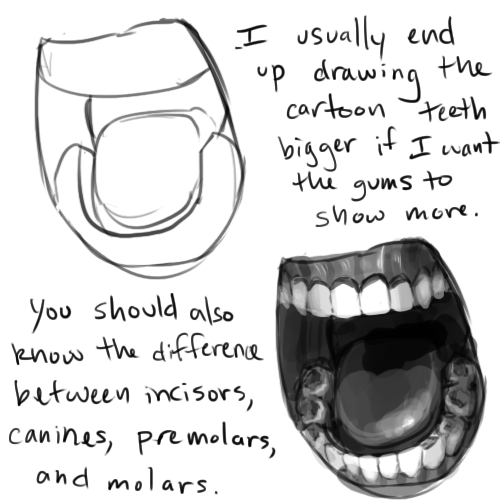
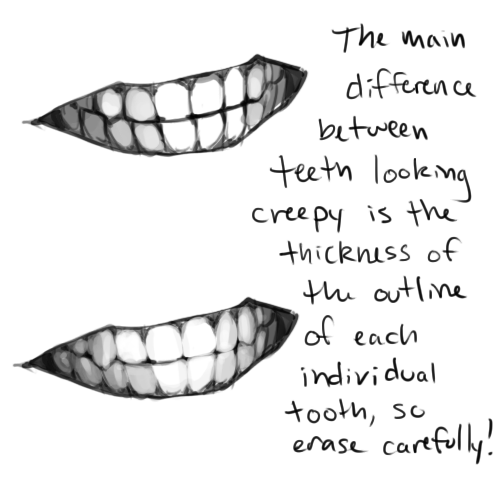
Showing frustration/intimidating/is intimidated: basically showing a lot of teeth. The corners are as open as possible and the middle sorta more squished. An extremely important detail here is showing some of the gums, and open space between the cheeks and teeth. That way it looks like the mouth it open to it’s full potential. Here is also where you basically MUST add folds and bumps, or else it’s not going to look relatable.

(Here I am again with the pulling upwards on one side and downwards on the other, as illustrated on the last sketch)
And then again, here’s just another doodle showing how important it is to show the gums. It’s the same face twice, but the second one looks slightly more frustrated doesn’t it?

(from my other tutorial on how to draw facial expressions)
As you can see, this last one is very versatile and I draw it a lot. Play around with the basic shape and see how much subtle details makes a lot of difference!
That’s it!
I hope that cleared some things up and was somewhat helpful! Enjoy drawing ✨
Hey! I love your art style and was wondering if you had any tips for drawing braids? Any techniques you found useful?
Hello! And thank you very much!
There may be easier ways of building braids than what I do, but this is just my process for drawing them, so take it with a grain of salt.
I’ll start with a line for whatever direction I want the braid to go in, if I don’t do a line and I have any kind of motion to the hair, boy do I mess it up lol

Next I’ll do wide half triangles, the line being my center, the right side or the left side always dropped lower than the other. If both sides meet in the center at the same level it’s not going to look very braid-like or have the illusion of being tangled with itself.

Afterwards you can remove the middle line if you want to take it further and connect each one with an alternating pattern like this one, giving it more of a braided look in the center.

Once the center is solid, you can add all the details you want in any style you like, curving inwards towards the center. I tend to like the more stained glass-ish appearance for hair so I’ll do very choppy, squared off lines to detail.


This works for whatever position you want to put the braid into using the wide triangles to build it up. It works for tightly woven or loose and messy braids depending on how wide/long you make the original half triangles.


I hope this helps!

-
 randmperso liked this · 5 months ago
 -
 twadi-gurl reblogged this · 1 year ago
 -
 honeydewhoneymoon liked this · 1 year ago
 -
 amitybrightlights liked this · 2 years ago
 -
 raven-star7 liked this · 2 years ago
 -
 kurukurudaza liked this · 2 years ago
 -
 somethingdowitharthere reblogged this · 2 years ago
 -
 flowerzbloozworld liked this · 3 years ago
 -
 amolap322 liked this · 3 years ago
 -
 tuturialreblog reblogged this · 3 years ago
 -
rachel78-99 liked this · 3 years ago
-
 vivo-morto liked this · 3 years ago
 -
 ifuchoosestrawberryugethitbyabus liked this · 3 years ago
 -
 gia101607 liked this · 3 years ago
 -
 hc-refs reblogged this · 4 years ago
 -
 hystericallycaptivated liked this · 4 years ago
 -
 manic-oc-hoarder liked this · 4 years ago
 -
 besuzes liked this · 4 years ago
 -
 dunes-moon liked this · 4 years ago
 -
 moon-dunes liked this · 4 years ago
 -
 unpopularsoftshipper liked this · 4 years ago
 -
 lilingforenight liked this · 4 years ago
 -
 bestboiiiwolf liked this · 4 years ago
 -
 lots-o-love-to-go-around liked this · 4 years ago
 -
 underture liked this · 4 years ago
 -
 moonicles liked this · 4 years ago
 -
 ghibliseul liked this · 4 years ago
 -
 pumpkinfollies liked this · 4 years ago
 -
 jasminexjanae liked this · 4 years ago
 -
 juicey-juic reblogged this · 4 years ago
 -
 pyoffin reblogged this · 4 years ago
 -
 im-fucking-brucebanner liked this · 4 years ago
 -
 letinspirationseekme reblogged this · 4 years ago
 -
letinspirationseekme liked this · 4 years ago
-
 horroralbi liked this · 4 years ago
 -
 persephoneys reblogged this · 4 years ago
 -
 quinoachaos reblogged this · 4 years ago
 -
quinoachaos liked this · 4 years ago
-
 sunsetcowboy liked this · 4 years ago
 -
 blacklilly27 liked this · 4 years ago
 -
 nobodykillingtime liked this · 4 years ago
 -
 inspiration-origin reblogged this · 4 years ago
 -
 alcadnes liked this · 4 years ago
 -
 softie-squid liked this · 4 years ago
 -
 thaismaddysblog liked this · 4 years ago
