Thought About Doing A Very Simple Step By Step Since I Had Some WIP Pics Laying Around ( ͡° ͜ʖ ͡°)


Thought about doing a very simple step by step since I had some WIP pics laying around ( ͡° ͜ʖ ͡°) Most of the time I start working on a drawing by laying down simple shadows and highlights in black & white - it’s one of the easiest ways to see how they affect the scene (and my favorite too). I don’t like worrying about too many things at once, so taking little steps is very helpful to avoid ruining the whole image at the very beginning~ commissions | instagram - deviantart - twitter - paigeeworld - facebook
More Posts from Arttuti and Others

Hey friends!
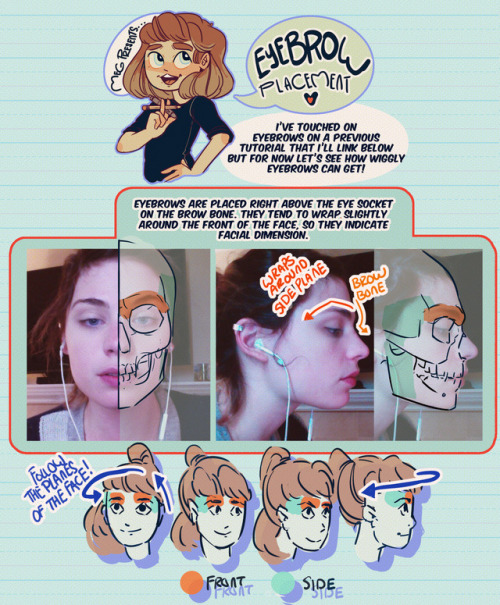
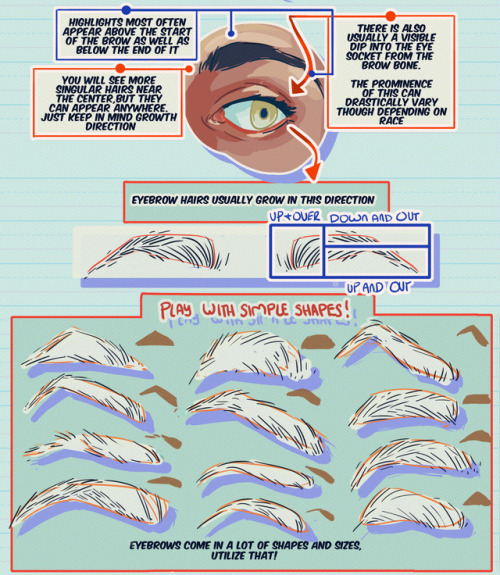
Meg here for today’s TUTOR TUES-WEEK! Today we’re taking a look at eyebrows/eyebrow placement! I’ve covered more about expressions here! If you have any tutorials you’d like to see send ‘em in here or my personal! Have fun, keep practicing, and I’ll see you soon!
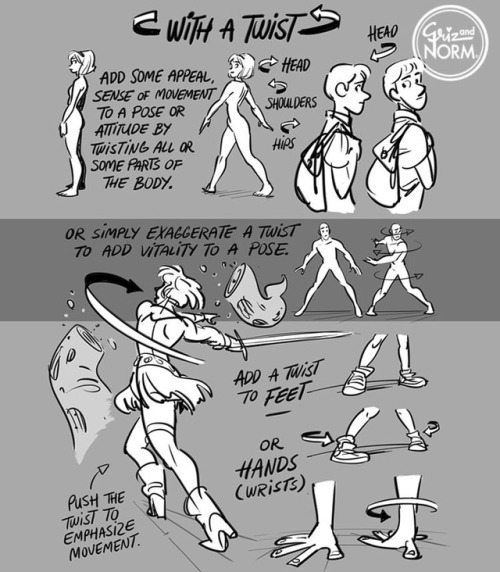
Tuesday Tips - With a Twist! Add some vitality to a pose by twisting parts of the body. A little or a lot. Give it a shot. #Norm #100tuesdaytips #WithATwist #grizandnorm #arttips #arttutorial


Artist Resource: Bodies in Motion
I came across this site that (if you subscribe) offers high-res frame by frame photos of people jumping, flipping, kicking, dancing, etc, so you can easily analyze each position the body goes through to complete each movement. I think this can be an excellent resource for gesture drawing and reference for all manner of artmaking. It is $49 a year for the basic plan, and that gets you access to the high-res photos and a few other features.
https://www.bodiesinmotion.photo/
How I Animate

The Technique:
I draw the frames and then I use the liquify tool to push the lines into the next frame and redraw them where I need to. This allows me to keep the lines consistent, but gives me the control of frame by frame animation bc I am still making each frame manually! I also use 3d models as reference to help me with the angles! Super important to use reference while you animate (and with art in general), if youre no good handling 3d models then act it out and record yourself!

The Theory:
i think most people are at least loosely familiar with the 12 principles of animation (if youre not, heres a 2.5 minute video showcasing them!), but may not necessarily know how to employ them. the main 3 i tend to focus on when I animate is rhythm, telegraphing, and inertia so ill cover those there 👍
1. Timing & Rhythm
Timing is how you space out your frames both in how long an individual frame is held for, and also when you drawn an inbetween of two frames you can favour one frame slightly more than the other instead of drawing the exact average of the cels, giving the favoured cel more timing weight.

Left line has the cels evenly spaced out on the timeline, right holds the first cel for longer and the second cel slightly favours the last frame. It creates a more interesting rhythm to the animation! Rhythm is how I think of animation timing. Theres a beat like a song to every animation I make, and creating an interesting beat is what makes an animation fun to watch (for me, anyway):

2. Anticipation / Telegraphing

Before I animate a big change in movement, I like to telegraph that its coming. Usually this is doing a little counter movement in the opposite direction, but thats not the only way to telegraph a motion, e.g. eye movement can telegraph a head turn!

3. Follow-through / Overshoot / Inertia


Unless the movement is mechanical, it wont come to a hard stop and will have some level of bounce or easing out to it. How much "bounce" you add will have a big impact on how the animation feels, but a very subtle bounce will add a natural feeling to the end of a motion.

Secondary animations will use a lot of this, note that the head and the hand have a small amount of continuous motion (primary animation), and then the hair has a lot of bounce and inertia (secondary animation which reacts to the primary animation). Note the different amounts applied to the braid vs the sideburn vs the bangs
anyway! I hope this was insightful ❤️ if you like my art you can commission me by the by :)
Comic Pages Storyboard Tutorial
OKAY SO! @biazerod asked me a little help on storyboarding and i decided to make this tutorial…i’m not a professionist. so don’t take these as golden rules…just advices! and as always sorry for the english FIRST THING FIRST! the storyboard part is the most important phase in a comic page ! you can spend an entire day storyboarding! because it’s the structure, the essence of the page! here’s some tips : 1- a page can start from 1 panel/frame (called splash page!) until how many f*cking panels you can fit ! (some pages , especially in french comics/bd can reach 24 panels/frames!) Exaple of splash pages:


(these are from the green lantern,DC and the newest Thor ,marvel ) Splash pages are a priority of American comics, you rarely can find them in french Bd ! they represent a scene of impact! a fight! a revelation! be careful! use it only one if two times on a range of 50 pages! cuz it cut the narration! instead in french bd you find this :


first one is from Blacksad 2# and second one is from Atar Gull see how high the number of the frames is?? the number of frames is very important in a page because it decide the narration time! :D also it all depends on the kind of ‘’direction’’ you want to use on your comic! so be really careful when you decide the number of the frame! LET’S PASS ON THE CREATION! 1- when you have a page that contains more than 3 Frames ALWAYS. ALWAYS HAVE AN ESTABLISHING SHOT!

the establishing shot is fundamental! BECAUSE READERS CAN UNDERSTAND WHERE THE CHARACTERS ARE! DON’T DO A COMIC PAGE FULL OF FACES !

DON’T DO THIS! LET THE CHARACTER BREATH! LET THE READER BREATH! PLAY WITH YOUR CAMERA! YOU HAVE THE POWER! in a comic page, is important to put the camera far away from the character most of the time! play with the different shots!

(found this on google) WATCH MOVIES AND TV SHOWS. lot of them can help you so much you have no idea! a comic artist and a director do the same job when creating a story 2- Candy eye this is a tricky trick that can help you with the audience! when a character is saying something important or you have to introduce them , USE THE CANDY EYE DUDE.

the candy eye is , basically, a bust shot where you show the character,their features , usually with a cool or a funny expression ( or of course it depends from the situation) and believe me WORKS 10/10 with the audience ;) 3- HIGHLIGHTS THE IMPORTANT SCENE IN THE PAGE!

FINAL TIPS: - when you’re doing dinamic poses try and try again! the first one isn’t always the best! -USE REFERENCES. -A STORYBOARD PAGE CAN REQUIRE EVEN 4 HRS IF NOT AN ENTIRE DAY IF NOT AN ENTIRE WEEK. REMEMBER THAT THE STORYBOARD IS THE ESSENCE. AND THE REST IS DECORATION. - IMAGINE THE SEQUENCE! NOT THE SINGLE PAGES. THINK IN SEQUENCES! imagine what would happen after the page you are creating! connect the various pages NOT THE SINGLES FRAMES ! YOU’RE CREATING A STORY! NOT A SINGLE ILLUSTRATION! -AGAIN DON’T DO PAGE OF FACES. most important thing:

if the page you’re creating it stresses you! STOP. continue it when you are in a better mood ,dude. our job requires lot of time and effort, but it should be the job we love. so don’t stress yourself and keep calm. hope this is useful. don’t take this as golden rules, this is just the way i work :)
quick proportion tips
- eyeballs are an eyeball width apart - ears align with the top of your brows to the bottom of your nose, and are the center-point of a profile view - lip corners line up to the center of each eye - hands are roughly the size of your face - feet are the same size as your forearm - elbows are aligned with your belly-button - your hands reach down mid-length of your thighs - both upper and lower legs (individually) are roughly the same size as your torso (this is all rough estimates for proportion! feel free to add more to help others)
-
 3fireworks liked this · 7 years ago
 -
 etohi liked this · 7 years ago
 -
 nutplan liked this · 7 years ago
 -
 painbunny reblogged this · 7 years ago
 -
 myeyesareblindmyheartiscold liked this · 7 years ago
 -
painbunny liked this · 7 years ago
-
 arttuti reblogged this · 7 years ago
 -
 firulaislovesyou liked this · 7 years ago
 -
 garrandia liked this · 7 years ago
 -
 isaoldaccount reblogged this · 7 years ago
