✨Tragon !✨

✨Tragon !✨
Trans...dragon..It's funny, right ?- Also, I know it's a wyvern...Dragon sounds better...
It's pride month, so it was the perfect occasion to finally make a dragon, yay ! It's also my first time making something akin to a dragon (technically the second time,, but the first one is truly horrible), and even if the proportion are still a bit out of place, it could have been worse. It's also my first time doing custom wings, but I'll talk about that in more details beneath :}
Also, it needs a name ! I’m really bad with names, but I would gladly take suggestions ! (And here is an alt picture, in its natural habitat-)

Anyways, details/closeups under the cut !
None of these picture below are edited, because it's exam period- Enjoy the green backgrounds :}

I have to say, before any other comment, that I made the body way to heavy for the two poor sockets of the legs. The position above is the only one where it's actually standing upright. Also, my stock of pink and rightly-shaded blue was much smaller than originally anticipated, so I would have done a bunch of tings differently, if it wasn't for that. Still, I was lucky to have that many curved blue pieces for the top part. Well, all of the ones with purple diamonds on them have been forcefully taken from a small Elves dragon, but it was worth it (I also really enjoy the purple here, it contrasts nicely).
All of the joints are mixel socket joints, except for the knees, which are just hinges. It gives a lot of movements, from the tail to the jaw. Even if these are limited, it gives it a wide range of positions (even if, realistically, it won’t change it much from the one I gave it). Still, it can sit ! (Including small trans flag)

The pointy scales on the back are some of the only elements which aren’t directly attacked to the body : one 2*2 plate holds them down, and a modified 2*1 under the plates keeps it from sliding in any other direction, so even with little connections, it doesn’t budge. I really liked these angular pieces. To keep them from being too repetitive, they are only connected to each other by one stud, with a small angle, which gives them a slightly "round" effect.

The tail here is not really complicated, it's just a bunch of socket joints linked together with curved tiles on top (one of the sticker is backward, and it's unnerving, but it's not my fault and I can't risk changing it...), with white arch pieces underneath. Not sure of why I added these in the first place, but it looks cool. And of course, the end of the tail is a big heart, because it simply fits the vibe, doesn't it?
Of course, I can't forget what is the most important, and what makes this creature as cute as it is ! (It is cute, and if that is the hill I have to die on, I will.)


The green background doesn't show it well, but the flame offers a good contrats with the rest of the head, and brings the eyes there first (instead of all the mistakes present). Because there are a bunch of these.
I spent nearly as long on the head as all the other body parts cumulated (except for the wings), because making something detailed yet small enough to be a good head is tough. I actually started from the top (for the piece with the sticker, more exactly), instead of the bottom, like I usually do, in order to get an idea of scale (because I already knew I wanted the jaw to move, and for that I needed to see how big it would be). Then, I did the back to quickly have a neck connection point, to see if it would fit. Because the neck is larger under the connection sockets, the socket of the head is actually pretty high up, but the colours are practically aligned so it works well.
Then, the next thing was the eyes and the spikes. The spikes took me a hile to figure out, because without the rest of the head, they looked kinda dumb, but it does bring the head together when everything is in place. Then the eyes : on the small dragon I took apart, there were these blue tooth pieces which I used to get some texture above them, so that they don't look flat, and then, I connected them to the center connectors of a 2*4 plates. That works well in placement, but I ran into the issue of what would be around. If I didn't do anything, there would be two gaps, which would look terrible. Instead, I stuck two 1*4 tiles in these gaps, and since the tooth pieces are around either side, they don't move - well, not much, they still produce a shaking sound when I'm moving the head.
Then under these plates, I directly have 1*4 pink bricks, which stick out behind the head. At first, it was a problem, and I had nothing else to replace them; but they actually restrict and hold the neck, so that even if the head is technically a bit too heavy, it remains in place.
The actual teeth are modified 2*1 plates, four at the top and four at the bottom. To keep them with such a small gap (and to attach them to either sides of the jaw) I have use modified 1*1 plates with a ring. There is a single one at the bottom, and then underneath a few cut 2*1 and 2*2 curved tiles to make the jaw triangular; and two on top, one which connects it to the head and one with holds the snout (which is using a cheese piece and another one of the blue tooth).
So, custom wings ! It isn't actually complicated, if only a bit tedious. Here below is all that I needed to make them :

As you can see, it's not much. Most important, of course, is a good, solid sheet of paper, and a cutter (precision cutter is better, in my opinion, but anything works). To make things easy (or if, like me, you don't know how to draw properly), you can take a basic lego wing, and trace the outline and where the holes go. I would advise only doing a single, blank one, at first. Once you have your proto-wing, you can start to make the actual frame it will be attached on. I chose to use bricks above it to act as claws, but you can use socket joints, like in most sets. The advantage of using plates is that the overall look is better, but if you want overhangs like I did, you have to get the holes really close to the edge of the wing.
Once you have your frame, trace where the holes would go on it ! (if you used a wing model, it might be easier, but it could also not fit, which is why you make a prototype first). To make holes just the right size, I would advise first cutting squares (easier than circles) at just the right size, then scratching the edges with the blade of the cutter. Once it looks good, try to fit an axle inside. If it just about fits, and can rotate, it's good ! Otherwise, just remove it and scratch again.
When that's done, test if it can correctly fit on your frame. Once that's done, you can either make two wings with that pattern, or simply make another copy. I personally made two new from my first prototype because it took me a while to figure out exactly how to place the holes.
Finally, once you got two wings, you can finally add whatever you want on them (easier when they're not actually on the frame, although that should've been obvious), and you're done :}

I went for a really basic thing, but technically, any shape is possible. I'll likely use it again someday, because it's quite fun !
And of course, the bonus picture, since you’re here ! I like the symbolic of this (also don’t pay attention to the tentacles).

I actually really wanted to get rid of this castle (which was gifted, not exactly desired, although I must admit it’s really well designed), and well. Now, it’s gone, and in its place lies the dragon…and my horrendous crab, too.
More Posts from Antrylis and Others
Hey I don't know if you saw my repost on your post but I would appreciate and would definitely built a brickheadz version of the boba fett prototype minifig that I have as my profile picture. Your post says feel free to request any more and I thought it was worth a shot even though I doubt he'd appeal to more people than me.


✨Boba Fett Prototype ! ✨
Hi ! This has been in my inbox for ages, I know. Finally had time to give it a try ! Had a lot of fun, actually, mandos have some really interesting shapes.
And, because it took me so long, I figured, I'd also give instructions, too. Some colours might not be available, though, but white should be pretty easy to find for the outside pieces.
Instructions can be found here !

✨Another custom vehicle !✨
It has eyes !
This horrendous prototype is a follow up to this post.
Now here is a video of how it works (using the same remote from the other post, that thing is universal !). I wish I had a way to display the good all-terrain capacities of this vehicle (other than wood and seashells...
Details beneath !
Side view :

There are plenty of things here to discuss. Firstly, the suspensions ! Three spring pistons : one of the 'new' models, two much older ones (System, can you believe it ?). At rest, the two small white discs in the middle don't touch the tread, but as soon as an object pass underneath, they get involved. The advantage of this system is that, with every part mobile, the obstacles can be passed easily. And I added rubber grips too.
These treads are powered by PF XL motors. Very very heavy and big, they have the same speed as other motors but much more torque. We're talking of Mindstrom-level torque; this means that In theory, I can add as much weight as I want and keep it at a more than decent page.
You can also see that I fixed two of the biggest flaws from my previous model : firstly the RC receivers have been turned to get signals from multiple angles. Secondly, to rotate the tower, I used a worm gearbox with a PF M to really slow it down; and the wires have been fixed to have a broader angular range.
The turret ? The turret !

These eyes are the best addition to this MOC.
You might notice that I have a servo and a PF M on the turret. This is because the weapon here is a harpoon with a cable. And it has a winch ! All of that with only four controls : two for treads, one for rotation, and one to fire/retract cable.
How ? Well I'm glad you asked. The firing works just like in the previous vehicle : the servo's arm presses on the spring-powered projectile and it flies, along with the cable connected to the other motor.
As for the retraction, it's slightly more complex : on the remote, I press the firing lever the other way around : this causes the servo's arm to go on the winch and it fits nicely, so that when the PF M rotates, the thread can't escape the winch (a video will be in the reblogs, because Tumblr doesn't want me to upload two videos at once...)
Major problems here are the following :
the PF M often detaches itself from the turret
the harpoon often get stuck on the treads
the thread is too short (yeah...)

✨Pride clones !✨
As I mentioned somewhere in my previous post (I think ?) I found my clones missing colours. So I did a rainbow Cody, and things went downhill from here.
There's not much to say about it built-wise that I haven't already said, but a few mentions of my colour palette might be interesting, notably some shade of 'rubber' materials, for a few of the purples. Also, there aren't nearly enough blue-green shades to satisfy my needs, but I can't do much about it.
You may also ask for other flags, who knows how they'll look...
Speaking of, the flags here have nothing to do with any headcannons or whatnot, they're purely aesthetic - or practical, since some colour subdivisions are easier to represent on some models than on others.


✨Custom Bionicle !✨
Today (and next week, too) was a good excuse to get these out of their shelf and showcase them (and wipe the dust away, too.
These are my custom/modified Toa Ru-Fahi, which are a reeeally fun project.
Other angles and details under the cut !
Before going any further, I can’t not link this post, because I made the name of these customs out of it, and also because it’s just so good of a work. Just check it out.
Atuaga Ru-Fahi


The most custom of the ones I’ve made for this series, even if some might spot some inspiration from Kongu Mahri. It turned out to be more silver than black, but it nonetheless remains the Earth Toa. I’m quite happy of how it turned out, with the red accents to fit the weapons, and its overall shape. The contours of the body made with tubes are also something I had never done before. One of the techniques I use to get a thicker effect is to superpose two 'limb' pieces on top of each other; but I also have multiple usage of bohrok hand pieces to get rounder effets, with some texture.
The cable going through the mask is connected directly to the shoulders, and it has a purpose which will be explained somewhere underneath. Also, the Kanohi is Norik’s great Pehkui, which is probably one of the coolest of my (extensive) collection.
Gali Ru-Fahi


Have you recognised her ? Probably, I gave her name. Gali’s always been one of my favourites, so I had to include her. More specifically, this one is a modified version of Gali Mistika, because that whole set was already pretty good as is. Here again, probably went overboard with the silver pieces, but oh well. The tubes are connected to the top of the Kanohi, because there were already holes there. With this one, I used arm pieces to get the torso’s shape. The shoulder plates I have not touched, because they’re a nice unique part. The back piece is a Rahkshi’s foot (in shape, because there’s sadly no dark blue Rahkshi).
The weapons are just a long axe covered by a tube, and the heads are stolen from another Gali (the new gen ones).
Lore-wise, I don’t really have anything for these, except that this Toa team is made out of Toa from different teams (chosen arbitrarily for their look) and are fighting is space (hence the breathing tubes, which is the element I keep on all these customs (only two here, but I promise two more next week). If anyone has any idea, I’m open. Considering what else I’ve on my shelves, the bad guys could be giant bugs, but that’s as far as my ideas go.
See you next week :}

Following in my pride flag series :
✨Ace pride flag✨
(Previous work here !)


✨Bile titan✨
Or the fact that I don’t have access to real legos anymore will not stop me from making mocs (more on that under the cut).
I’ve really enjoyed Helldivers and I’ve been meaning to make one of those for some time, now. And I think it turned out quite alright, all things considered. It’s a shame this happened he will never physically be on my shelf, but it’s better than nothing~
Anyway, details and rumbling under the cut, as always.
Here are more viewpoints :


Most of the parts here are articulated, although the head barely moved, and the second joint of each leg is fixed, because making it movable with this size would have been a hassle.
Though, it still has a lot of posability (even the small pincers move !).
The bottom is not really detailed, because it won’t be seen much, but I’ve still added a few things, including the protuberant bile sack underneath, because it gave me a great excuse to use an alien egg, which used to be an incredible piece.
Now though, let’s deal with what this isn’t : real.
It’s fully made with Bricklink’s Studio, which is a free computer software giving one access to pretty much all the bricks you can think of, without limitations on colour (this is great, because 99% of the pieces I use here do not exist in the colour scheme I used). It also comes with a part designer, to create custom prints and/or bricks. There aren’t any prints here, but I am working on something else which uses them.
The only down part is that I can’t use any illegal technic, which is a shame since I usually rely on those a lot (check my post about the Citadel and you’ll understand~). It does make sense, though, and custom rotations are allowed, so it’s not all bad.
Also, if you’ve read until there, congrats ! I do have one more thing to say, though. Given that I know have access to an infinite amount of bricks, I can take requests, if you ever have an idea you’d want to see realised (albeit note it might take a while !).


Get booped
Get booped back ! Ah !
Oh, and have an actual (Lego) cat while I’m at it !


✨Custom ice Toa !✨
And another one ! If the others were already experimental, this one is much, much more-
Closeups under the cut !
Front/back views :


That one was a lot of fun ! But it’s also not really stable, considering there are some weird piece combinations. This one also has disproportionate legs, compared to the rest of the body, but it’s alright.
With that one, I really tried to remain within Kopaka’s spirit (notice the ski blades and the Kanohi). The bow and arrow (which doubles down as a lance, and is using one of Kopaka’s blades), is a weapon I don’t think has been used before in the original bionicles (correct me if I’m wrong).
The arms/hands are using Pridak’s feet, because it works well and still allows for large movements.
I used some darker white pieces on the back and shoulders to get some slight contrats, and used technic pieces on the chest to get a proper body shape, with a leg piece underneath.
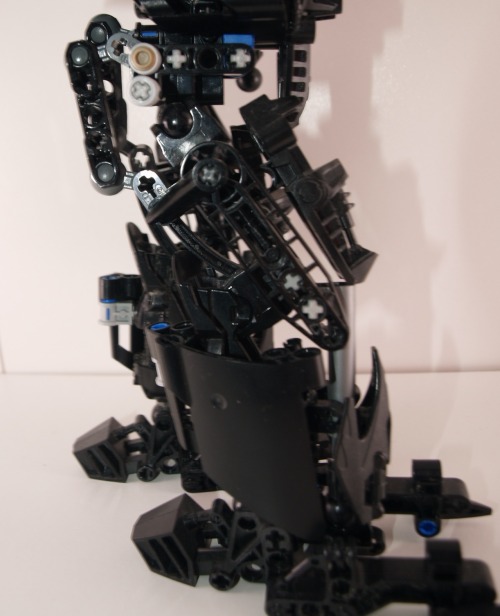
Legs :

(Too) Many details on the legs ! The blades under the feet are a combination of Kopaka Nuva’s blades and Glatoran blades, which also hold a shoulder piece used as a supplementary leg pieces.
Now is the here we enter the mess : all of the ankle sockets you can see are not used for the articulations, and are only here to keep the back piece in place (Star leg), while the actual socket is behind the technic gear plate. Then there is a socket which doesn’t even have a ball, it is directly stacked on top of another socket, and I use multiple feet to cover the leg areas which would expose how terrible the inside is. At the front, you might also notice a 1*2 curved slope tile held by two technic pins. It’s floppy, and it looks weird from the side, but the front appearance makes it worth it. Finally, at the front, I also use part of a Vahki’s head as a final plate, before we finally reach the connection between the legs and the body. As I said, that whole part is a mess.
Head :

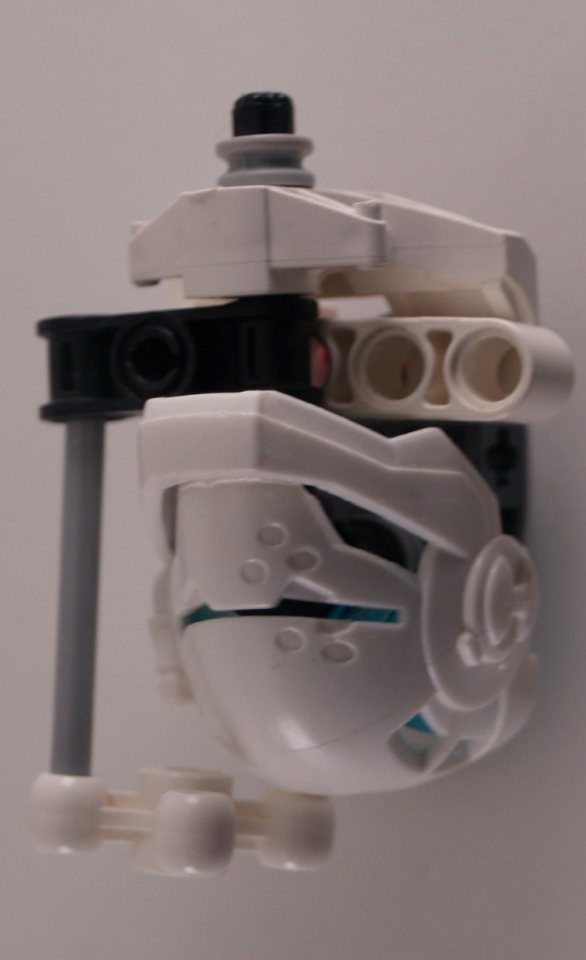
Tried to remain close to Kopaka’s appearance here too, by adding a X-ray vision thing, but the most important part is that the Kanohi is Hero Factory Stormer’s mask, but sideways. The trans blue pieces are Borhok eyes, which fit perfectly, and I managed to cram a socket connector inside, making the head quite mobile and sturdy.
Next week is another one ! Not sure which of the three it will be, but I haven’t decided which one yet (tell me if you have a preference~).
I also finally received my new parts, meaning I can get back to working on my big project, yay !

✨Custom earth Toa !✨
It’s spiky ! And we’re now at 5/6 !
More below !
Front/back :


He’s spiky ! Some might have already noticed I took for base the old Von Nebula set, because I acquired it recently and it worked well, plus the joints are interesting. Pretty much everything else was change, though I kept the mask, sphere, and spiky plates. These were nice, and even if stone colours are usually black and purple, but blue works well too.
I relocated the sphere directly in the thorax so that it looks like some kind of core. The back is mostly composed of two large car pieces.
The hands are using black pieces to make them larger, which works well with the blue blades (which supposedly come from either Chima or Hero Factory, I can’t remember).
Leg :
Another type of Bohrok piece to act as feet ? Yes. These are the head pieces, and they work well with a classic foot as a back piece. The piston in the leg was there originally, but I covered it with these large technic panels and some other technic pieces.
There is also an interesting mechanism to stop the legs from doing too odd moves on top, which can have some interesting applications. Here, I’m wondering about removing them to gain a larger range of movements though.
Head :

Kept the original mask and teeth, but with a cable and a spider’s claw to elongate it.
This picture also allows for a clear view of how much dust has accumulated. Don’t judge me, these are on a top shelf which isn’t the easiest to clean…
Also, my project is now finished (officially) ! I went to a small exhibition with it this weekend actually, and…a recruiter from a much larger exhibition found it good enough to offer me a place next month (I’ll post it here once the bionicle series is done) ! I also brought some of my pride flags, which seemed to be doing their effect, so I’ll bring more next time. So overall, yay !
-
 mysticum-draconis liked this · 1 month ago
 -
 teammadolora reblogged this · 3 months ago
 -
teammadolora liked this · 3 months ago
-
 fankaninjago liked this · 6 months ago
 -
 foximator-blog liked this · 6 months ago
 -
 obsidiandragongenderwhatgender liked this · 6 months ago
 -
 cabbagesenpai liked this · 8 months ago
 -
 karthara reblogged this · 8 months ago
 -
karthara liked this · 8 months ago
-
 gardenergulfie reblogged this · 8 months ago
 -
gardenergulfie liked this · 8 months ago
-
 yourpumpkinqueen liked this · 9 months ago
 -
 thesystemcircus liked this · 9 months ago
 -
 snowdandelion reblogged this · 10 months ago
 -
 patmax17 reblogged this · 11 months ago
 -
 trans-bright-green-machine reblogged this · 11 months ago
 -
snowdandelion liked this · 11 months ago
-
 themysterioustaria reblogged this · 11 months ago
 -
themysterioustaria liked this · 11 months ago
-
 orozon reblogged this · 11 months ago
 -
 antrylis reblogged this · 11 months ago

They/them - AroaceLego MOCs and photography with a wide range of different characters and environments, every Wednesday (in theory-)
77 posts