Get Booped
Get booped
Get booped back ! Ah !
Oh, and have an actual (Lego) cat while I’m at it !

More Posts from Antrylis and Others

✨Another edited photo, yay !✨
This is an entire version of the blog’s banner, too !
Technic details under the cut !
So ! Looking through my archives, I found images for the process I described in my previous similar post, including my made up studio (and very messy desk…) :

As you can see, it’s not quite a professional set up..
To be more precise, this is three led bands hooked to a power bank, on top of which my phone is meant to be sitting to take two photos in a row. Obviously, there is also a desk lamp illuminating the scene, so here is a picture without it :

So, the way this is organised is that I have my black screen in the background which reflects the lights a little, but not the actual minifigs; the characters are held by transparent pieces connected to ball joints, so that I can have a steady but adjustable display. Light-wise, the two prominent led bands are colour-coded with the character’s color (kinda) to get them in opposition; the junction between the two is covered by some black bricks to create a darker area to offer more contrast; ans on top of the stage is help a (theoretically) white led with lesser intensity to make sure the scene stays lighted up properly, even if the light sources are from underneath. The red pieces I have used as frames are really good to hold these light bands, because I can have varied angles and heights plus a very solid structure, which is all I want.
Finally, to get the floating render, I take a first shot with the characters, then a second one at the same place without the characters :


And then, with a bit of editing magic and other simple image manipulations, you get the result I have at the top of the post ! I’d recommend trying it for yourself, because it can be a lot of fun !
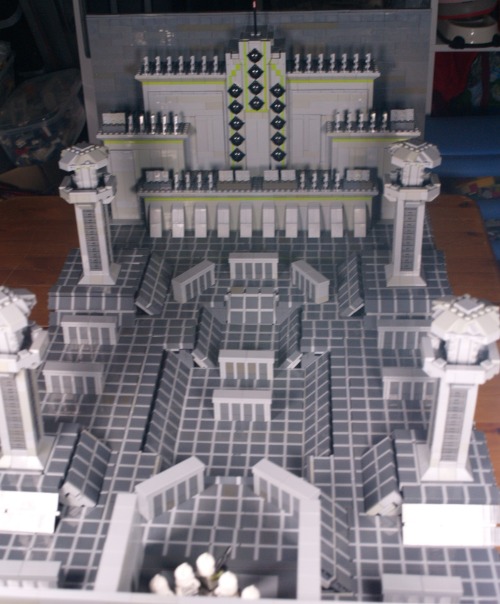
✨Kamino’s citadel challenge !✨
I am…very excited about this one. I’ve had this vision for a long time, and I’m so happy it’s ended up looking like that.
Now, there are a lot of things I’ll go into details along close ups under the cut; the only thing I’ll mention above is that I’m very grateful for TCW’s episode guides’ artworks, without which this would have been quite a hassle.

Okay ! Before diving into all the details and things, here is a view from above, to really display how big it is. Dimension-wise, the plank I built it on is around 110*70cm.

Now of course, the first detail which is noticeable is the floor, because, well, it’s everywhere.

This was probably the most challenging part of the build, because making a grid out of Lego is tough. Most of it is rows and rows of dark square, light lines, separated by 1*n tiles. It was the easiest way to get this pattern with as if it were just tiles; because this is one of the objectives I had here : most of this MOC is smooth, except for a few zones (usually voluntarily).
The fact I used this technic means that the floor in most place isn’t very stable, but it actually holds up pretty well because of some hidden connection points with the foundations underneath, which are mostly hidden under the cover blocks.

Here for instance, I’m using modified 1*2 bricks with a Technic hole : it hold the cover block, and it also attaches the floor to the foundation.
Of course, another problem I ran into were slopes. Much harder to get a smooth effect with the technic I’ve used, so it’s a bit wonky and unstable. Also, most them are not aligned properly, which is visible in the picture above (and some area have some really big misalignments because of a few problems I probably won’t bore anyone reading this with).
Now, since they’re also here, I can deal with the cover blocks. These were, among the details, the hardest to figure out, to get a good size while keeping some texture. Eventually I came up with this design, which, ironically enough, uses the same technic the floor uses, in a different orientation.
Another detail : the miradors :

This is one of the first elements I had in place, because I needed them to get a good sense of scale (and was made better by an existing concept art of a tower alone). Most of it does not have anything noteworthy, except for one illegal technic I used (can you spot it ?)
The pillar holding the roof of the mirador is using a technic I had in my toolbox for a long time, but had never had the occasion to use : if you take two 'brick' bricks and attach them perpendicularly on a snot brick, the small space separating the lines of 'bricks' align to let a 1*n tile in. It’s somewhat reliable (for an illegal technic) and an easy way to get octogonal shapes.
Now, before looking at the Citadel itself, let’s turn around for a minute.

This point of view obviously isn’t the intended one, but it’s still worth noting, if only for some composition.
Notice that the wall here is quite small (smaller than the miradors, even), and light gray; it’s in contrast with the towering dark gray wall on the other side, behind the citadel, which technically should give at least some impressions even to the people who never saw TCW.
Anyway, it’s also on this view that we can see most of my slope struggles, including the central one, which is the biggest I had to do.
And I can’t not mention the most important element :

What would be the challenge without a squad of clones to take it on ? These clones (4 privates and a sergent) are ready to fight ! Well. Kinda. I wish I could have actual cadets, but they are not part of the Lego universe (and the floor was enough of a fee, I can’t afford to get customs figures too). I wish I had the Dominos though. I have TBB Echo, and I plan to get my hands on Fives at some point, but they wouldn’t fit here, sadly, so instead I used some movie accurate clones (because all the others are used for a project I still haven’t posted..maybe later…)
Notably, I at some point tried to get the elevator to work - needless to say it was a disaster (it’s too close to the plate underneath to make something working).
Now, without further ado. The citadel.

I’m very proud of it. I got the proportions just right (I actually made some measurements to make sure of it), and there is just enough texture to not make it bland while leaving it as artificial. This alone took roughly 8-10h (which were all spent during an accidental all nighter, whoops), but it was worth it. It’s completely empty inside, and, in fact, the wall behind it isn’t full as well, anything behind the citadel is opened. The spikes are simple 1*3 angle plates illegally connected, and the walls’ small details were made with a bunch of modified 1*2 plates, there isn’t anything really special in it.
The only really complicated zone was the middle tower, because I had to put all the cannons while keeping it clean and smooth, and including the vertical lime lines. It was a fun challenge. And I included the 'flag' At the top, too, just a red transparent cone on a stick (there’s no need for more), which peeks above the gray wall (for composition and because of a lack of pieces).
Anyway, such a long project deserves one behind the scene photo :

Yes, my desk is messy (and include my mandatory tea cup).
On the left, you can see my remaining floor tiles, which have not been used yet; and just under the citadel, you might notice the foundations visible; it’s a checker of 2*2 tiles which gives my floor a good base to be fixed on. There are also some slopes which haven’t been placed yet (in front of the background miradors), and at this steps, there were no cover blocks or walls yet.
As far as my tools go, you might notice brick separators scattered all around my work environment (I never have enough of those), as well as a tablet in the bottom right hand corner (which i use to check and measure concept arts), and in the middle, the red triangle is an official (albeit old) Lego measurement tool which counts in stud, Lego bar holes and axe length.
Also visible, finally, is the bottom of the foundations, which are stacks of 1*2 bricks (each of the three floor layer is separated by a height of 3 bricks), which means that looking directly under it can lead to watching the dark basement of my build (which isn’t aesthetic…).
Anyway, if you read until here, thanks, I guess ? I still have a few TCW related stuff (a small one next week, some other in the foreseeable feature), so feel free to stick around and maybe leave a note, if you feel like it ? That’s it, bye !

✨41st Recon Squad Camp Site ! ✨
Closeups and other stuffs under the cut !
Backside :

Right scene closeup :


Campfire scene closeup :


Tomb scene closeup :


And finally, my personal favourite :

New lights, new camera settings, and a larger space…because this one didn’t fit the other one…Indeed, using shelves as a photo studio is not my brightest idea, but in my defence, it works.
This MOC has entirely been made because of the camouflage cloak I found in the bottom of a box. I don’t know where it’s from, but it looked very cool with that particular trooper, and thus I needed to show it off.
It was also helped because the large amount of olive green plants I received recently (those that are all over the place).
I tried something new, which is that I have not a rectangular base, but rather, three trapezoidal ones linked together to play with the shapes a little. Some parts were a pain to link together, but some tricks can help with that. The crates, for instance, are on top of a hole I couldn’t fill because of the odd shape.
The tombstone was actually the best idea I could get because I’m missing a trooper torso ! I can’t find it, and a pair of legs and a helmet are all I have left, and I might have watched Tales of the Jedi again recently, so that ended up being here.
The tent itself is made thanks to a fun discovery of mine, combining nets and my recent shipment of plants. I put a plant every three holes, in one line, and continue the pattern diagonally. In the back, to hold them in place, I used 1/2 technic bushes, which are quite convenient. And of course, this part is not connected to the poles at all, I case I want to add something in the tent.
Finally, some will notice the main incoherence of the thing : all the smaller wooden poles (tent and fire pit) are not birch-coloured. That’s mainly because finding the good pieces would have been a terrible hassle, and also because the campfire would really look weird in white.
Also, I might have spent an entire night on these trees to find what the colour balance and shape would look the more natural, I hope these are good.

I realised I’ve posted quite a lot of my MOCs on this blog, but any of my more 'photographic' works, yet, so here’s one of the first I made (we don’t talk about previous attempts), which still works quite well, although there are some things I would do differently, were I to do this again.
My process, and other details, below :}
So. The process I used to get this effect is not a really complicated one, but it still offers a more or less good render at the end, which is nice.
The blue guy has nothing special, but the red one I made float, but how ? The answer is not telekinesis, but superposition. Take a look at the images below :


Left one is the original, with no special effect (and no cropping, to offer a larger view), while the right one is the same, without the red minifig. By taking both photos without changing the camera angle (which is a painful thing to do with a phone, I would not recommend), and with a simple image editor, I put the 'empty' image (right) on a layer under the image I want to modify, and simply erase the supports.
It is important to note that if the erased bit casts a shadow, it’s better to also remove it, to avoid weird effects (here, there are no shadows because of the light source).
I’m also using an old set of blue LEDs inserted directly into Lego bricks to get this foggy aspect at the top, and to get a darker aspect to the blade of the red minifig, though there is also a desk lamp above providing some proper light, of the whole thing would be blue.
Last interesting point, this technic is the same I’ve used for the blog’s banner (but with proper lighting, for once). One might even recognise that the background for the two pictures is the same, because black was easily findable and gives quite the dramatic effect. The banner is, in fact, only half of my picture. Since you’ve made it here, I’ll offer another tiny bit of it here, as a treat :}

(And yes, I stole the characters from Star Wars sets, gave them light sabres even if they’re not meant to have one, and also added one of my cool cloaks, and made them fight. Don’t you dare judge my poor choices.)

Here is a second batch of custom minfigs ! (Yes, these are Nexo knight based too. What can I say, the original designs are just too good.)
Closeups and commentaries underneath the cut !
Closeups are from left to right

So, starting with the pretty basic guy. Quite a mixup of different things : the helmet is modified from some type of samouraï thingy, the pauldron probably from clone wars, and the axe’s blade (beautifully chromatic bronze, so rare these days) come from an old castle set. Other than that, the base is mostly a basic evil guy starter set, but the armour details are really neat

This one ! Probable the most customised. Legs are from one of the cool original minifigs, torso is from the (meh looking) main antagonist, with both arms equalised with red color (the purple arms came handy for something else~). The armor piece is from a Ninjago skeleton, the head is also from Ninjago, but with a much later subtheme, and the bit of hair comes from the nice guys of Nexo knights. Sword comes from China Chima, and the shield ! The shell is made from an Hero Factory piece, and it looks pretty nice like that. And of course, I can’t not mention my favorite piece, the cloak, that I put literally everywhere, because it goes with a lot of things. It also comes from Chima.

Probably my favourite. It’s not really modified much from the original (ultimate) version because it is very, very cool. I did make some slight modifications on the blade to use shiny dark grey; and the armor piece + pauldron are just an addition to make him look more menacing. But it simply looks great as it is !

…Yes, the cloak is here again. Ignoring it, everything is recycled from somewhere in Nexo knights, here. The body is from the moltor guy, the head is, too, but with the back in front, framed by the helmet to make it an eye. And the two sword. These I can’t use as much as the cloak, but if I could, I certainly would. An awesome addition, really.

Finishing touch is quite simple. Most of the piece are from different characters of Nexo knight, mostly following a default character, and the two tridents are from Atlantis (a really really good Lego theme. One day I’ll have a diorama of these)
You’ve made it here ? We’ll be aware I have a batch of the blue ones that will arrive…at some point. Probably not next week, I’m hoping to have enough time to put my bionicle customs in my larger studio for next week.
✨I made a carrd✨
A friend of mine said I could use it — they were right !
Essentially, I now have all of my published MOCs sorted by theme in a single place (as well as a few unpublished ones !)
Here it is : https://enteroctoups-darkysils.carrd.co/ !

It also feature some none-Lego photographs, too, feel free to take a look.
Small, unnecessary update bellow the cut :
I’m gonna have to remove the 'one post every Wednesday', for multiple reasons : firstly, I’m gonna start a long maths cursus which won’t leave me much time to build — or even to post; and, beside that, I’m running out of MOCs ! I still have a few, which I will probably work on and queue so that they appear semi-regularly. I received just earlier today part of the pieces I’ll need for my final(?) MOC. And it’s a big one. Well anyway, I’ll be off to work on it now ! Thanks for reading this far~

✨ Small lego diorama of some ARFs of the 91st ! ✨
This is of course from the Clone Wars — expect much more of these in the upcoming weeks, it’s one of my favourite themes :}
(Closeups, commentaries and complaints under the cut)


These trees are pretty experimental, I usually use classic leaves rather than plain plates, but these were interesting, and were a pretty fun challenge (I like making trees a lot, so there are usually some in most of my dioramas). This is supposedly based on Kashyyk, but most of the trees there are waaay too big for me; however I found some nice pieces for the roots (the large ones in the middle, which are not really visible, are using Lego Elves’ dragon horns; and there are also some old palm trees trunks, which are really awesome pieces to use.)
This is probably gonna be the only one for the 91st though, because I don’t have much more of these. The only other possibility of that would be Neyo’s execution of o66 (not fun~).
Also, the night effect on the closeups is due purely to one of my led lighting dying in my hands, which wasn’t exactly practical.

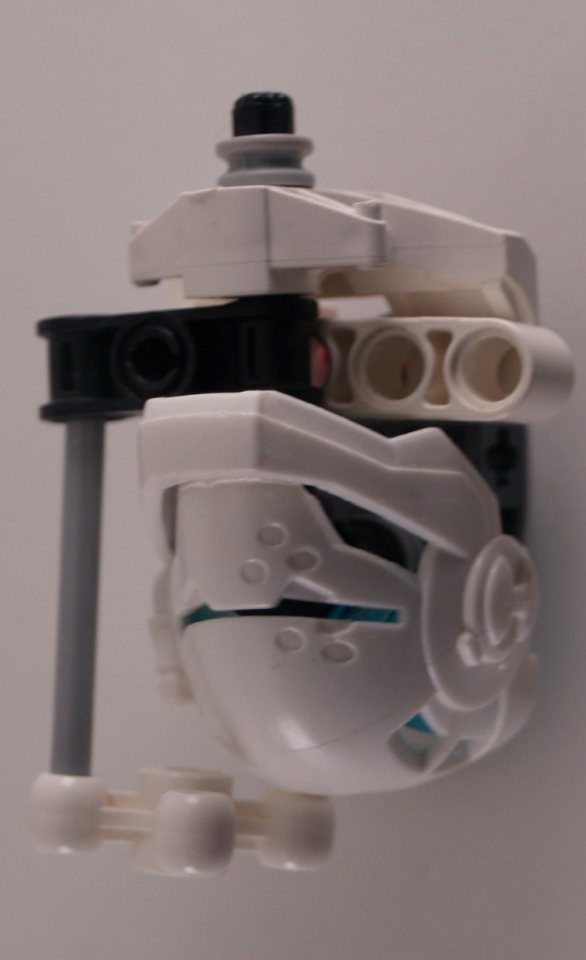
✨Combat mech and pilot ! ✨
Closeups and lore under the cut !
Side and back closeups :


Minfig closeup :

So, lore I said.
Welcome on Earth, in a nearish future. WW3 happened, but after that, everything is going absolutely fine ! Lot of tasks are automated, no one had to work anymore, and thus, humanity worldwide become a society of entertainment. Films, videos, games, you name it. But of course, games are not 'real' enough, so some streaming platforms organised life-sized fighting games with giant machines. That couldn’t go wrong, right ? Right, in fact, a world-wide tournament was made, with always much complete arenas, and billions of watchers.
So, about this mech — and its pilot, too. This one is part of the original cast of the mech battles, a beautiful Mark One. All of them were the same, originally, with only colours to distinguish them.
Its pilot, skilled as he was, won the first season. Survived the second. And the third. And so, eventually, this one became the last one of the Mark Ones. And it won again, awarding enough of a prize for the pilot to upgrade it. It was also renamed Relic by the crowd.
Fully reworked, for the next season, Relic has been updated with a plasma beam and a heavy rotator cannon, fuelled by a large tank located on its back — if any other competitors ever attain this place.
With this upgrade, the commands, too, have been updated, with controllers now having holo-projections, and a much faster update rate. One has to imagine that these mechs were originally controlled in large rooms (similar to Jaeger command centers), but have been rendered light enough to be added to a living room, for amateurs. The pilot, however, did not change his original headset and suit, which is full of old equipments and souvenirs.
That’s it for this one, expect one of Relic’s competitors next week : Quake !


✨Bionicle insect !✨
Yay, back to Bionicles MOCs !
I made fewer of these, but here is the first one (other images and additional details below the cut).
I’m still not entirely convinced of the edited photos, but given the size of these MOCs, I didn’t really have much choice but to do how I did. At least the ones with background give a few colours.
Anyway, photos of the left and underside !


This was really a fun one to work with, obviously largely inspired by the Visorak sets (I kept the head piece and the claws), but with more legs !
The claws are combined with feet to add some shape (the two pieces work quite well together) to the end of the legs, then I made of 4 joints articulations to give it a proper insect-like stance. The middle legs are slightly longer (using a long transparent blue piece, instead of the small dark one), which makes it less linear.
I kept the disc of the Visorak, held in place by…a broken Pirahka headpiece. Yes, I’m not exactly very original in my techniques, and I have a lot of these broken pieces. As you might see in the third picture, I have the secondary connectors of that piece attached to the belly of the beast, so to speak.
Although, speaking of techniques, the one I’m using for the 'tail' is not exactly recommendable. It’s a bit tough to see, but there is an elastic band attached to the foot used as a tail part on the third picture. It’s the only element which connects the end of the tail (shiny Visorak claw in second picture) to the rest of the body, which makes it wobbly but offers some interesting movements if needed.
Oh yeah, I also used Vakama’s disc launcher again, as mandibles this time. I originally tried to make a transparent blue disc (from all promotional sets) inside, but it doesn’t fit well enough).
I’m considering making another in another colour, but I’ll have to see if I even have enough ressources to do so~ Maybe green and silver, since these are pieces I have a bunch of, or black and silver…Only time will tell.

✨Custom ice Toa !✨
And another one ! If the others were already experimental, this one is much, much more-
Closeups under the cut !
Front/back views :


That one was a lot of fun ! But it’s also not really stable, considering there are some weird piece combinations. This one also has disproportionate legs, compared to the rest of the body, but it’s alright.
With that one, I really tried to remain within Kopaka’s spirit (notice the ski blades and the Kanohi). The bow and arrow (which doubles down as a lance, and is using one of Kopaka’s blades), is a weapon I don’t think has been used before in the original bionicles (correct me if I’m wrong).
The arms/hands are using Pridak’s feet, because it works well and still allows for large movements.
I used some darker white pieces on the back and shoulders to get some slight contrats, and used technic pieces on the chest to get a proper body shape, with a leg piece underneath.
Legs :

(Too) Many details on the legs ! The blades under the feet are a combination of Kopaka Nuva’s blades and Glatoran blades, which also hold a shoulder piece used as a supplementary leg pieces.
Now is the here we enter the mess : all of the ankle sockets you can see are not used for the articulations, and are only here to keep the back piece in place (Star leg), while the actual socket is behind the technic gear plate. Then there is a socket which doesn’t even have a ball, it is directly stacked on top of another socket, and I use multiple feet to cover the leg areas which would expose how terrible the inside is. At the front, you might also notice a 1*2 curved slope tile held by two technic pins. It’s floppy, and it looks weird from the side, but the front appearance makes it worth it. Finally, at the front, I also use part of a Vahki’s head as a final plate, before we finally reach the connection between the legs and the body. As I said, that whole part is a mess.
Head :

Tried to remain close to Kopaka’s appearance here too, by adding a X-ray vision thing, but the most important part is that the Kanohi is Hero Factory Stormer’s mask, but sideways. The trans blue pieces are Borhok eyes, which fit perfectly, and I managed to cram a socket connector inside, making the head quite mobile and sturdy.
Next week is another one ! Not sure which of the three it will be, but I haven’t decided which one yet (tell me if you have a preference~).
I also finally received my new parts, meaning I can get back to working on my big project, yay !
-
 obsidiandragongenderwhatgender liked this · 6 months ago
 -
 rachelamorph reblogged this · 8 months ago
 -
 zoeywankenobi liked this · 8 months ago
 -
 rachelamorph54 reblogged this · 8 months ago
 -
rachelamorph liked this · 8 months ago
-
 antrylis reblogged this · 1 year ago
 -
antrylis liked this · 1 year ago
-
 attackboss6 reblogged this · 1 year ago
 -
antrylis reblogged this · 1 year ago

They/them - AroaceLego MOCs and photography with a wide range of different characters and environments, every Wednesday (in theory-)
77 posts