So I’ve Been Thonkin™️
So I’ve been Thonkin™️
I’ve been thinking over and over about writing a fic where batman gets like. suuuper injured. life threateningly injured. and a recently formed JL takes him back to the watchtower, trying to patch him up.
Meanwhile Alfred has access to the cameras and mics on the watchtower because, batcave, and he sees just how bad it is, and is just BESIDE himself. Barely restraining himself when, then, he hears a few league members not immediately tending to anything musing about who this mysterious “alfie” is that bats kept asking for as he was passing in and out of consciousness. And Alfred is just like. Okay that’s it my boy needs me.
Zetas his ass up to the watchtower, bullies the other members into letting him get into the medbay, and assists with patching batman up. Everybody is confused.
And OF COURSE he sternly states (or snarls, not sure how Unhinged With Worry I want him to be for this) “that is MY SON in there!” as he’s pushing his way into the medbay, leaving the league BAFFLED at this. Like….. batman’s…. dad?????….. like.
I love batfamily meets the justice league but I also want more ALFRED meets the justice league. Especially in the context of Overprotective Father With An Idiot Son Whom He Is Very Proud Of!
And of course, this is far before anybody knows batman’s identity. So now all they know about batman is 1: he claims to be human 2: he knows how to destroy most living creatures and 3: his dad alfie is really scary (maybe scarier than batman himself)
More Posts from Allister-is-best-bo1 and Others
I need a scene at the end of the Ithaca saga where the royal family is hugging and Athena gets pulled into it like this

getting evicted, apparently 👍 might need to open emergency comms soon to make sure we have enough to stay at a hotel for a bit or smthn
love when they go hehehehehe

A mom helping her kids beat a hard level in Super Mario Land, 1990s

He does, in fact, have daddy issues

Had to join to this trend cus it's literally them..


Ultimate Sneak Attack
Sylveon Cosplay Ears Tutorial
A friend of mine wanted to cosplay Sylveon for an upcoming convention we were attending and asked for my help. As I love making cosplay props and helping others, I worked on making the ears for her and photographed the process for this tutorial to help others. This tutorial ended up a bit longer than expected so bear with me :)
What you’ll need:

- Craft foam: I had about three sheets lying around that were $1 each and I bought a huge roll at Michael’s for $8
- Scissors
- Hot Glue Gun and a lot of refill sticks
- Pen and Pencil
- Acrylic Paint: You’ll need white, pink, two types of blues (a lighter one and a medium one), and a light teal/seafoam.
- Three Pieces of Sandpaper: I believe mine were a 75, a 100, and a 150
- Headband: I recommend the stiff kind that is covered in fabric. You can buy a three pack at Walmart for about $4
The Process:
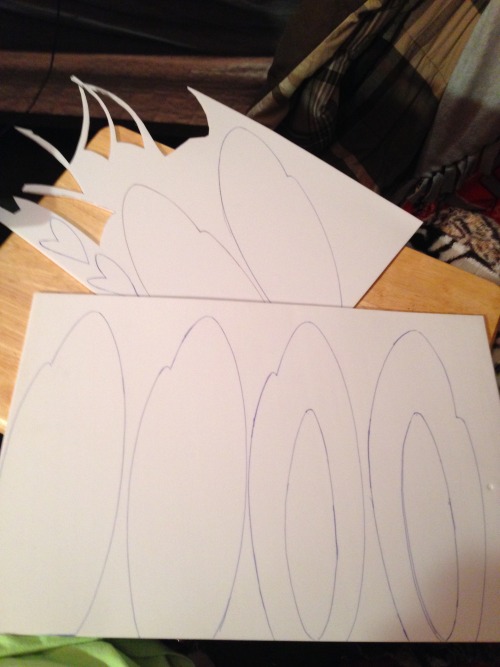
Step One: Pattern Making
The first thing you need to do is draw out your pattern with pencil on paper. I just Googled a picture of Sylveon and used that as my reference picture. Once you have it drawn, cut out the pattern.


Step Two: Making the Foam Shapes
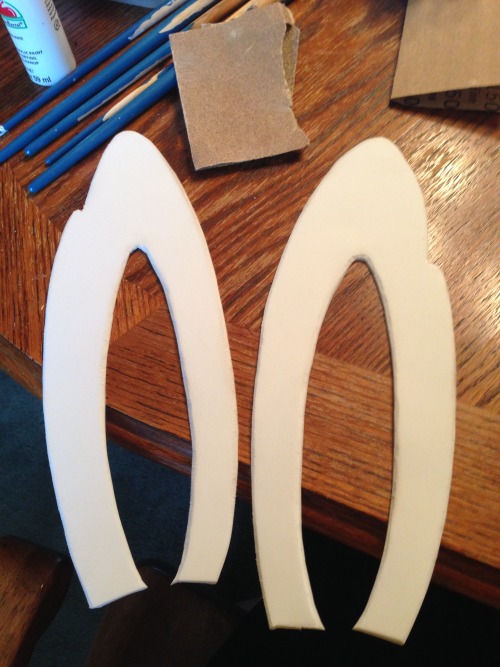
Now you’re going to trace your pattern onto the craft foam with a ballpoint pen (pencil tends to tear the foam). You’ll need: two of the little hair piece, four of the full ears, and two of the full ears with the center cut out. After you have outlined all of your pieces, cut them out of the foam. I trimmed along the sharp edges of the back of the piece on the bottom of each stack in the second picture, the front of the top piece, and the front of one hair piece and the back of the other to round out all of the edges for sanding.

Step Three: Gluing
I don’t have a picture for this step, but it’s easy to understand. You need to take your hot glue and glue together the two full ear pieces with the rounded edge at the back and glue the two hair pieces so the rounded edges face out. A word of caution: foam can warp with the heat of the glue gun so just try and smooth it out the best you can.
Step Four: Sanding
Now you’re going to sand all of the edges that you rounded before. BE CAREFUL! The sandpaper (especially the roughest) will tear the foam, so sand lightly. Start with your roughest (the smallest number) and then use the middle size and then finish with the smoothest paper.
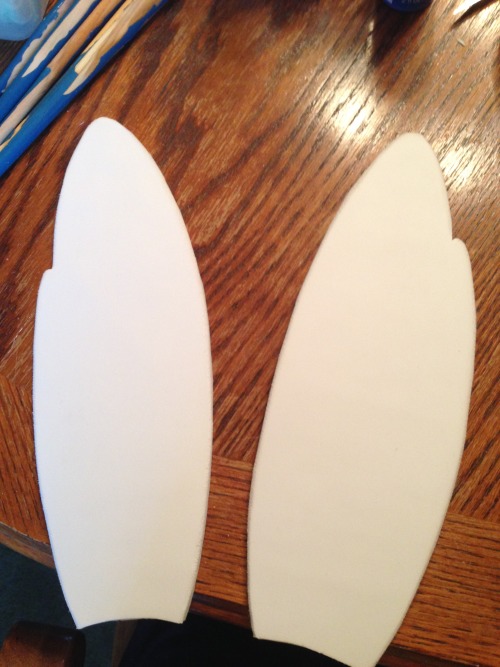
Step Five: Paint it Pink
You’re going to paint the very front and sides of the ear (the two pieces with the center cut out on the right) and the back and sides of the two pieces you glued together earlier. You’ll also paint both sides of the little hair piece. Leave the front of the glued pieces blank, you’ll be painting them later. Also, foam tends to absorb the paint so it will take quite a few layers to cover the foam fully. I think I used about six layers. Let this paint dry.

Step Six: Painting the Blue
For this step, I mixed a medium blue and a light blue until I was happy with how it matched Sylveon. This will be the “inside” of the ear. Most of this will be covered by the front piece so don’t worry about having perfect edges while you’re painting. Let this dry before you move on.

Step Seven: Some More Gluing
First off, I apologize for the terribly picture quality, the lighting wasn’t great so the picture came out a bit orange. For this step, you’re going to glue the front piece over what you just painted blue. Again, the foam will slightly warp with the heat and stay that way once it’s cooled so work fast to smooth it out.

Step Eight: Bow and Ribbons
Now you’re going to make a pattern and cut out the bow and ribbons (ribbons not pictured). For these you only need one layer, so you’ll end up with one foam bow and two foam ribbons. The center of the bow matches the pink of the ear and the stripes on the ribbons are light teal/seafoam, blue that matches the inner ear, and pink.


Step Nine: Assembly
Finally, you’re going to hot glue everything together. The bow is glued to the left ear with a little space left on the sides to slide the end of the ribbon under. The ears are then glued to the headband. I positioned them similar to how I saw them pictured when I was Googling reference pictures. Last but not least, slide the end of each ribbon under the bow and position to your liking. As you can see, I wrapped one up around the right ear and glued and the other is just slightly folded and glued to the side of the headband.

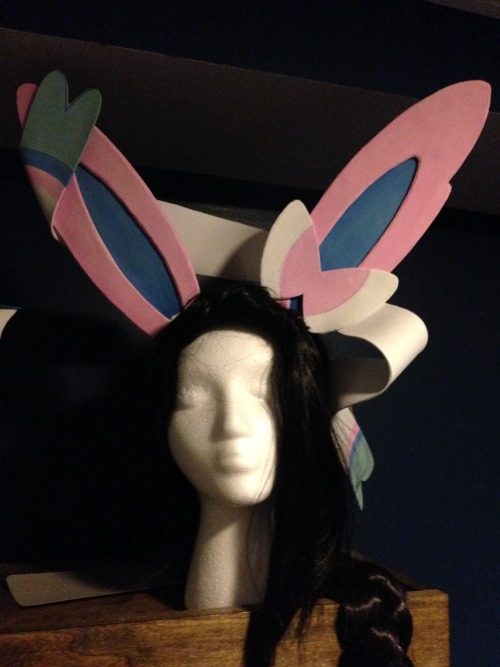
Now you’re done! I hope you guys enjoyed this tutorial, have fun with your new Sylveon ears!
I will be posting better pictures of the set of ears soon, I just need to touch up the paint in places because the pen is showing through.

Sharing is caring
*Ben making cookies from scratch*
The DC peek around the corner.
The DC: Cookie doooough!
Ben: No! No cookie dough!
The DC: Cookie dough! Cookie dough! Cookie dough! Cookie dough! :D
Ben: It’ll make you sick! No!
The DC: 🥺🥺🥺🥺🥺
Ben: …..I hate it when you all give me that face.
The DC: 🥺🥺🥺🥺🥺
Ben: ….. Ugh! Fine! One piece!
The DC: Thank you, Father! :D
Ben: Yeah yeah. I don’t know why I keep spoiling you all so much.
The DC: Because you love us.
Ben, chuckles: Yeah you’re right.
-
 mistress-of-evil-8052 liked this · 1 month ago
 -
 geekgasmiic liked this · 1 month ago
 -
 allister-is-best-bo1 liked this · 4 months ago
 -
 dragon-lancelott liked this · 5 months ago
 -
 drownmeinthemoon liked this · 6 months ago
 -
allister-is-best-bo1 reblogged this · 7 months ago
-
 seeker2028 liked this · 7 months ago
 -
 slug04 liked this · 7 months ago
 -
 alicerivaill reblogged this · 8 months ago
 -
alicerivaill liked this · 8 months ago
-
 maple-soda liked this · 8 months ago
 -
 honepiii liked this · 8 months ago
 -
 jasminerose135 liked this · 8 months ago
 -
 totally-unsuspicous-person liked this · 8 months ago
 -
 trashy-tea liked this · 9 months ago
 -
 multishipperofmany liked this · 9 months ago
 -
 snapback-gravity-falls liked this · 9 months ago
 -
 sirennotmermaid liked this · 10 months ago
 -
 jason-toddie liked this · 11 months ago
 -
 pronounoptionother liked this · 11 months ago
 -
 solemndarling liked this · 11 months ago
 -
 gobgremreads liked this · 11 months ago
 -
 strangenerdwagongarden liked this · 11 months ago
 -
 yazz-frost reblogged this · 1 year ago
 -
yazz-frost liked this · 1 year ago
-
rulebritannia liked this · 1 year ago
-
 wolfgirl-moonlight liked this · 1 year ago
 -
 baldacci1 liked this · 1 year ago
 -
 smi1ing-v0id liked this · 1 year ago
 -
 underatedlikegeorgeliot liked this · 1 year ago
 -
 arbitrarycategories liked this · 1 year ago
 -
goldenwaterlotus liked this · 1 year ago
-
 kassi-exo liked this · 1 year ago
 -
 huntressbbg liked this · 1 year ago
 -
 heyheycallmeheyhey liked this · 1 year ago
 -
 violaite333 liked this · 1 year ago
 -
 boxscraps liked this · 1 year ago
 -
 unifuckandmegadick liked this · 1 year ago
 -
 alienne-in-green liked this · 1 year ago
 -
 artraccoon liked this · 1 year ago
 -
 purple-owl2543 liked this · 1 year ago
 -
 golden-apples liked this · 1 year ago
 -
 all-eyes-no-dragon liked this · 1 year ago
 -
 ourlordjeremy liked this · 1 year ago
 -
 theatricsunflower liked this · 1 year ago
 -
 nixmir liked this · 1 year ago
 -
 dragonhoardsfriends reblogged this · 1 year ago
 -
dragonhoardsfriends liked this · 1 year ago