Rb This With Ur Opinion On This Shade Of Pink:
rb this with ur opinion on this shade of pink:

More Posts from A-mess-of-links and Others
yall look at this shit ad*be is tryna pull now on ppl who have outdated software:

(note for context: i’m all for piracy, but in this case my copy of CS6 was downloaded years ago when they were giving it away to students. i got it totally legally.)
to all my researchers, students and people in general who love learning: if you don't know this already, i'm about to give you a game changer
connectedpapers
the basic rundown is: you use the search bar to enter a topic, scientific paper name or DOI. the website then offers you a list of papers on the topic, and you choose the one you're looking for/most relevant one. from here, it makes a tree diagram of related papers that are clustered based on topic relatability and colour-coded by time they were produced!
for example: here i search "human B12"

i go ahead and choose the first paper, meaning my graph will be based around it and start from the topics of "b12 levels" and "fraility syndrome"

here is the graph output! you can scroll through all the papers included on the left, and clicking on each one shows you it's position on the chart + will pull up details on the paper on the right hand column (title, authors, citations, abstract/summary and links where the paper can be found)
you get a few free graphs a month before you have to sign up, and i think the free version gives you up to 5 a month. there are paid versions but it really depends how often you need to use this kinda thing.
hey here's a website for downloading any video or image from any website.
works w/ youtube, soundcloud, twitch, twitter (gifs and videos), tumblr (video and audio), and most other websites you're probably lookin to download stuff off of.
How do you go about getting such high quality scans of your art?
ok bear with me cuz this is going to be a lengthy post since I see a lot of people struggle with this and I think I could help by detailing my process.
before anything else I have to remark, this whole process only works with paper, loose canvas and any other media that can at least bend and warp a little in order to properly fit into a flatbed scanner, if you're working on on hard/non-maleable surfaces like wood pannel or mounted canvas, I recommend these tutorials:
Now, the first step is the most crucial: USE A GOOD QUALITY SCANNER! a scanner that's capable of obtaining photographic quality images is crucial, as there's no amount of editing that can salvage an image that has been overexposed, burnt, and artifacted to hell and back, here's an example: on the left, a scan of one of my paintings taken on the scanner of a cheap all-in-one printer. on the right, the same painting, scanned on a dedicated HP Scanjet G4050 flatbed scanner, which is the scanner that I still use to this day.


The difference might seem minimal at first, but when you start getting up close, the differences become REALLY apparent, not only are the colors washed out and muddy on the all-in-one scanner; there's some heavy artifacting on its scan as well as random blurry spots that makes the image look much worse, and the overexposure has completely killed the paper grain which is much more visible on the flatbed scan.


it's worth pointing out that both images you see here are what they looked like /AFTER/ adjustments and corrections in photoshop; the first one, as bad as it looks, took me several hours to of tweaking to get to that point, while the latter took me about 10 minutes of saturation adjustments to make it look as close as possible to the original painting. the reasons for this stark difference in quality are very simple: all-in-one printer-scanners ARE NOT made for scanning art, they're made for scanning documents, so the quality needed for that is much lower than the one needed for a painting or a photograph, so what you need instead is a dedicated, photographic quality flatbed scanner. One that I could recommend, not from personal experience but from recommendation from my peers, is the Epson Perfection V550/V600 Photo Scanner, BUT I don't want you to think from this that you NEED to shell out the big bucks into the most expensive and latest equipment in order to be able to get decent scans of your art, the previously mentioned scanner that I used is a lower-mid range device and is almost 10 years old, so if you ask me, it is perfectly acceptable to buy a pre-owned, used, refurbished photo scanner, as long as it's in decent shape and works as intended, you will be able to get what you need out of it. (***EDIT*** Another tumblr user with experience in professional media scanning has pointed out that while these scanner models are great and very advanced, they are very expensive and most of that pricetag is related to photographic scanning features that are not useful for anything that isn't photo negatives or digitizing of documents, their suggested model instead is the Epson Perfection V19, because "it's running the same photo scanning firmware as the higher-end models, has the same bit depth and still scans up to 4800 dpi. They run ~$70 brand new, even cheaper if you find them on sale or used.") Ok, I have the scanner, what now? the first and most important thing to consider when you're going to scan your work is: SCAN AT THE HIGHEST POSSIBLE QUALITY THAT YOUR COMPUTER CAN HANDLE, most if not all scanners give you the option to select the dpi (dots per inch) measurements at which you want to scan. the standard for "decent" quality images is 300 dpi, but I personally find that extremely insufficient, yes, it will give you decent-ish images to post on social media, but if you want to do anything else with your images, like making high quality prints, posters, or high quality closeups of your work, those 300 dpi are going to fall really short and become extremely limiting. personally, I scan ALL my work at 1200 dpi, I could go higher than that all the way to 2400 but honestly, I've yet to find a use for an image size that big, at 1200 you already have enough quality to print a house-sized poster with a pretty decent looking final product, so unless you plan on hanging copies of your work to the side of the Empire State building or if you're trying to scan EXTREMELY small pieces, 1200 dpi should be enough, the file sized you're going to get out of 1200 are already almost ridiculous (yes, this image is over 1 GB in size)


Next, to address the elephant in the room: What do I do if my painting is bigger than the flatbed of the scanner? well, you're gonna have to learn to scan in parts like I do! the trick to scanning in parts is that every section you scan needs to cover a little more area than it should so that when you start stitching the individual scans together in your preferred image editing software, you can erase the sections warped by the edges of the scanner bed and cover them over with the extra area scanned in the other images, for example, here's a little chart I made on how I scan a medium sized painting in 4 parts:

make sure to NOT rotate the painting while scanning it, simply slide it across the bed to match your desired section, always with the top, bottom, left, and right pointing always to the same directions, if you start rotating the painting you run the risk of warping the whole scan, or warp it in less predictable ways, and it's gonna be a bit of a nightmare to stitch together. I also recommend to instead of closing the top of the scanner to make it flat against the scanner bed, keep it open and put a few books on top of the painting that are a 1 or 2 cm smaller than the scanner bed, the reason to do this is because closing the scanner cover and letting that flatten the painting, the fit between the top and the bed is so tight that you risk bending and damaging the paper/canvas when scanning, giving it some space at the edges when scanning lets the paper/canvas curl naturally with the material's own flexibility, so the risk of damage is much lower. if your painting is bigger than that, you will essentially follow the exact same process but just divide the painting into more scans, personally I've done up to 9 scans per a single painting on my biggest pieces, any more than that can get a little toooo complicated to stitch together, but not necessarily impossible, especially considering that a lot of image editing softwares nowadays have automated stitching functions, which CAN get over the edge warping on their own, but I've personally found that you'll still get better results if you can eliminate that warping and let the AI work with the best sections of the scans only. PERSONALLY I don't use the automated functions and prefer to do it completely by hand in Photoshop because I'm a neurotic perfectionist and I tend to zoom in into the paintings and notice every little microscopic smudging and bad overlap the AI does between the scans that 99% of people won't notice, but hey, that's just me, absolutely feel free to use the automated functions that the software gives, you don't need to be as extra as me! I think that about covers most of my process there, remember this is a process that might take a little practice so don't give up if your first scans don't look that great or look wonky when stitched together, you have plenty of room to finetune and adjust everything to your liking. If you have any more questions, feel free to ask and I'll try my best to answer. Also if you found this small tutorial useful, maybe drop me a tip or checkout my patreon and store to support me ;) ***edit*** noticed someone added a flashing imagery CW so I modified the gif so that it blinks slowly and it's hopefully less hard on the eyes!
Since we’re coming to the last month of the year, here are the Top 10 Tumblr Controversies This Year
1. Popular blogger who was paid $120 by their followers to eat all the little fish out of their aquarium
2. Misha Collins tries to do an AMA but staff forgot to promote it on the top of the site like usual so he didn’t get any questions
3. Staff accidentally brings back post editing for a total of 5 minutes and John Green is immediately harassed and he is forced to delete all his posts.
4. Popular user starts rumor that baby was born and in dashcon ballpit but it comes out that there actually was a baby born in one of the dashcon bathrooms.
5. Disney claims copyright on 17 different users who had references to baby yoda in their URL and staff deletes all 17 of their blogs.
6. Voice actor of Dobby, Patrick Stewart, is sent massive amounts of anonymous harassment after declairing Dobby “deserved what he got in the end.”
7. Communismkills reveals that she eats her pizza without any sauce or toppings and also later reveals that she has scurvy
8. Sixpencee tries to bring back sixpenceeheals and copy pasted the old post about it but then deleted it 10 mins after posting
9. Popular rat blog dedicated to “letting her rats type the posts” “accidentally” posts a homophobic slur in all caps
10. Old Friends Senior Dog Sanctuary tried to sue the person behind the “I just want to get dicked down again =/“ post but they lose and the blog remains up
Want to learn something new in 2022??
Absolute beginner adult ballet series (fabulous beginning teacher)
40 piano lessons for beginners (some of the best explanations for piano I’ve ever seen)
Excellent basic crochet video series
Basic knitting (probably the best how to knit video out there)
Pre-Free Figure Skate Levels A-D guides and practice activities (each video builds up with exercises to the actual moves!)
How to draw character faces video (very funny, surprisingly instructive?)
Another drawing character faces video
Literally my favorite art pose hack
Tutorial of how to make a whole ass Stardew Valley esque farming game in Gamemaker Studios 2??
Introduction to flying small aircrafts
French/Dutch/Fishtail braiding
Playing the guitar for beginners (well paced and excellent instructor)
Playing the violin for beginners (really good practical tips mixed in)
Color theory in digital art (not of the children’s hospital variety)
Retake classes you hated but now there’s zero stakes:
Calculus 1 (full semester class)
Learn basic statistics (free textbook)
Introduction to college physics (free textbook)
Introduction to accounting (free textbook)
Learn a language:
Ancient Greek
Latin
Spanish
German
Japanese (grammar guide) (for dummies)
French
Russian (pretty good cyrillic guide!)
Hey all, you know how internet searches suck now? When the results are awful, full-of-AI, death-of-the-internet levels of bad?
Start appending date constraints to your searches - "before:2023".
My results have gone from 90% AI bullshit to ~60% usable - which frankly at this point is a huge improvement.
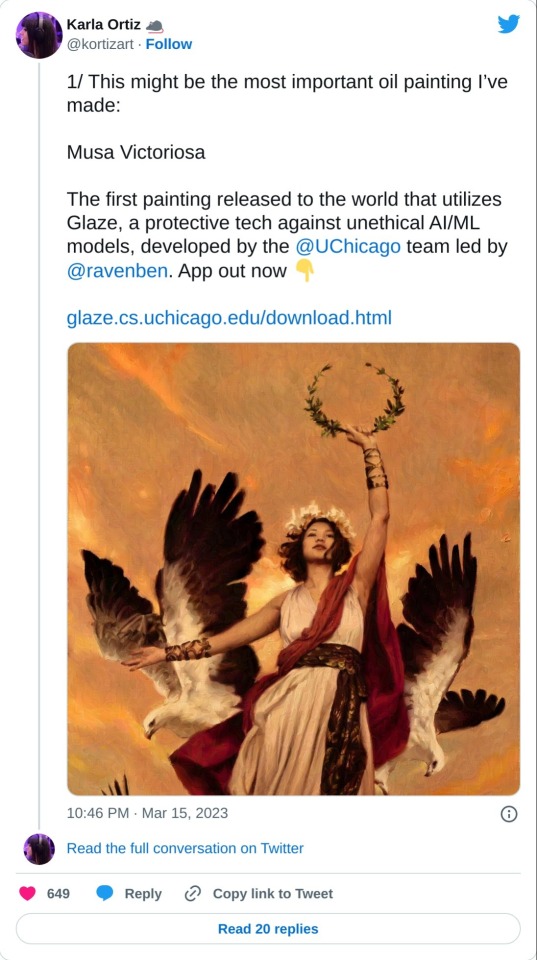
Glaze is out!
Tired of having your artwork used for AI training but find watermarks dismaying and ineffective?
Well check this out! Software that makes your Art look messed up to training AIs and unusable in a data set but nearly unchanged to human eyes.
I just learned about this. It's in Beta. Please read all the information before using.

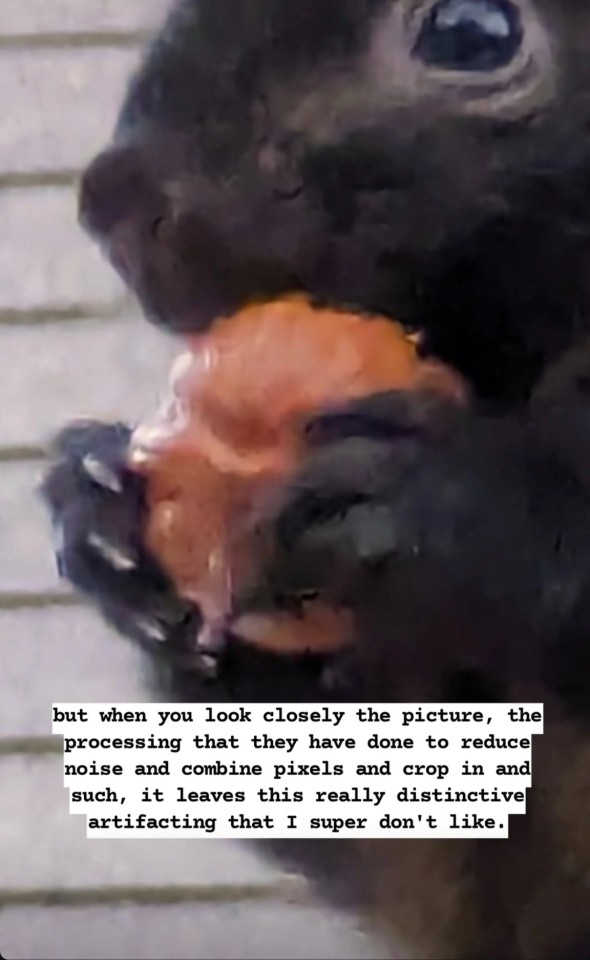
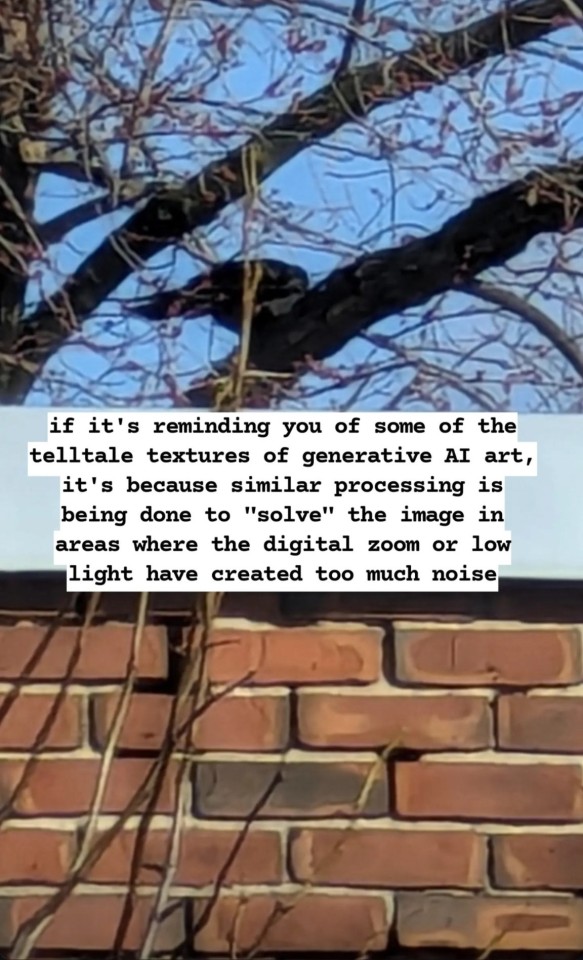
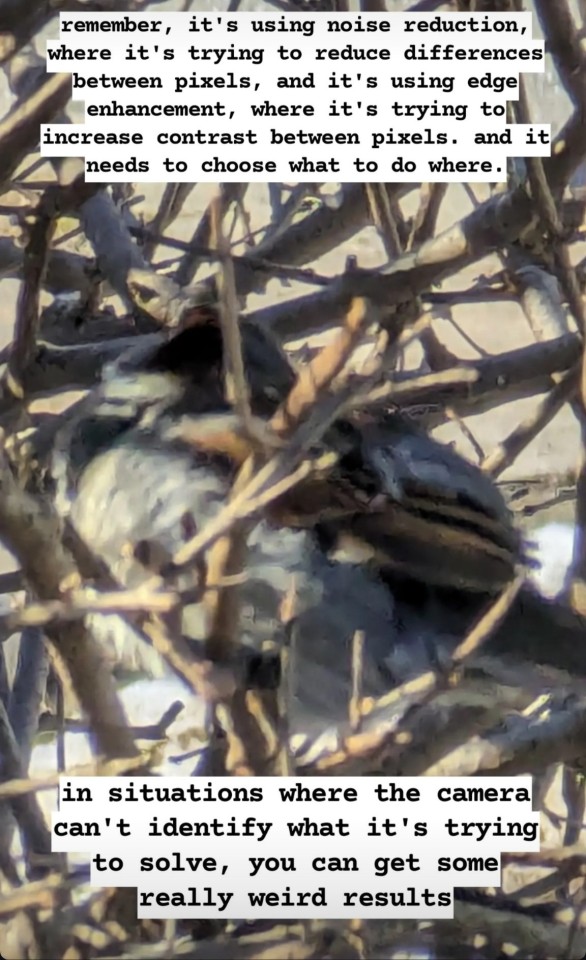
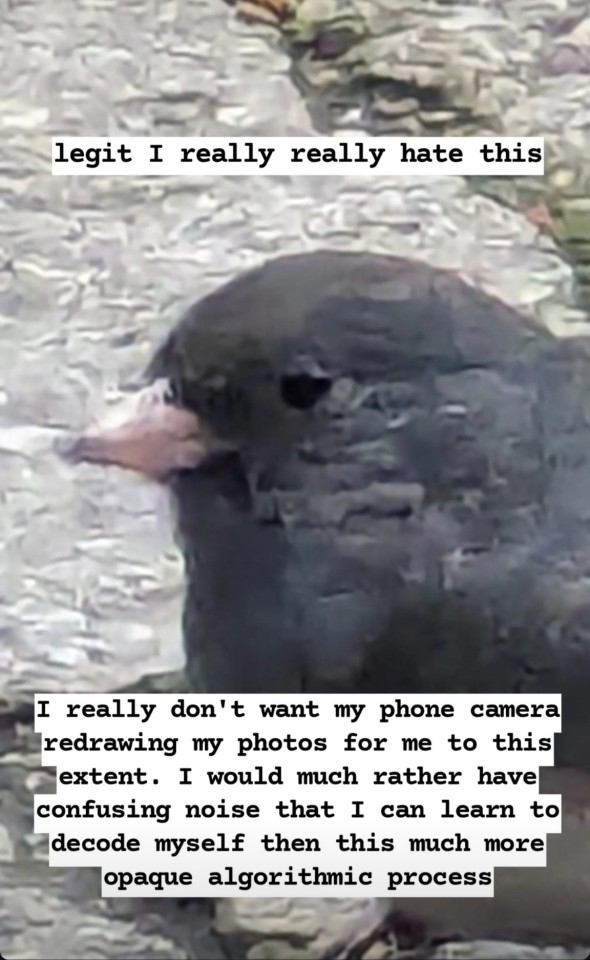
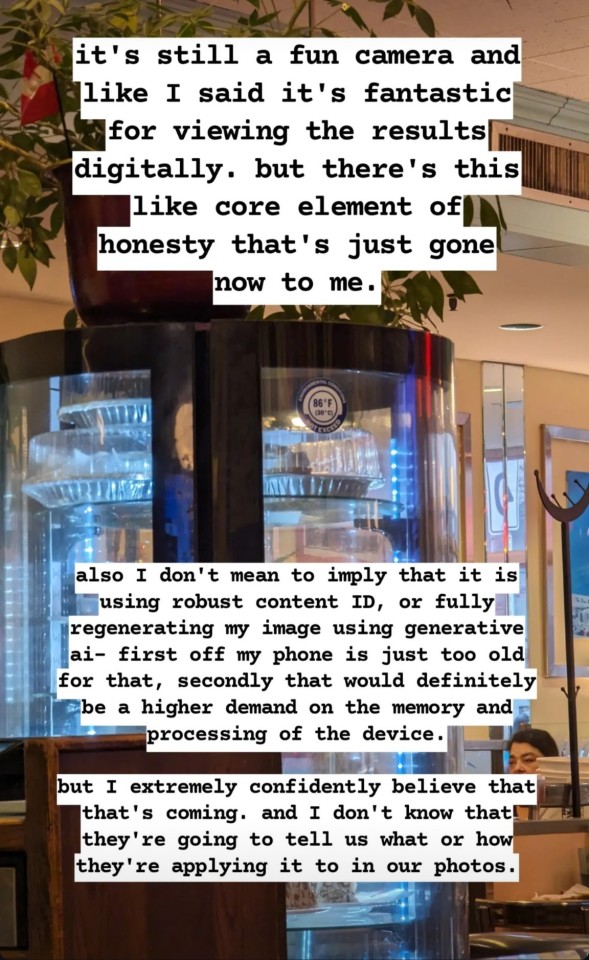
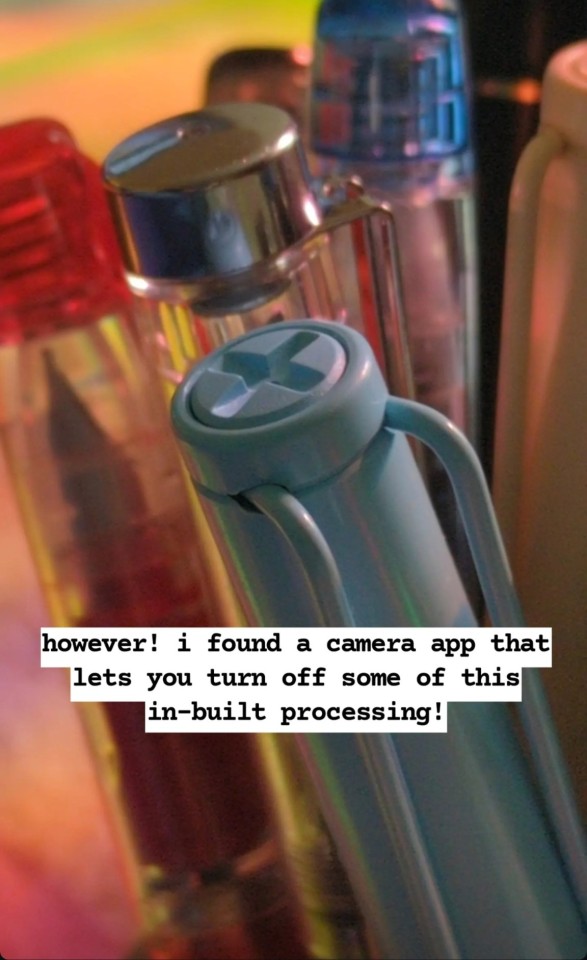
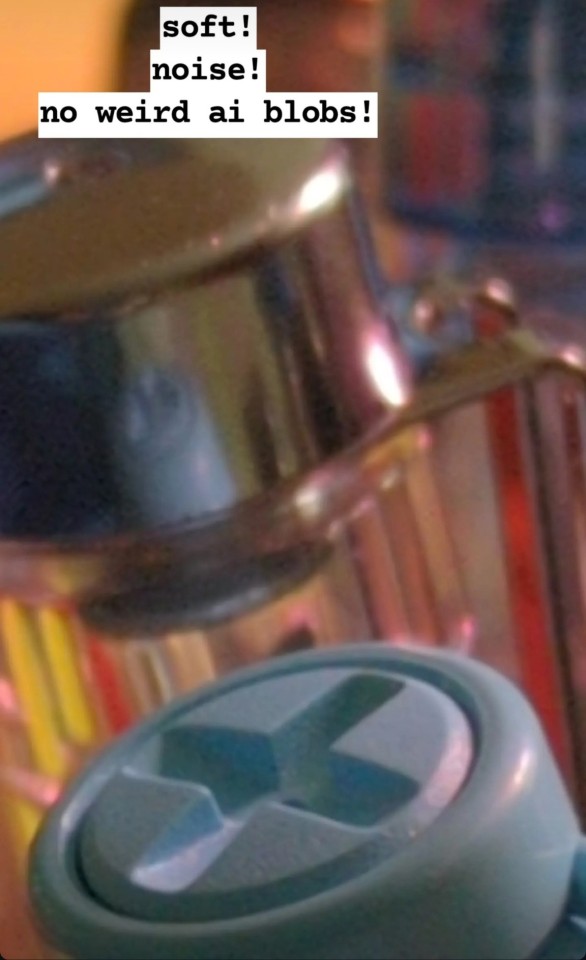
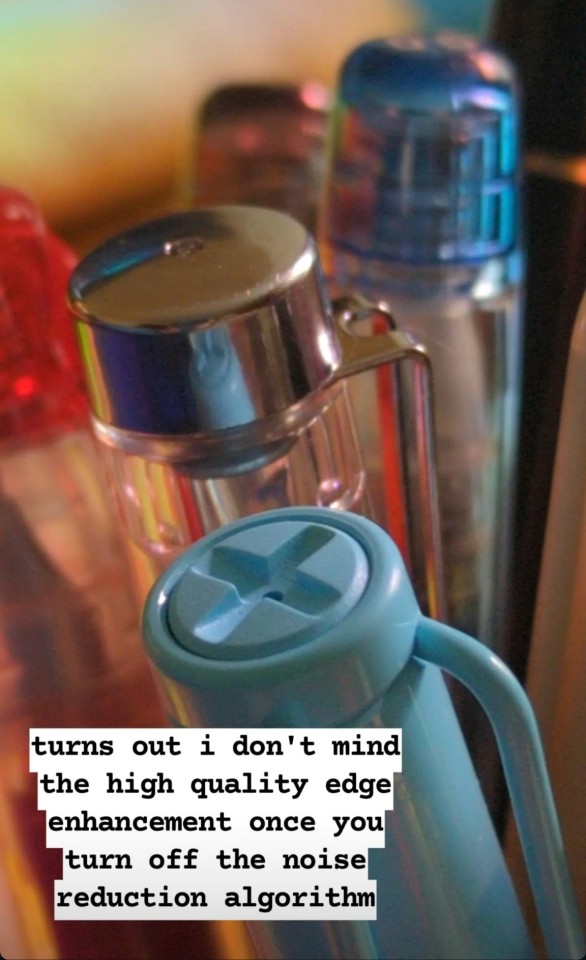
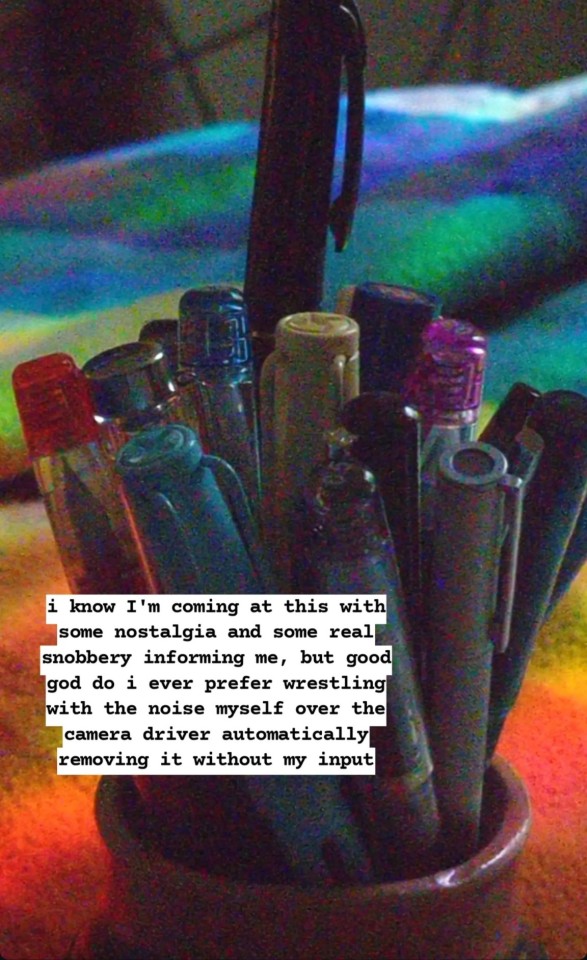
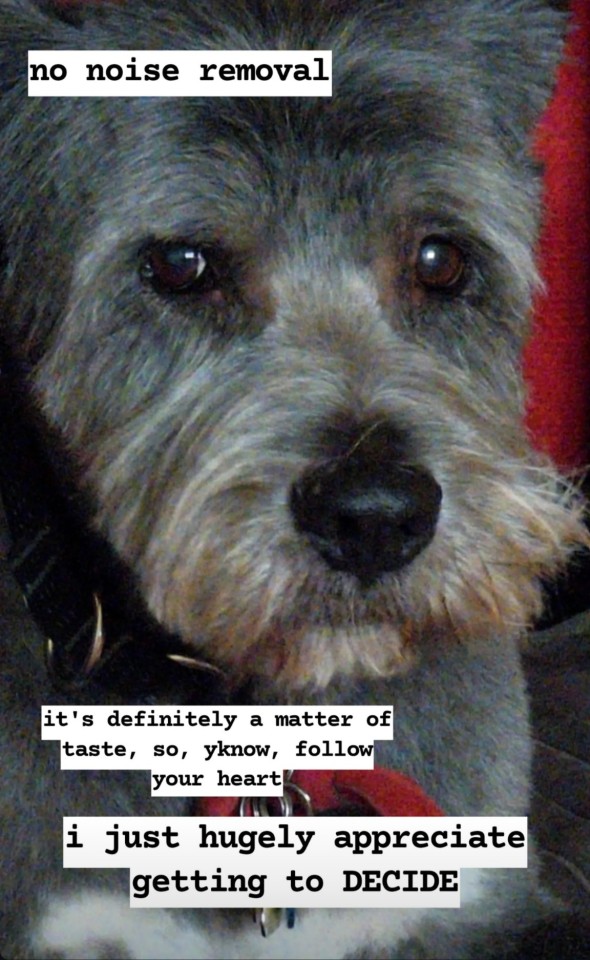
I am mad about cellphone cameras hiding the processing they do, and I am glad about software that lets me control it and opt in and out, and I dictated this rant on insta so I am resharing the images here and will attempt to turn this into a useful text post on my blog in future, when my hand is working better 🤘👍


-
 mulligrubby liked this · 2 weeks ago
 -
 envys-stories liked this · 2 weeks ago
 -
 adageyer liked this · 2 weeks ago
 -
 bwux liked this · 2 weeks ago
 -
 tinnydandelion reblogged this · 2 weeks ago
 -
tinnydandelion liked this · 2 weeks ago
-
 that-one-theater-thing liked this · 2 weeks ago
 -
 moonlightlyn liked this · 2 weeks ago
 -
 cecebeanie liked this · 2 weeks ago
 -
 some-anonymity-preferred liked this · 2 weeks ago
 -
 yourfavoriteconifer reblogged this · 2 weeks ago
 -
 dellafloosh reblogged this · 2 weeks ago
 -
dellafloosh liked this · 2 weeks ago
-
 hang-on-lil-tomato reblogged this · 2 weeks ago
 -
hang-on-lil-tomato liked this · 2 weeks ago
-
 lazerpie101 reblogged this · 2 weeks ago
 -
 vladimirtebastard reblogged this · 2 weeks ago
 -
 clairebear1621 reblogged this · 2 weeks ago
 -
 celestial-fucker reblogged this · 2 weeks ago
 -
 usernamehasexpired liked this · 2 weeks ago
 -
 kalaira liked this · 2 weeks ago
 -
 too-funky liked this · 2 weeks ago
 -
 bookwyrm-art-stuff reblogged this · 2 weeks ago
 -
bookwyrm-art-stuff liked this · 2 weeks ago
-
 kyroosterred reblogged this · 2 weeks ago
 -
 mousemostly reblogged this · 2 weeks ago
 -
 jormy reblogged this · 2 weeks ago
 -
jormy liked this · 2 weeks ago
-
 missmagoo18 reblogged this · 2 weeks ago
 -
missmagoo18 liked this · 2 weeks ago
-
 regretssweater reblogged this · 2 weeks ago
 -
 benewhocamberbutch reblogged this · 2 weeks ago
 -
 taksez reblogged this · 2 weeks ago
 -
taksez liked this · 2 weeks ago
-
 goneahead liked this · 2 weeks ago
 -
 sadbretzel reblogged this · 2 weeks ago
 -
 paranoidintheclub reblogged this · 2 weeks ago
 -
 livinginfictions reblogged this · 2 weeks ago
 -
 vanillamangoes liked this · 2 weeks ago
 -
paranoidintheclub liked this · 2 weeks ago
-
 sdeutsch79 reblogged this · 2 weeks ago
 -
sdeutsch79 liked this · 2 weeks ago
-
 boyglomper liked this · 2 weeks ago
 -
 bettermetalgoat reblogged this · 2 weeks ago
 -
bettermetalgoat liked this · 2 weeks ago
-
 doublebill reblogged this · 2 weeks ago
 -
 owl-librarian reblogged this · 2 weeks ago
 -
 angryfacewritings liked this · 2 weeks ago
