Ska! How Do You Ink Your Traditional Drawings? And. Would You Mind Sharing Some Tips For Traditional?
Ska! How do you ink your traditional drawings? And. Would you mind sharing some tips for traditional?
Yes of course, thank you for asking! ; 7 ; / To start, don’t think you need expensive tools to draw traditionally, even just a $1-$2 ink pen or sharpie can look nice against paper! The tools I usually use for all my ink work is a red color pencil, $2 ball-point ink pen, and a sharpie (occasionally white out)! If you’re like me (someone who has trouble doing a large-scale picture and do better with smaller thumbnails), I would suggest to buy yourself a small canvas sketch journal!

It’s a lil beat up, but this is what I use! It works well with sharpies/ink and feels great to draw on! As for sketching, I find red color pencil sketching looking better than a regular pencil! It feels like guidelines and makes the black ink pop out more! Here’s a comparison with an old doodle!

A great way to make your lines look nicer is extra line weight! I usually give my outlines an extra stroke with the pen to make the lines thicker on the outside, and you might also want to go over your lines twice if your ink is not dark enough! ; 3 ; / I also occasionally use whiteout to fix mistakes or add lil stars/sparkle by dipping a toothpick in it.
The next thing I suggest is using an app called CamScanner! It uses your camera to capture your pictures but defines the lines/colors better and works great if you want to use the lines as lineart when you scan it to color digitally (don’t think you need a tablet to color it! Half of this picture was colored with my tiny trackpad. You can totes do it with time and effort)! Here’s another comparison!

CamScanner on the left, and regular camera on the right! It also changes lighting, crops pictures (I had to crop the right one on sai), changes toning, and even fixes angled shots for you! It works wonderful and I recommend it! The last thing is that please have fun and take your time!
I think that’s about it! Sorry if I went a lil long! Of course, I’m not a professional and obviously there’s probably more benefits with professional tools, but this is my process! Thanks so much for asking! <3
More Posts from Sapphire-53 and Others


Me, a fool: It would be cool if TOTK brought back old Zelda enemies!
Me, later: I take it back I take it back I take it back
Something about the hand shaped enemies in Zelda games give me the absolute heebie-jeebies. I hate them so much. They freak me out man, it’s legit bad for my heart!
So here’s an artistic interpretation of the first time I came across those damnable gloom floormasters in game. It was like every creepy hand enemy merged into one nightmarish abomination come to haunt me. Link almost met the goddesses that day…
See if you can spot all the references!
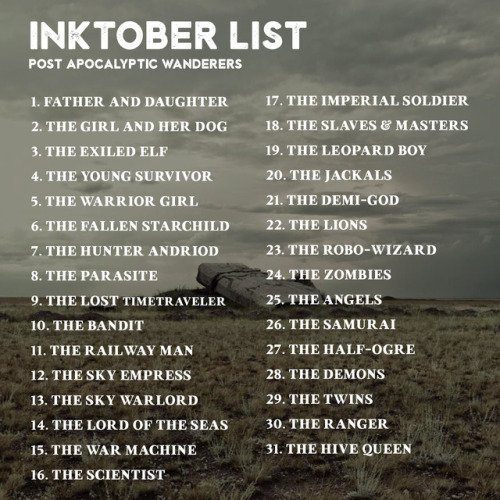
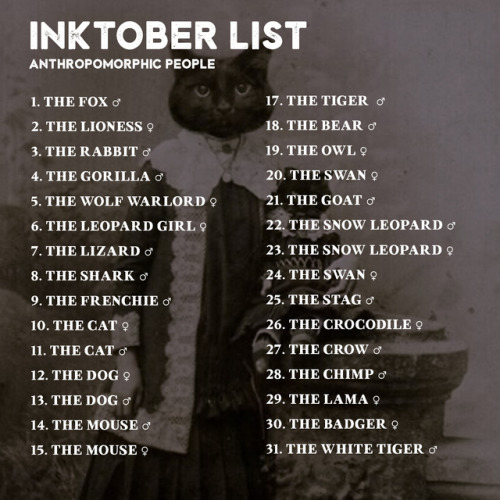
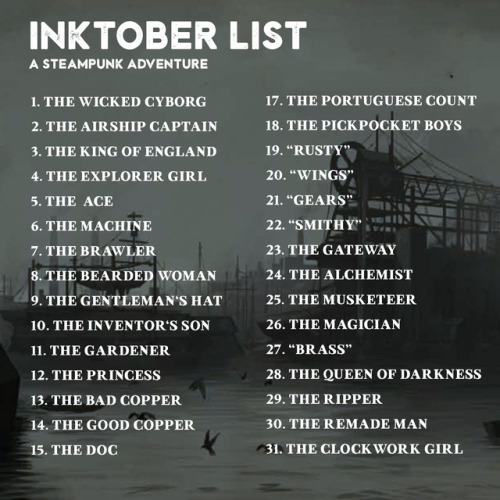
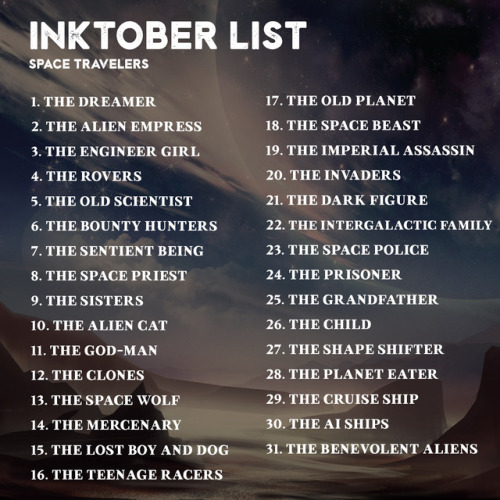

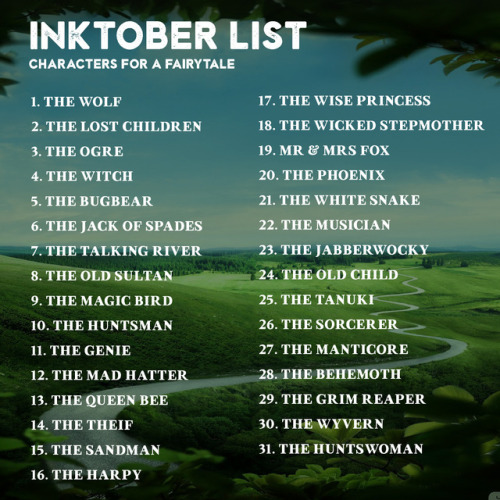
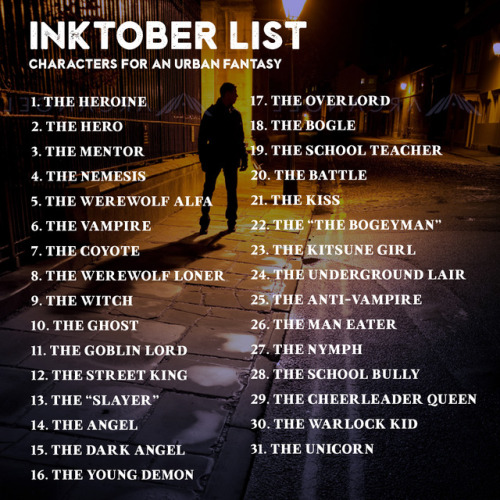
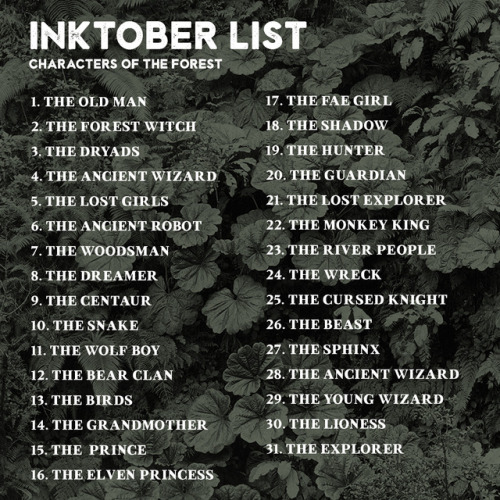
Preparing for Inktober 2017?
I am too! And to get inspired, I have put together 8x Inktober prompt lists, to help us create something really cohesive and cool this October
Prompt lists:
- Post Apocalyptic Wanderers
- Anthropomorphic People
- A Steampunk Adventure
- Space Travellers
- Super People
- Characters for a fairytale
- Characters for an urban fantasy
- Characters of the Forest
Enjoy and share!

My favourite things about Scrivener
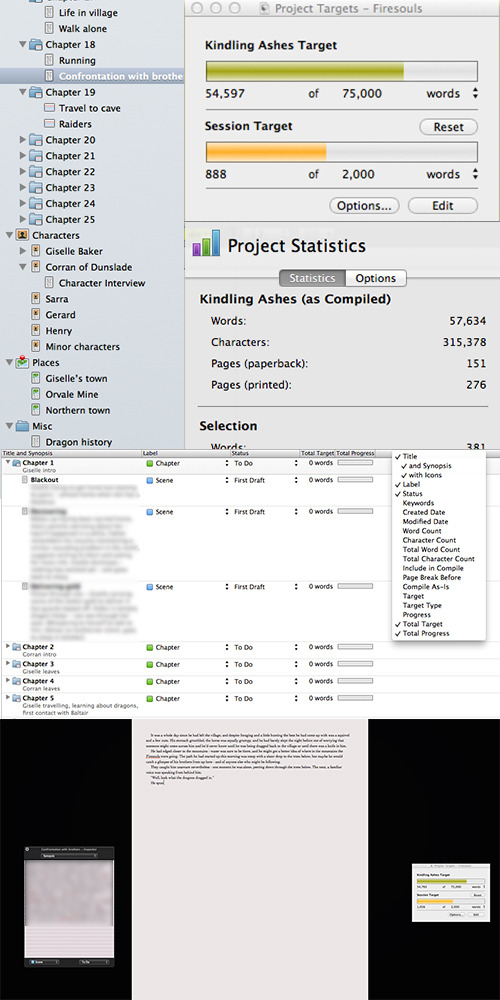
1. Navigation. You can see all your chapters, scenes, character & setting planning at one glance and switch between them very easily - compared to scrolling up and down in one long word processing document. Every file can also be a folder, so you can have collapsible items underneath it.
2. Word count targets. The “Project Targets” are particularly useful for NaNoWriMo so you don’t have to keep looking back at the website to see how you’re doing for the day, but more so outside of it, when you want to keep yourself working to a target but don’t have Nano’s charts and daily word counts. It also gives you a nice ding when you hit your session target.
3. How many pages? I only recently discovered this, but it’s very nice to be able to see in Project Statistics approximately how big your manuscript would be in pages without worrying about formatting.
4. Outlining. Scrivener has two methods of outlining - one is Corkboard, which is exactly what it sounds like, a digital corkboard with notes pinned on it that represent your chapters/scenes with their summaries. The screenshot above is called ‘outliner’ and lists collapsible chapters/scenes with various statistics you can select as shown in the tick menu. Generally I prefer Corkboard, but Outliner is useful if you just want to see everything in a clear order.
5. Full screen. I get distracted very easily when writing, so the full-screen writing mode is wonderful for me to avoid that - but you can still choose certain windows from the normal Scrivener view to show up. I have my targets and my summary, so I can stick to my plan when I’m writing and also see what progress I’m making.
6. Notes. No screenshot, but it’s a simple post-it note style box to the side of every document (chapter, scene, character etc.) that allows you to add notes. This may sound very simple, but it’s far more useful than I’d expected. During NaNoWriMo when I’m not meant to be editing at all, but I know something needs fixing, I will jot down something in the side like ‘Take out the horse’ so that when I go through again to edit I know exactly the things to focus on immediately but which would have taken too much time before. It’s linked to the scene so I don’t just have a pile of notes in one document at the end and then have to work out where it needs fixing.
Overall
I downloaded Scrivener for the first time two years ago, and now I can’t imagine working without it. It’s so nice to have the planning and the writing all combined into one place where I can easily switch between the two. I haven’t yet got as far in a novel created in Scrivener to use the compile features so I can’t comment on those, but so far all my experiences of it have been good.
One thing to note is that if transferring project between a Windows and a Mac version of Scrivener, it’s generally best to zip the file first.
[Screenshots from my current novel Kindling Ashes using the Mac version of Scrivener - some features may not be available in Windows yet.]


Hey friends!
Sorry for the late TUTOR TUESDAY, but here it is! Today is on clothing folds and was a recommendation from @kitemist, thanks! If you have any recommendations you’d like to see send ‘em in here or my personal! Hopefully I can expand on clothes more soon! Keep practicing, have fun, and I’ll see you next week!

After watching spiderman i finally understand this picture of Tom

LONGHENA, Baldassare San Giorgio Monastery: Staircase 1641-43 Photo Isola di San Giorgio Maggiore, Venice
Gen:lock Idea
Just an idea that won't go away until I write it down. Not the best but here it goes.
This is an AU where somehow before Weller could bring is idea to Holcroft and the Polity he got captured by the Union. And everyone being younger as well. When finding his Gen:lock work, the Union found it interesting and made sure to weaponize it.
Since Gen:lock relied on the neurons of a young body the Union made sure to include children in the recruitment list. Which lead him to find everybody (including Leon) easier.
- Chase and team would be the range of 10 to let teen. Not even at their 20's.
Then came the experimenting, this leading to Chase's and Leon's physical problems. But eventually leading up to the children being able to fight (excluding Cammie, she is still too young even by Union standard)
When the Union was planning to finally attack New York, Weller knew he needed to get everybody out of there. The was no doubt that the Union would put even greater pressure to get Gen:lock field ready no matter what happened at the battle in New York. And Weller could no longer see his kids be suffer for progress of what was once his dream turned nightmare.
He was finally able to contact the Polity, and basically held himself hostage when they only wanted to retrieve him alone. But he would never leave his kids.
The day before the Battle of New York, Polity soldiers waited outside of some of the exits of the research facility. Waiting for their objectives to arrive.
Dr. Weller prepares his kids to be separated. The talks to them about the Polity and reassuring that they will meet again, somewhere where it was safe.
The kids are split like so:
- Valentina, Kazu, and Cammie
- Yaz and Chase
- Weller, Leon, and Sinclair
Valentina and Kazu make an excuse to leave the building, while Cammie is screaming and crying about a nightmare, to calm Cammie.
Yaz and Chase sneak out from the sleep guards.
Weller and and the rest just says he needs to check something and bam everyone is out.
It's only when they are running across the field does the Union finally realize their attempt to escape. They give chase only to find three hovercraft getting air and flying away.
That's all I have so far, but my brain wants to finish but I can't and I am not a writer by any means but this just wouldn't get out of my head. But I feel better now.
not doing great?
clean your room
open curtains/windows
take a shower
put on clean clothes
get out of your room a bit
stretch
drink a glass of water
get the hard/important stuff out of the way while you have energy
set some (any!) goals
remember that it is okay to have bad days
my favorite clip studio assets!
since i’ve been using csp a lot more now i thought i’d make a post of the assets i use the most for ppl looking for good stuff!
general brushes: Pen + Caspar Pen (かしペン+カスレかしペン) (my fav pen for sure) Erase Along Edge (YOU NEEED THIS ERASER YOU NEED IT!!!) Freehand Style Brush Set (フリーハンド風ブラシセット) (cant recommend this one highly enough, i use it for all my backgrounds) Bong pen OBONGBONG’S PEN Halftones (スルスル塗れる5線刻みトーンブラシ) A non-shin pen (しんでないペン) SU-Cream Pencil Noisy Ink Brush v2 Simple Retro Halftone Brushes Smeared Paintbrush (べっとり絵筆) A breather pen (一息ペン) Aj’s Pencil Set Watercolor set (수채화 세트) T-marker Wind Brush Set (Tマーカー風ブラシセット) Watercolor marker ▲ ■ and texture set (水彩マーカー●▲■とテクスチャーセット)
special effect and decorative brushes: Tights Pen (タイツペン) Glitch Brushes 2 (彩塵ブラシ(Prism Dust) Hand-painted effect set No. 2 (手描き効果セットNo.2) Oriental Emblem 11-20 (동양 문양 11-20) (this creator has so many amazing assets ive downloaded them all) Ribon brushes (りぼんブラシ) Lace Set レース セット Ornate lace Bramble (rose-玫瑰叢) Loose hand-painted sprinkle brush (ゆるゆる手描きのふりかけブラシ) Bush pen (수풀 펜) Fantasy Papers Pearl Brush (真珠ブラシ)
gradient maps: Gradient map set for hologram (홀로그램용 그라데이션 맵 세트) Yunywave★ Gradient Set cb gradients 3 ONG SET
3D: The Only Perspective Grid You Need! 3d sketch head Movable horse 1.8 A (可動のお馬 1.8a) Sitting poses collection (便利かもしれない座りポーズ集)
misc: Raiku RGB Shift Hand-drawn Rags tool Set (手描きのボロ線ツールセット) VHS action set
-
 hetnicka678 liked this · 6 months ago
 -
 l1ttl3beetl3 liked this · 7 months ago
 -
 moonlighteclipse17 liked this · 1 year ago
 -
 akikonamikaze liked this · 1 year ago
 -
 runawaysoulwispers liked this · 1 year ago
 -
 nymanders liked this · 1 year ago
 -
 nooneimportgaymer liked this · 1 year ago
 -
 shukomx liked this · 1 year ago
 -
 wisteriapetshops reblogged this · 2 years ago
 -
 mariana-souza-soares liked this · 2 years ago
 -
 alestrans liked this · 2 years ago
 -
 sp0rkless liked this · 2 years ago
 -
 mushroomwitch123 liked this · 2 years ago
 -
 sawika56 liked this · 2 years ago
 -
 nendor01d liked this · 3 years ago
 -
 6-1-2-3 liked this · 3 years ago
 -
 fangs-art-blog reblogged this · 3 years ago
 -
 fang107 liked this · 3 years ago
 -
 maximumponyempathroad-blog liked this · 3 years ago
 -
 remuschocolatestash liked this · 3 years ago
 -
 anaguel-bianca-34x liked this · 3 years ago
 -
tsukisima-kei liked this · 3 years ago
-
 autism-man liked this · 3 years ago
 -
 virtualdonkeysportspanda liked this · 3 years ago
 -
 quaveyllc liked this · 3 years ago
 -
 hyperfixationcentralsvoid liked this · 3 years ago
 -
 oilydraws liked this · 3 years ago
 -
sinpvtaidea liked this · 3 years ago
-
 raynebrry liked this · 3 years ago
 -
 suitablysarcasstic998 liked this · 3 years ago
 -
 fififantasy liked this · 3 years ago
 -
 love-alyonka liked this · 3 years ago
 -
biskaroy liked this · 3 years ago
-
 betweenbooksandmoths liked this · 3 years ago
 -
azunelily83 liked this · 3 years ago
-
 stardemonzw liked this · 3 years ago
 -
 ghost-owl liked this · 3 years ago
 -
 ptalex liked this · 4 years ago
 -
 just-another-weeb12 liked this · 4 years ago
 -
 taylor-sweet2526 liked this · 4 years ago
 -
 isokale liked this · 4 years ago
 -
 unepetiteyaoisteworld liked this · 4 years ago
 -
 donttrustvuvu liked this · 4 years ago
 -
 craftydragongardenshark-blog liked this · 4 years ago
 -
 spookybluebirdballoon liked this · 4 years ago
 -
 tiredandlazyasfuck liked this · 4 years ago
 -
 coffeeangel06 liked this · 4 years ago
 -
 meroreo8 liked this · 4 years ago
 -
 spiderbop liked this · 4 years ago