I Made A Fish Man.
I made a fish man.


Well, partially. I had a Monster High body that was missing limbs and frankinsteined him some replacements. Plus a few extra fins and a tail. He can't really stand on his fin leg (though I did make the fin articulated), so I made him a simple crutch. I've been watching art doll videos recently (of the stuffed and wire-articulated variety) and got inspired.
I still need to paint some details to make everything more cohesive and repaint the head. All the translucent additions glow in the dark, so I really want that to come through in his eyes. To cover his head to neck transition, I'll probably use some painted fabric.
The fin for his left leg is somewhere, I just forgot to attach it before I took the pictures.
More Posts from Quantumjames and Others


xD by La Tarte au Citron on Flickr.


Welp, time to actually learn dutch and return to the motherland.

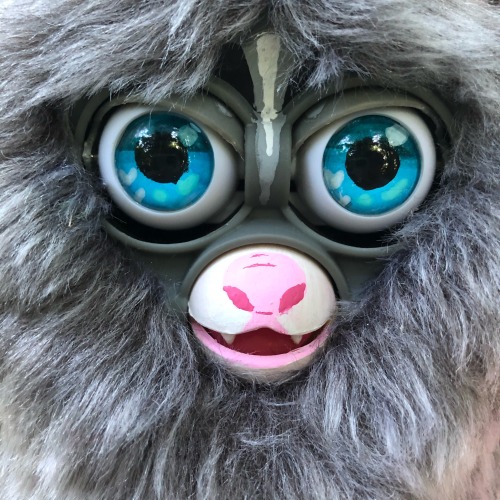
FURBY HAIR DYEING TUTORIAL
FURBY FUR DYEING TUTORIAL:
Hi everyone! Welcome to my Furby Tutorial! In this specific tutorial we will be dyeing the hair on the Furby’s head and tail (this can also work for maned Furbys). EDIT: THIS TUTORIAL ALSO WORKS ON BODY FUR!!!! Please read the entire tutorial before dyeing your Furby with this method! Thank you!
BACKGROUND KNOWLEDGE THAT CAN HELP YOU: Furbys have synthetic fur. Synthetic = PLASTIC. As you all know, most commercial dyes won’t work on a Furby very well. That is why we are going to use ACRYLIC PAINT to color our Furby! Keep reading!(also plz be aware that Nomi’s hair was dyed prior to this tutorial)

MATERIALS YOU WILL NEED: 1.) A glass of water 2.) A small vessel to mix your paint wash in 3.) Acrylic paint color of your choice (we are using metallic green for Nomi) 4.) A paintbrush (any medium sized flat or round brush will do) 5.) A toothbrush (CLEAN, preferably a clean used toothbrush) 6.) A Furby (thank you Nomi, for being our model and willing participant!) 7.) Paper towels (not pictured but you will need them.) 8.) Hair Dryer (optional but it can be very helpful; also not pictured)

Step One: Wash your hands! This is a great way to start a new art project!

Step Two: Create your wash/“dye”: this part looks daunting but is actually QUITE easy! We are going to make what’s called a “paint wash”- some of you artists may already be familiar with what this is! It’s basically thinned-out paint. What you do is put a tiny bit of paint into your empty vessel (I used about the size of a dime) and add water to it until it becomes a mixture that I slightly more WATER than paint. For me, that was about a dime-sized paint blob with about 3-4 tablespoons of water. You want it to be RUNNY, not thick.


Step Three: Once you have made your wash, it’s time to get that “dye” on your Furb! Take your toothbrush and dampen it with the wash. Tap your wash-soaked toothbrush out on a paper towel to remove excess wash. This step is important because you want your toothbrush WET with paint but not SOAKING wet. It’s best to start out first with a tiny dab of wash to play around with and then work your way up to a more saturated toothbrush.


Step Four: comb your wash through your Furby’s hair. It’s best to have your Furby ready to receive the wash, which means you should part the hair you wish to dye AWAY from the fur you do not wish to dye, so that there is minimal pigment transfer to the fur you do not wish to dye. (Tl;dr-part ya Furby’s hair, y’all)

NOTE: See this hair clumping here? I did this on purpose to show what can happen when you have TOO MUCH wash on your toothbrush. You don’t want this because it can take longer to dry and give your Furby’s hair a matted look. (I mean, if you like this look by all means, go for it! It’s your Furby, my dudes!) If this happens and you don’t like it, just blot with a paper towel, tap off your toothbrush a bit, and continue combing the wash through the hair again!


Step Five: YOUR ROOTS ARE SHOWING?!

This is any easy way to cover roots! Just take your paintbrush and load it with a TINY bit of wash, then dab the wash into the hair roots and continue to comb through with the toothbrush! Ta-daaah!


NOTE: Keep a paper towel nearby cause YOUR HANDS GONNA GET PAINT ON ‘EM.

Step Six: Continue adding the wash into the hair and combing it through until you like what you see!

Step Seven (optional): Use a hair dryer to dry your Furby’s hair!

This is for peeps who don’t want to wait for the hair to fully dry before they handle their newly-dyed Furb! I also believe that this can help seal the pigment in better, as it’s actually melting the pigment of the paint into the shaft of the synthetic hairs. If you don’t want to use this method, simply put your Furby in a place where they will be undisturbed until they are dry! (Please allow at least ONE HOUR for your Furby to air-dry if you don’t use a hair dryer). While you dry, continue to brush the hair with the toothbrush to get rid of any remaining clumps!
FINAL STEP: admire your work! Well done!!

I hope this helps you guys! You can also use washes to dye eyelashes!!! I’ll be making a tutorial on how I do mine next! Thank you for your time!


Brie my possum furby 💛
A lot of his process was very collaborative over on my Instagram @raptorfurby! His tail is fully posable and is strong enough to hold him from!

Some how some of my post got cut off, so… If a follower wins the prize money goes up to 150.
Ends the day after Camp Nanowrimom (May 1st).
-
 agirlwithbracesonherbrain liked this · 1 year ago
 -
 lovelypaperdoll liked this · 1 year ago
 -
 teary-eyed-teeth liked this · 2 years ago
 -
 u-friend-or-ufo liked this · 2 years ago
 -
 lumberjerk liked this · 2 years ago
 -
 itsjellybone liked this · 2 years ago
 -
 rnaiz reblogged this · 2 years ago
 -
rnaiz liked this · 2 years ago
-
 boobiesbreaker liked this · 2 years ago
 -
 vaguely-smart liked this · 2 years ago
 -
 kaitlyngilmore6 liked this · 2 years ago
 -
 robynlionhart liked this · 2 years ago
 -
 nobelinstupidity liked this · 2 years ago
 -
 disastrousnonsense reblogged this · 2 years ago
 -
 cat-using-laptop reblogged this · 2 years ago
 -
cat-using-laptop liked this · 2 years ago
-
 rojo-ojo liked this · 2 years ago
 -
 twerkyvulture reblogged this · 2 years ago
 -
 gtaor liked this · 2 years ago
 -
 horticulture-dreamland liked this · 2 years ago
 -
 thatshitswack reblogged this · 2 years ago
 -
thatshitswack liked this · 2 years ago
-
 splen-dens liked this · 2 years ago
 -
 ratswithguns liked this · 2 years ago
 -
 ohuhspaggetti liked this · 2 years ago
 -
 peanutbutterbananaslice liked this · 2 years ago
 -
 gaugedgauntlet liked this · 3 years ago
 -
 familiarterror reblogged this · 3 years ago
 -
 platypus-pie liked this · 3 years ago
 -
 ughiwokeup liked this · 3 years ago
 -
 minikinmission reblogged this · 3 years ago
 -
 amym30 liked this · 3 years ago
 -
 lovinglapislazuli liked this · 3 years ago
 -
 otherclawdeen liked this · 3 years ago
 -
 bubble-tea-rex reblogged this · 3 years ago
 -
bubble-tea-rex liked this · 3 years ago
-
 goodnightwindy liked this · 3 years ago
 -
 punkdraculaura reblogged this · 3 years ago
 -
 carola4u reblogged this · 3 years ago
 -
 swordbird7 liked this · 3 years ago
 -
 slutshrapnel liked this · 3 years ago
 -
 fishwithlegz liked this · 3 years ago