I'm Not A Prayin' Man, But The Night I Found Out My At-the-time-fiancé Had Been Sending Sex Horny Nasty
I'm not a prayin' man, but the night I found out my at-the-time-fiancé had been sending sex horny nasty horny sex asks to my friend on THIS VERY WEBSITE, I sat in the car in the parking lot of an abandoned church and watched a family of deer play in the snow, and it didn't quite feel like a sign because that part of Pennsylvania was mostly deer and abandoned buildings and snow, but it felt nice, and once the tears stopped, I looked down at my phone and my other friend had sent me a text that said, "HE'S TRYING TO CHEAT ON YOU ON THE ONE DIRECTION IMAGINES WEBSITE?" and I realized that life is all about your curated experience. A real choose-your-own-adventure deal. I have never seen someone post about One Direction on here in my life.
More Posts from Itz-offline and Others
Look I know the toxicity and the tension is like the main appeal of Burned Bridges and it’s utterly delicious but
Have you considered. An alternative. That exists in my head.
Them representing the part of themselves that they actively suppresses to each other. One suppresses his emotions behind a mask of a lack of emotion(Smitten(overwhelming emotion) to Cold), while the other suppresses the part of himself that feels alone and empty, covering it up with all of the other emotions that he intensely feels(Cold(the emptiness and yearning) to Smitten). Masks of overwhelming positive emotion and no emotion to hide the depths of their emotions. Their vulnerability. They are each other’s tormentors.
Cold pushing Smitten’s buttons at first out of his own amusement. Smitten retorts back at Cold every time he provokes him and dislikes the realisation of how easy it is for Cold to push his buttons. And then. Emotional torment. Them showing the depths of their hearts to each other. Whether by complete accident or an action made by Smitten that had unraveled them both. Their vulnerability and the parts of themselves were shown to each other. Cold hits a realisation. Smitten sits in stunned shock. They realise there is more to the other than they originally thought.
Smitten being Smitten denies it at first. He denies how similar they are to each other and retorts with uncertain anger in a vain attempt to cover up the parts of his heart that he tries so desperately to hide. But how can he deny it anymore? When now the question swims within his head on the possibility that he may be wrong, and now everything that he has done within the construct is coming back at him at full force? When what he’s done in HEA and him being the reason why his beloved and the Decider are unhappy? Is he a good person? He must be a good person! He is passionate and full of emotion! But is he really? The heart yearns for companionship, and yet he cannot get it through the Princess anymore. She is gone.
Cold acknowledges their similarities. And yet he remains unchanged. Outwardly at least. His heart has been shown to Smitten. The depths of his buried emotion and passion, the feelings of betrayal from the Narrator. They find their way back bubbling onto the surface. His heart rages a storm. He continues to deny the emotions within the dam that he kept locked up. Another drop in a glass that is already spilling.
Their existence forces each other to look into themselves. Their existence forces each other to start their journey to grow and to face the parts of themselves that they try so desperately to suppress and hide. A seed of doubt planted into their hearts, and it will only grow further. And one day, they will be a devotion no longer blind, and a longing satisfied. It will be a long and difficult journey, but with guidance, one day they will be able to look at each other in acceptance and learn to love the parts they feared and despised.
How do you draw the head but at different angles? (Ex. Somebody looking up, looking down and ect) any tips for that? Because when you draw it, it looks so natural :0

USE REFERENCES. USE REFERENCES USE REFERENCES‼️‼️ These drawings are only possible because I was consistently looking back at these photos!


its literally as simple as searching “Frog jumping” or “pelican mouth” to find what you need. You don’t need to know the anatomical reasoning behind everything at first, you learn it along the way with REFERENCES. Bonus speed paint below, if you wondered how I build up the faces a bit more
How to show emotions
Part VII
How to show pride
standing tall
expanded posture, opening of the torso
lifted chin, head held high
big and confident smile
looking around to see if people recognize and admire what they are proud of
How to show enthusiasm
big smile and laughter
wide radiant eyes
raised eyebrows
jumping up and down or bouncing
clapping hands
big hand gestures
loud and high pitched voice
speaking quickly
How to show anxiety
not holding/breaking eye contact
fidgeting
heavy breathing
twitching in their face
often a blank stare or looking away
rigid posture
sweaty palms
bouncing their knees
rubbing palms against each other or clothing
How to show playfulness
laughing
giggling
grinning
using a playful tone
making a silly face
touching the other person teasingly
e.g. tickling, nudging, bumping into them
How to show being offended
stiffening up
hard line around the lips
frozen stare
narrowing of the eyes
Part I + Part II + Part III + Part IV + Part V + Part VI
If you like my blog and want to support me, you can buy me a coffee or become a member! And check out my Instagram! 🥰


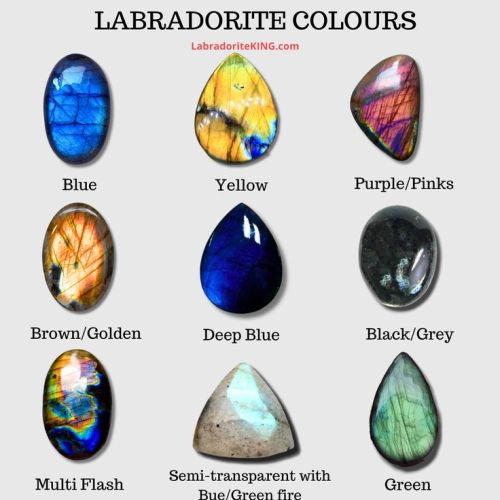
By LabradoriteKing on Pinterest


✨Offline with glasses✨
(yes his name is Offline... and yes a horrible name really...)
You know what’s some crazy $hit?
This fabulous bitch
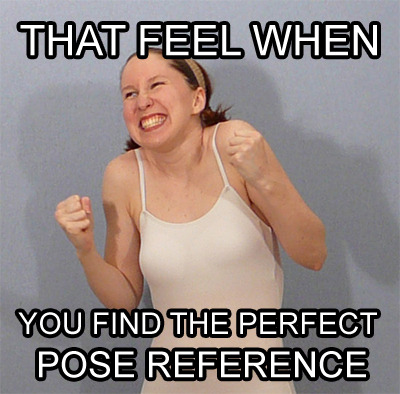
She makes a shit ton of poses (like 16,000 or some crazy nonsense). I used this lovely lady to draw so much as a teen. Whether it was some nerdy pose for my Mary Sue as fuck OCs

or for full on fight sequences

or for tragic deaths of my OCs in the arms of a totally OOC main protagonist.

this bitch hooked me up.
And with the wildest, craziest stuff that you could see in your head but had no way or resources to reasonably draw like

or this

or this

DUDE! INASNE SHIT!! So I was using her for a pose reference and decided, you know what, I owe this bitch some cash. Lemme dole it out for her. BUT then, I looked and saw she only has 286 fucking patrons!! This chick gives out free shit and spends countless hours arranging these shoots and setting this stuff up.
I’ll fork up the cash, SenshiStock. You’re worth it.
Check out this amazing woman’s stuff, and get knowledged: https://www.deviantart.com/senshistock
Book binding 101: Materials
I’ve decided to do a series of posts on how to book-bind since I talk about it a lot, and I think it’s a really fun process. These posts will include various inexpensive alternatives to “professional” supplies, many of which you will have at home. Not everyone can afford a cricut and that’s ok! I will also be listing more expensive materials for people who want to invest a bit more into the craft, but they absolutely are not a must.
This first post will focus on a list of supplies you can use to make books, but will not yet get into the instructional part of it. That will come later!
Anyway…
Bookbinding Materials: Essentials
These are items you need to bind, but many you can find around your house!
Sewing thread: Any thread will work for bookbinding, though waxed threads can help reduce tangles. You can also double up thread as another way to prevent tangling if you so choose. Waxed thread is definitely more expensive, so it can be good to use what you have starting out. Here’s a link to the waxed thread I used for those that are interested. You can buy it in a lot of different colors! (White is good if want an “invisible” thread).
Sewing needle: A lot of people say to use a curved needle for binding, but I’ve never found it to be much different from using a regular needle. If you have one, I would recommend a larger needle, however, since it’s better for piercing through signatures (aka the stacks of pages you bind together). In other words: there’s no special needle you need to bind books.
Ruler: I’d recommend any metal ruler since it’s better to use as a straight edge for cutting. There’s a good chance you already have one. It’s just used for measuring and being a straight edge. Nothing fancy.
Paper: Any paper will work. What you wanna use depends on your project really: if you’re binding together a work of text you’ll want to use some kind of printer paper (of course). If you’re making a sketchbook, you can fold up some sketching paper. I like to get sketchbooks with perforated edges so I can tear them out easily if I want to use a blank page for bookbinding. You can also buy large sheets of paper made for any medium. For example, if you want a sheet of water color paper, just search “large watercolor paper sheet”.
Awl (or all alternative): An awl is a tool used to poke sewing holes. It’s nice because it’s sharp and ergonomic, but you can totally also use a pushpin or even a sewing needle.
Bone folder (or a bone folder alternative): A bone folder creates sharp creases when you fold your pages, making them lay flatter. It also helps define the hinge gap on finished books, making it open easier. You can use a ruler if you don’t have one.
PVA glue: PVA glue is what to look out for when it comes to binding glue. There are some designed specifically for bookbinding, which spread out a bit faster than ones that aren’t. You can also use tacky glue which IS a PVA glue.
Book board: Also sometimes called chip board, Davey board, or mat board. This is what you’ll use for hard cover books. It is important to use book board specially, as cardboard will warp. You can buy book board directly, or you can cut the covers off of old textbooks or binders, unwrap the paper/plastic around the board, and use that!
Box cutter or utility knife: for cutting the board
Decorative paper and book cloth: For wrapping around cover boards and for endpapers. Book cloth can also be used to cover boards. You can also draw your own designs on Bristol paper if you want (or any paper with a similar thickness/durability). When it comes to decorative paper I like to either get scrapbook paper or rolls of fancy handmade paper (you can get those on Etsy, through paper source, or through bookbinding websites).
Bookbinding materials: Optional (and not crazy expensive)
These are supplies that you don’t need for binding but that can make the process easier and/or help with the decorative elements of your books. I’d recommend these things for when you’ve been binding for a while and feel these things could be helpful!
Paper trimmer: can cut a few sheets of paper evenly—I find it really helpful for endpapers
Stencils: Super helpful if you want to add text on the covers
Stamps: Good for adding text and also great for adding illustrations if you’re not able to draw them on your own. You can buy ink pads for them or use markers by coloring over the stamp lightly and using the stamp immediately so it doesn’t dry (I’ve tested this with alcohol markers and it works very well)
Paint markers: great for drawing directly on the cover. Since they’re opaque they can imitate the look of vinyl. You can also get them super painterly if you want. The internet usually talks about poscas but there are tons of different brands. Do some research, figure out what you like & can afford.
Hot foil pen & heat transfer foil: Perfect if you want to add foil to your covers but don’t want to spend a ton of money on a cricut. A lot of binders uses the foil quill brand, but there are ones that cost less and work the same (I have both a cheaper one & an actual foil quill because I wanted some nib variation. As long as the pen has good reviews that aren’t from bots you should be good). Also remember: don’t use foil designed for going through laminators (I.e. decofoil) . It doesn’t work the same way.
Bookbinding Materials—Expensive
These are materials I’d recommend for people who have been bookbinding for a while & feel that it’s something they really want to invest in. To be fully transparent, I’m a college student and don’t own these and have little personal experience with them. However, I know a lot of binders who love them!
Cricut machine—Cricuts are cutting machines that can make precise cuts into paper, wood, bookboard, or vinyl. A lot of binders will cut designs out of vinyl and apply them to the covers using a heat press.
Book press—What it sounds like. The pressure helps the pages lay flat and stay even. That being said you can stack heavy books on top of your projects, it just may not have the same even pressure. I also know some people will DIY these, so if you’re skilled with power tools you can give it a go!
Paper guillotine—like a paper trimmer but bigger and can cut more sheets of paper at once. I believe really good ones can also be used to cut bookboard!
Those are all the materials I can think of! Hope this can work as a good starting point for those interested in the craft. I’ll definitely be posting more info about bookbinding for people who are interested :)
-Zoë💗

Fish & Gill


A couple of gouache paintings of my clown girlies
-
 babybat98 liked this · 1 week ago
 -
 twyella reblogged this · 1 week ago
 -
 tiredghost777 reblogged this · 1 week ago
 -
 flanneltaire liked this · 4 weeks ago
 -
 telecastertelepathy reblogged this · 1 month ago
 -
 bearthecaptain reblogged this · 1 month ago
 -
 quantumqstar liked this · 1 month ago
 -
 enochianghost reblogged this · 1 month ago
 -
 spout1nk liked this · 1 month ago
 -
 statuesarecooliguess reblogged this · 1 month ago
 -
statuesarecooliguess liked this · 1 month ago
-
 jolinarofmalkshur reblogged this · 1 month ago
 -
 socialfilter liked this · 1 month ago
 -
 kirby97 liked this · 1 month ago
 -
 cultiest liked this · 1 month ago
 -
 fat-fem-and-asian reblogged this · 1 month ago
 -
 spacemooshroom reblogged this · 1 month ago
 -
 katrinahood reblogged this · 1 month ago
 -
 galpalactic liked this · 2 months ago
 -
telecastertelepathy reblogged this · 2 months ago
-
telecastertelepathy liked this · 2 months ago
-
 fiction-central reblogged this · 2 months ago
 -
 solwantstobeindaroomwhrithappens liked this · 2 months ago
 -
 axlauhua reblogged this · 2 months ago
 -
axlauhua liked this · 2 months ago
-
 acorul reblogged this · 2 months ago
 -
 thegaysdescendatmidnight reblogged this · 2 months ago
 -
 thornaes liked this · 2 months ago
 -
 so-brave-about-my-tummy-aches reblogged this · 2 months ago
 -
 the-midnight-kai reblogged this · 2 months ago
 -
the-midnight-kai liked this · 2 months ago
-
 sourlemonblue liked this · 2 months ago
 -
 turnstosilverglass reblogged this · 2 months ago
 -
 formaldehydefaggot reblogged this · 2 months ago
 -
formaldehydefaggot liked this · 2 months ago
-
 menkhubones reblogged this · 2 months ago
 -
menkhubones liked this · 2 months ago
-
 quanxisgirlfriend reblogged this · 2 months ago
 -
 through-the-untempered-schism reblogged this · 2 months ago
 -
 livaja reblogged this · 2 months ago
 -
 rinielle liked this · 2 months ago
 -
 dreamsmthgold reblogged this · 2 months ago
 -
dreamsmthgold liked this · 2 months ago
-
 jumbleddufus reblogged this · 2 months ago
 -
 stripedsilverfeline reblogged this · 2 months ago
 -
stripedsilverfeline liked this · 2 months ago
-
 chitterandchatter reblogged this · 2 months ago
