Please Do Not Let Debt Collectors Play In Your Face.
Please do not let debt collectors play in your face.
More Posts from Imeanmaybesomeday and Others

Too many writers are using generative 'AI' to make their book covers, so I've written a guide on how to make your own cover for free or cheap without turning to a machine.
If you can't afford to pay an artist, you CAN make your own!
I hope this is a helpful overview that covers the basics and points to some free resources.

Tiny kitty that can be made with 2 pipe cleaners. If you care. If you even care.
Visible Mending
Introduction:
Visible mending is a decorative way to fix up an item. Instead of trying to make your mend as invisible as possible, the idea is to make it part of the garment's design.
Visual mending is not a single technique: it's more of a mindset. If you've got an item you love, it deserves to be mended, and if you're going to put that love into stitches, why not show them off?
That being said, there are some specific techniques that are popular with visible menders. Let's take a look!
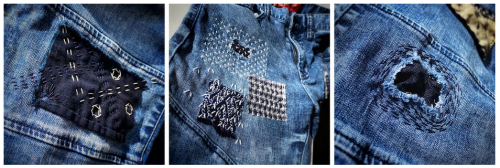
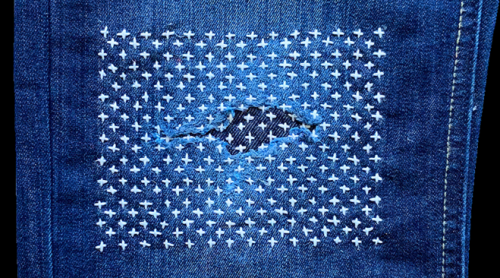
Sashiko:
Sashiko is a type of traditional Japanese embroidery that is used to both decorate and reinforce fabric. In visible mending, sashiko is often used to cover up holes with patches or to reinforce thinning fabric. This technique uses a variation on the running stitch.
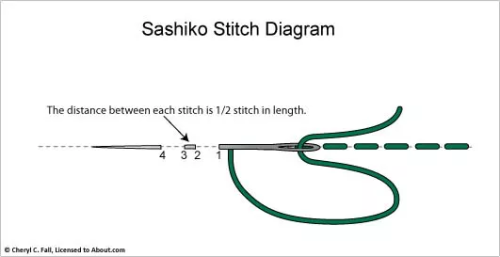
(Image source)
Some resources on sashiko:
SashiCo on YouTube: sashiko livestreams and information on the cultural aspect of sashiko.
Written tutorial by Upcycle Stitches.
Free sashiko templates by TheSpruceCrafts.
Fixing jeans with sashiko by Soluna Collective.
(Image source)
(Image source)
Embroidery:
Regular embroidery is also a popular technique to accentuate your mends. Check out my embroidery 101 post to learn how to get started. You can embroider patches, or use embroidery to hide or accentuate any stitches you've made to fix holes. Embroidery's also a great way to cover up stains.
(Image source)
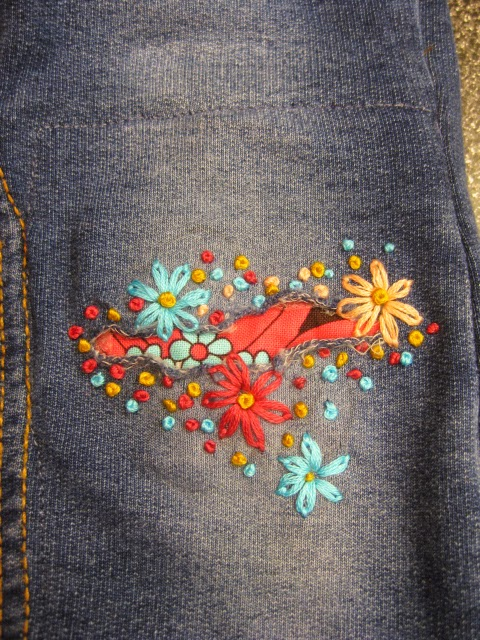
(Image source)
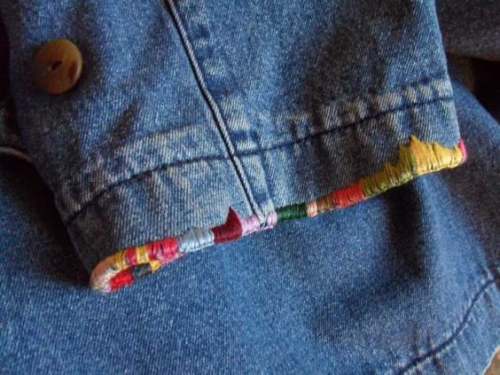
Patches:
There are many ways to add patches to a garment. My tutorial on patches is a good place to start if you want to make custom-shaped patches to sew on top of your fabric. You can also sew your patch on the inside of your garment and have it peek out from beneath the hole you're trying to fix. Fun ideas for this are lace or superheroes.
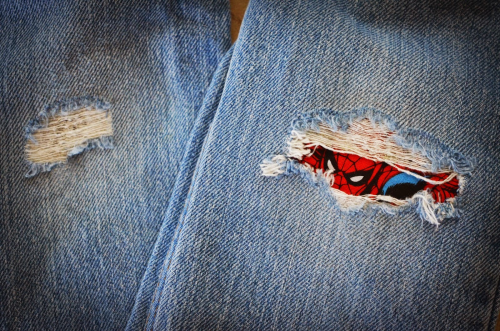
(Image source)

(Source)
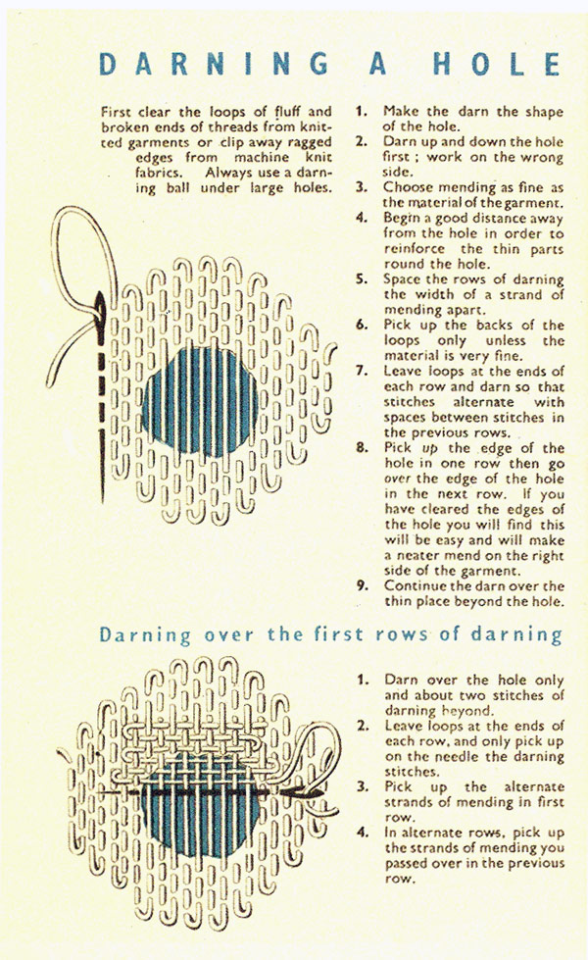
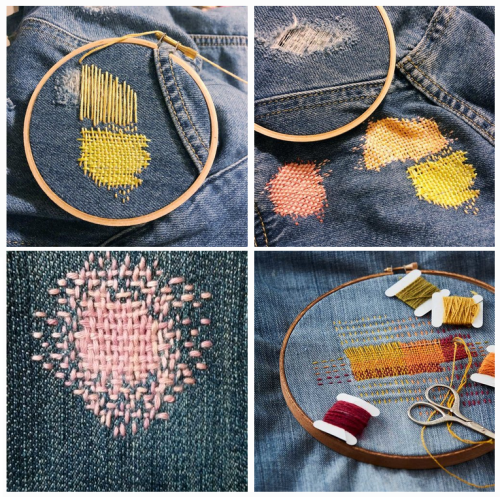
Darning:
Darning is a technique used to repair holes in fabric by using running stitches to weave extra fabric over the hole as to fill it up again. While traditionally darning is done in an invisible way by using the same colour of thread as your fabric, you can also use contrasting colours to accentuate your fix. Check out this written tutorial on darning by TheSpruceCrafts.
(Image source)
(Image source)
Conclusion:
Visible mending is a creative way to fix up your clothes and give them some personality at the same time.
You should be proud of the fact that you took the time and learned the necessary skills needed to mend your clothes! Show off what you did!
A fun side effect of wearing these obvious mends is that people will notice them. They'll remember your fixes the next time they're faced with a hole in their wardrobe, and it will make them more likely to try it for themselves.
These are just a few ways to visibly mend your garments. Want more inspiration? Check out Pinterest or r/Visiblemending on Reddit.

im sure someone already made a post about it but i came across a ublock origin add-on that blacklists around 950 AI websites and disables AI overview ☝️ so u can be free from seeing AI in your search
lol I am in such a stressed-out blind rage today from insurance bullshit that I wrote up a glossary of health insurance terms (things like deductibles, premiums, and copays) because all the free guides online are unnecessarily complicated and the only way you can squeeze a dime out of these bullshit companies is to understand their overly-complicated policies. give em hell
One of the best ways to make an edible is to take weed you don’t care about (really old, lots of sticks, etc) and make weed butter. Bear in mind that with this method your whole house will smell like weed.
I like to use the full fat plugra or Kerrygold but you can use any type of butter you want. Melt the butter in a pot with about 4 cups of water, keep it around 145 degrees. While you’re doing that, toast your weed in the oven on a sheet pan at a verrrry low temperature (145 degrees is what you’re aiming for) for about 15 minutes.
Once the butter is melted and your weed has been lightly baked, wrap your weed in some cheese cloth and make a lil bundle and steep it in the pot like a tea. Leave it for 3hrs. The THC gets absorbed by the fat in the butter. After that, pull the pot off of heat, squeeze out your weed bundle of as much liquid as possible, and put the pot in the fridge for about 4 hours, overnight if possible. The butter will separate to the top of the water, and then you can pull it off, dab it dry with a paper towel. Voila, now you have weed butter that will taste like ass but you can put it in cookies, brownies, cakes, etc. I made a coffee cake outta mine that had some of the most hardened stoners I know one their backs for like a whole day.
Happy baking 💖💖
omggg thankyou


This is part four in my series about making my first book, You Are a Sacred Place, and also about making literally anything at all.
Read parts 1–3
Order You Are a Sacred Place
-
 corruptedremnant reblogged this · 2 weeks ago
 -
 eternalparadisearchive reblogged this · 2 weeks ago
 -
 twinklingberrysoup liked this · 3 weeks ago
 -
 thehappiestmistake reblogged this · 3 weeks ago
 -
 battymoonflower7 reblogged this · 3 weeks ago
 -
 weegeeboard reblogged this · 3 weeks ago
 -
 jimmiesvesey liked this · 3 weeks ago
 -
 ongoldenwings reblogged this · 3 weeks ago
 -
 bambina-daydreamer reblogged this · 3 weeks ago
 -
 be-0kay reblogged this · 1 month ago
 -
 iwritingsblog reblogged this · 1 month ago
 -
 elmjack reblogged this · 1 month ago
 -
elmjack liked this · 1 month ago
-
 seaslugsanon reblogged this · 1 month ago
 -
seaslugsanon liked this · 1 month ago
-
 incineratedtoothpickgamer reblogged this · 1 month ago
 -
incineratedtoothpickgamer liked this · 1 month ago
-
 cloudbatcave reblogged this · 1 month ago
 -
 azucarino reblogged this · 1 month ago
 -
 iris-in-the-dark-world reblogged this · 1 month ago
 -
 petrichorsinestra reblogged this · 1 month ago
 -
 biolumin-escent reblogged this · 1 month ago
 -
 alexanderlightweight liked this · 1 month ago
 -
 redlightsandicedtea reblogged this · 1 month ago
 -
 breadsgalore liked this · 1 month ago
 -
 lesgay-loser reblogged this · 1 month ago
 -
lesgay-loser liked this · 1 month ago
-
battymoonflower7 reblogged this · 1 month ago
-
 postmoderngloryhole liked this · 1 month ago
 -
 phantasieandmirare reblogged this · 1 month ago
 -
 bugsupport liked this · 1 month ago
 -
 the-messengerrr reblogged this · 1 month ago
 -
 skelimes liked this · 1 month ago
 -
 anyatomy liked this · 1 month ago
 -
 tricksterize liked this · 1 month ago
 -
 entguarde reblogged this · 1 month ago
 -
 lilehhlilyy liked this · 1 month ago
 -
 ilovethenintendods liked this · 1 month ago
 -
 martyslittleusedblog reblogged this · 1 month ago
 -
martyslittleusedblog liked this · 1 month ago
-
 snorkeldog reblogged this · 1 month ago
 -
 reddeadwrites reblogged this · 1 month ago
 -
 swirlspill reblogged this · 2 months ago
 -
 benreyfaggot reblogged this · 2 months ago
 -
benreyfaggot liked this · 2 months ago
-
 lukadjo reblogged this · 2 months ago
 -
 portalcartoon liked this · 2 months ago
 -
 ash-angelic reblogged this · 2 months ago