HEYY My 2nd color Tips Pdf Is Now Available ! ^o^ Hope You Enjoy!


HEYY my 2nd color tips pdf is now available ! ^o^ hope you enjoy!
BUY HERE or HERE
More Posts from Arttuti and Others


Wrist in Motion Top Image Row 2: Left, Right Row 3: Left, Middle, Right Row 4: Disney’s Beast, Source Unknown Bottom Row: Left, Middle, Right (Source Unknown)
I absolutely adore your art style I was wondering if you could explain how you draw faces and like heads cause I have a lot of difficulty with constructing the face without having it look like an utter disaster sorry if your busy you don't have to do this but I was just wondering if you could help a young artist out thanks :D
Aww, thanks, anon. I’m pretty haphazard with things, but I’ll try to help.
This is your new best friend!!

The friendly neighborhood scribbly circle here is your foundation for drawing heads from any angle.

Like, any angle.

Because even when viewed in perspective, the head still has the same amount of volume.
As for actually constructing a face and placement of features, you can see that when jotting down a face, I generally lay down those guidelines [here in green] so I have something to work off of when I’m expanding upon a sketch. I would mostly recommend being aware of the underlying structure of the face.

If you’re going for super-anatomically-correct, you can see that facial features line up in specific, symmetrical ways. For real though, nobody’s symmetrical and sometimes noses are long or ears are small and faces are asymmetrical or just plain different. So this is a foundation but not a cast iron rule.
I will say that the more you do it, the easier it will become! It all just takes practice. And I totally tried to screen record a sketch, but my computer is being hella slow and it keeps freezing up, so I give up. In lieu of something new, here’s an older process gif that I think shows things pretty well:

YUP. Hope this helps. o/
Hey! I love your art style and was wondering if you had any tips for drawing braids? Any techniques you found useful?
Hello! And thank you very much!
There may be easier ways of building braids than what I do, but this is just my process for drawing them, so take it with a grain of salt.
I’ll start with a line for whatever direction I want the braid to go in, if I don’t do a line and I have any kind of motion to the hair, boy do I mess it up lol

Next I’ll do wide half triangles, the line being my center, the right side or the left side always dropped lower than the other. If both sides meet in the center at the same level it’s not going to look very braid-like or have the illusion of being tangled with itself.

Afterwards you can remove the middle line if you want to take it further and connect each one with an alternating pattern like this one, giving it more of a braided look in the center.

Once the center is solid, you can add all the details you want in any style you like, curving inwards towards the center. I tend to like the more stained glass-ish appearance for hair so I’ll do very choppy, squared off lines to detail.


This works for whatever position you want to put the braid into using the wide triangles to build it up. It works for tightly woven or loose and messy braids depending on how wide/long you make the original half triangles.


I hope this helps!

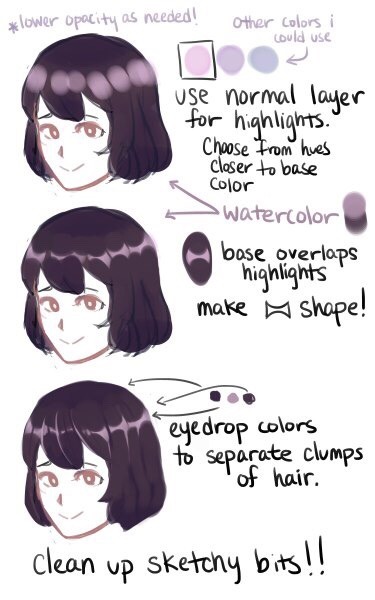


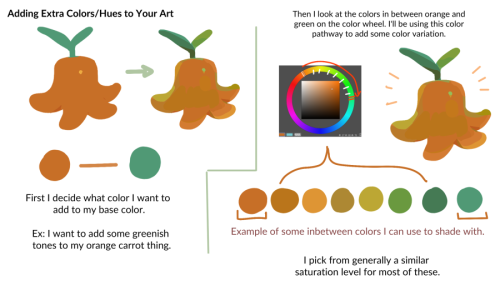
So here is that tutorial thingy i promised.
All of it is pretty basic stuff, no secret ingredients in there, still, i hope the way it’s put together is somehow comprehensible.


I'm so excited to announce Loish's Digital Art School! I've been working on this for a long time and I'm so glad I can finally share it with you all. This is for those of you who are looking for brushes, tutorials, and other super helpful learning content!
Loish's Digital Art School is a collection of resources for digital artists that includes video tutorials, brushes, palettes, challenges, and more. Most importantly, it’s free! I know how important it is to have access to helpful information, especially if you’re self-taught. To get access, just head on over to Loish.School ❤️


-
 malakaistar liked this · 1 week ago
 -
 jmrdesign reblogged this · 2 weeks ago
 -
 bloosrefblog reblogged this · 2 weeks ago
 -
 yukow reblogged this · 2 weeks ago
 -
 brainfog-and-books liked this · 2 weeks ago
 -
 juniebuggs liked this · 2 weeks ago
 -
 0some-person0 liked this · 2 weeks ago
 -
 teammadolora reblogged this · 3 weeks ago
 -
teammadolora liked this · 3 weeks ago
-
 acidicleafbat liked this · 3 weeks ago
 -
 widegrinbigchin liked this · 3 weeks ago
 -
 triflelayer liked this · 3 weeks ago
 -
 yourlocalotaku666 liked this · 4 weeks ago
 -
 sourcestorage reblogged this · 1 month ago
 -
 softypyro reblogged this · 1 month ago
 -
 nemolyaka liked this · 1 month ago
 -
 xkeres liked this · 1 month ago
 -
 falsaratoira liked this · 1 month ago
 -
 whatshehassaid liked this · 1 month ago
 -
 juunana-sai liked this · 1 month ago
 -
 nagirart liked this · 1 month ago
 -
 nettlefrog liked this · 1 month ago
 -
 whistle01 liked this · 1 month ago
 -
 freakfordsy liked this · 1 month ago
 -
 mylowmilo reblogged this · 1 month ago
 -
mylowmilo liked this · 1 month ago
-
 agua-fresh reblogged this · 1 month ago
 -
 hornedglory reblogged this · 1 month ago
 -
hornedglory liked this · 1 month ago
-
 veradune liked this · 1 month ago
 -
 gforceworks reblogged this · 1 month ago
 -
gforceworks liked this · 1 month ago
-
 ladyofthecreeddraws reblogged this · 1 month ago
 -
 cool-cat-nat liked this · 1 month ago
 -
 neptunestoast liked this · 1 month ago
 -
 zcyan135 liked this · 1 month ago
 -
 mistress-of-malevolence reblogged this · 1 month ago
 -
 nochnye-vedmy liked this · 1 month ago
 -
 raccoon-zilla reblogged this · 2 months ago
 -
 weeklink liked this · 2 months ago
 -
 m-mugs reblogged this · 2 months ago
 -
m-mugs liked this · 2 months ago
-
 mayonakanoparadise liked this · 2 months ago
 -
 deadmeeant liked this · 2 months ago
 -
 fucking-brains-out liked this · 2 months ago
 -
 kel1-33 liked this · 2 months ago
 -
 velvaur liked this · 2 months ago
 -
 doodlebot liked this · 2 months ago
