Well I Just Got Here And All But I'd Sort Of Like A Tutorial On How You Do Shading And Highlights? Yours
well I just got here and all but I'd sort of like a tutorial on how you do shading and highlights? yours is really good, and I can't really shade or anything, so if you could explain how you do that, that might be cool? no pressure of course!
It’s been forever but I did this ajshaj
Quick notes:- I use Paint Tool SAI 2- some of the tools and layer names are in Russian but it all should still be understandable I hope
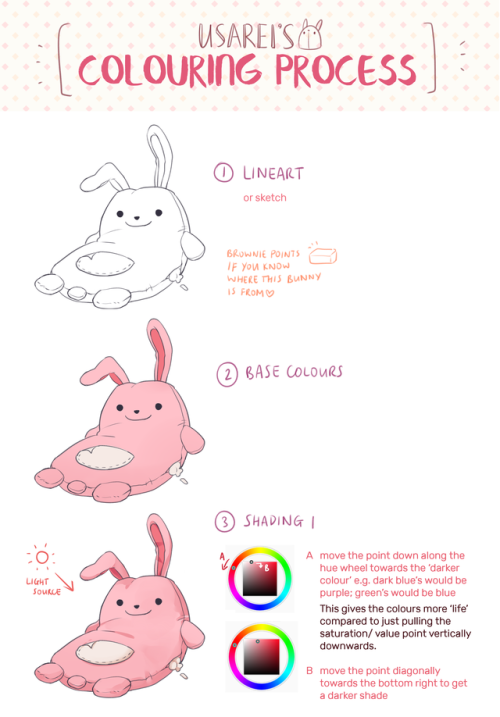
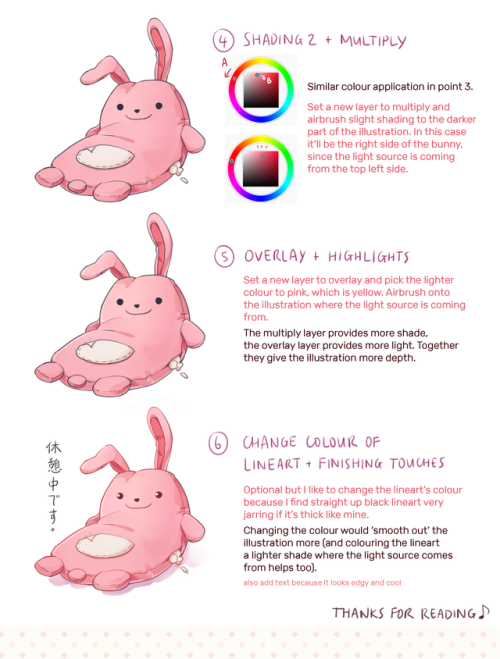
So here’s a tutorial on I do my simple coloring
There’s not much to it but maybe this can help someone


More Posts from Arttuti and Others

after eight years, I finally updated my huge Historical Fashion Reference & Resources Doc! Now in the form of a MUCH more easily updated Google Doc with better organization, refreshed links, and five more pages of books and online resources.
I know tumblr hates links, but it’s worth it for a doc that I can now update with far more regularity going forward! RIP to the original, you did your duty for far longer than you should have. 😔🙏🏼


THANK YOU! ANON!
I stopped the coloring of the shirt here cause I guess you get the basic idea. If you wanna see more of the coloring and the brush I use you can look HERE! Also you can see how not just folds but shading can define a form HERE!
I hope this helps! I’m so bad with words and explaining things (/)//(/)
Could you give a tutorial on how you do hair? I just looooovvvveeee the way you did rhetts hair & beard
Hey! Thank you so much. I’m not a good teacher, but I’ll give it a shot :)
Step 1: DO NOT TRY TO DRAW EACH HAIR! Draw each bunch of hair but NEVER each hair.
Step 2: Draw a faint outline of the entire portrait using the reference photo:

Step 3: Pick one bunch of hair, and make loose, dark strokes to draw the roots of the hair. Make similar strokes at the other end of the bunch. (Remember, you’re not drawing each strand. You’re essentially drawing shadows). Don’t let them meet. This is important to render the shine in the hair. Let the pencil lift off the paper as you move towards the middle from both ends.

Step 4: Use a paper stump to smudge out the roots and the outer edge of the hair. Make loose strokes, starting from the darkest end towards the centre of the bunch. Let a few strokes run all the way through the centre to make it look like a natural shine. Then use a dark pencil to re-do smaller strokes on both ends of the bunch, to increase the contrast.

Step 5: Treat each bunch separately, and repeat till you cover the full head. To finish off, erase a few highlights from the middle of the bunches, to give a consistent shine, and smudge out the hairline for a more natural shadowed look.

I hope that was useful! Let me know if you want me to give a step by step for the rest of his face too :) - I would be completing this portrait anyway!


Need a bigger serving of practice? Check out the 19-paged worksheet and .psd practice file!
The difference between a beginner’s comic and an experienced artist’s comic comes down to the details, and one of the biggest “invisible” details is proportion.
How does an artist utilize page and panel layout, negative space, word balloons and composition to their best advantage? This Shingworks tutorial covers all of this information, and the 19-page supplement worksheet and comic proportion analysis template .psd takes it a step further and teaches you how to analyze real comics so that you can apply these principles to your own comics :]
My Patreon tutorials are unlocked to the public 6 months after their original publication month. You can find the full high-resolution archive of monthly tutorials at my Patreon! Thanks again to my Patrons for supporting me in the creation of my own comics, The Meek and Mare Internum.
My recent free-to-read tutorials on Tumblr:
Worldbuilding!
Understanding Patreon & Building A Patreon
Grow Your Brand
Acting for Comics
Researching for Comics
Writing for Webcomics
Coloring with Masks
This month’s Patreon tutorial: Webcomics 101
And as usual, thanks very much for not deleting my text~~


In ain’t one to draw a perspective grid and then place figures in it; it’s never worked for me. So here’s my method!
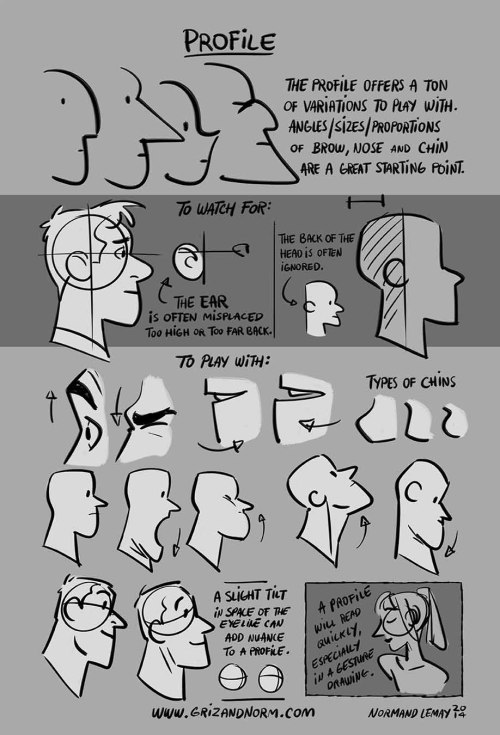
Tuesday Tips - The Face Profile Something I use all the time when I storyboard. The profile is simple, direct, and conveys a lot of information about a character. A great deal of facial features are easier to define in a profile, such as the nose and mouth shapes. Use it to your advantage! It’s really useful when thumbnailing or doing gesture drawing. -Norm

Hi! Idk if my qn got sent before (tumblr mobile yeesh) I wanted to say i really really love your blog and art style! I was wondering if you have tips to draw Dean's and Cas's hair??
REALLY LATE REPLY BUT UM Dean’s got a hair parting on either side but his hair kinda all comes out from a spot on the back of his head. Keep the sides short but flip up the hair in the front

And here’s Cas again! Recapping: part on one side and have the hair come out from the parting and flip up in front as well. He’s got a longer fringe than Dean’s

-
 nezjazz reblogged this · 3 months ago
 -
 coriander-bat liked this · 5 months ago
 -
 sadlyserendipityxo reblogged this · 6 months ago
 -
sadlyserendipityxo liked this · 6 months ago
-
 kira-quartz liked this · 9 months ago
 -
 multidimensionalfang1rl liked this · 1 year ago
 -
 haruka-the-dragon liked this · 1 year ago
 -
 ye-old-references reblogged this · 1 year ago
 -
 grimaussiewitch liked this · 1 year ago
 -
 zachandkaylarph liked this · 1 year ago
 -
 nackrosor liked this · 1 year ago
 -
 snakeposts liked this · 1 year ago
 -
 chainsawcann0n liked this · 1 year ago
 -
 kafbatood liked this · 1 year ago
 -
 lialoopin liked this · 1 year ago
 -
 hatterinev liked this · 2 years ago
 -
 aperturebug liked this · 2 years ago
 -
 down-the-white-rabbit-hole reblogged this · 2 years ago
 -
 ghost-zon3 liked this · 2 years ago
 -
 mikeisgreat2017 liked this · 2 years ago
 -
 strawberrybards liked this · 2 years ago
 -
 hinataluvr4ever liked this · 2 years ago
 -
 the-fancy-cookie liked this · 2 years ago
 -
 feedtheartists2 reblogged this · 2 years ago
 -
 purplehoodie09 liked this · 2 years ago
 -
omgladykens reblogged this · 2 years ago
-
 3dotinarow liked this · 2 years ago
 -
 seeningreen liked this · 2 years ago
 -
 void-study-room liked this · 3 years ago
 -
 amillowsstuff liked this · 3 years ago
 -
 art-refs478457 reblogged this · 3 years ago
 -
 decaffeinatedfirehydrantturkey liked this · 3 years ago
 -
 art-tip-tapdance reblogged this · 3 years ago
 -
 doramas1999 liked this · 3 years ago
 -
 shineycomet liked this · 3 years ago
 -
 lucky3gskittyzine liked this · 3 years ago
 -
 vanillamidnight-us reblogged this · 3 years ago
 -
 cannibalreferencesiguess reblogged this · 3 years ago
 -
 vipitis liked this · 3 years ago
 -
 josiebeale liked this · 3 years ago
 -
thelostinthestars liked this · 3 years ago
