MY FROND Asked Me How I Draw Shoes And Then I Got Really Into It And Drew A Whole Bunch Of SHOES HAHAH


MY FROND asked me how i draw shoes and then i got really into it and drew a whole bunch of SHOES HAHAH I hope this helps someone
DON”T worry about getting the shape perfect at first bc you can always edit it later!! ALso this is just my really quick way of drawing shoes IT PROBABLY ISN”T EVEN RIGHT SOMETIMES LIEs down
More Posts from Arttuti and Others


How to do “extra” facial expressions!
Drawing basic facial expressions is not the hardest. Most people can draw a sad face, a happy face, angry etc., but making more multidimensional expressions is more of a challenge. I have gotten a lot of compliments on how I draw facial expressions, (specifically “angsty ones”) telling me that they are very dramatic and well… expressive! And there are actually only a few things I think about when I draw faces that take them to the next level, so I thought i’d illustrate them all here!
SUPER IMPORTANT TIP BEFORE WE START: Look at your own face when you draw faces. Even making the face when you are drawing (you don’t even have to look at it), will give you some sense of how the face muscles pull and where things fold and stretch, because you can feel it. You are the best reference when it comes to facial expressions!
Angles
Draw the head in an angle that matches the expressions you want to make. It is not a requirement, but is going to add to the effect.

Symmetry vs asymmetry
A face is rarely symmetric. Unless the face the character is making is 100 % relaxed or even dissociating, the eyebrows, mouth and facial muscles will have different placements of their respective side. This image shows the dramatic impact asymmetry has on a face:

That’s the difference between a smile and a smirk!

The first one’s like “oh yeah?” and the second is like “oH YEAH??”
The “balloon squishing principle”
This is something I did subconsciously, and I didn’t know about until I made this tutorial. And this principle goes hand in hand with an asymmetric face. Basically, if you squish one part of the face, you need to even out the empty space by “inflating” the other part of the face so that it doesn’t appear shrunken. The picture hopefully explains it:

Teeth
Don’t forget to add the gum when the mouth is open to its full potential!

Squinting and folding
Adding folds around the eyes when a character is squinting makes a HUGE difference. It makes a smile more genuine and a growl more intimidating. Adding folds to the face in general makes your characters more lifelike and ‘visually relatable’. Like, they look human, and less plastic or fake.


and so on..
Pupils and irises
The placement of the iris and pupil in relation to the eyelids is very important! The less of the white you see, the more relaxed the character is.

And then of course eyebrows and eyes go hand in hand!


Gestures, spitting, sweating…
Adding more elements than just a face is key to making the character actually look like they are feeling what you want them to feel. Just the tiniest sweat drop adds to their anxiety, spitting adds frustration to their rage, slouching shoulders, waving hands, a double chin, extreme angles, the list goes on! Add whatever and see what kind of impact it makes! Does it do the trick? Great! Add it!
Over exaggeration!!
Remember that you can almost always exaggerate more. Don’t be afraid to do draw “too much” because you’re just experimenting. See what works and what doesn’t. What do you like to exaggerate?


Now that you know some theory, it’s time to practice!
Practicing!!
The 25 Essential Expressions (a classic! I’ve done it multiple times)

And the one I do when I’m bored:
Fill a page with circles and fill them in with different expressions. Try and exaggerate as much as you can!


This is mostly for experimenting. They are quicker to draw than complete faces, but the same rules should apply!
And that’s about it!
I don’t know if I covered everything in this tutorial, since some things might be obvious for me, and this post perhaps only scratches the surface. So feel free to send me a message if you want an explanation about something more in depth! Thank you for reading! And now DRAW!!! ✨🎨


lHey friends!
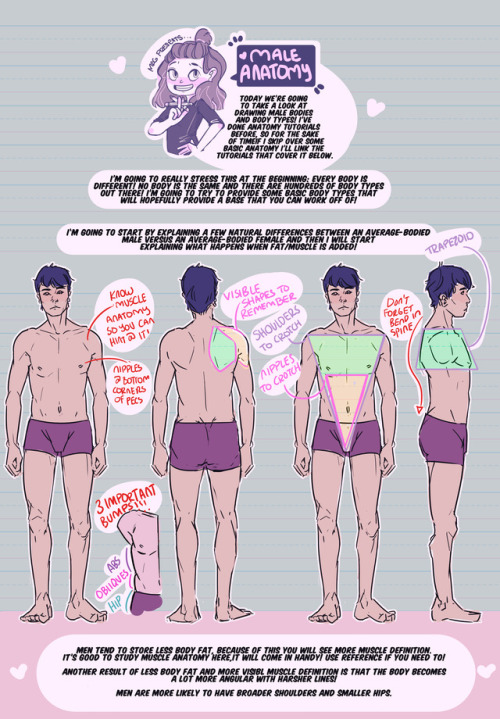
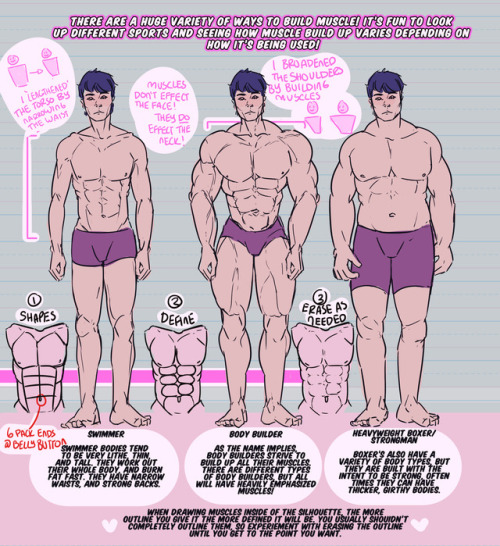
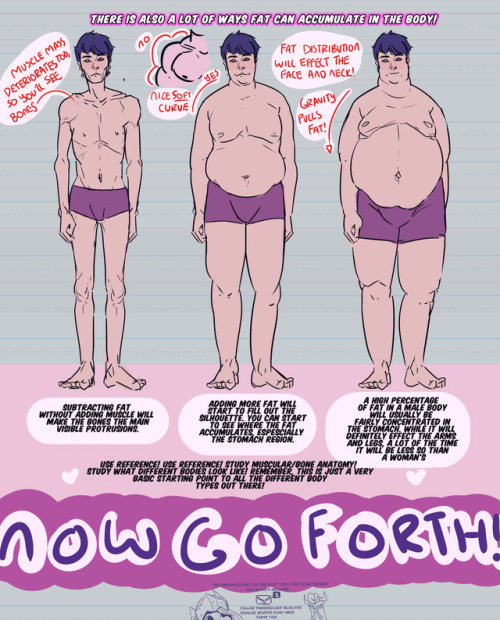
Meg here for TUTOR TUESDAY! Today has been hectic so I apologize for it’s lateness. But let’s look at male bodies and body types. I cannot stress enough that this is meant to be provide a few base body types that can then be compounded on as there are a MILLION body types out there. I’ve made anatomy tutorials and muscle/fat distribution tutorials that may help understand this one. This was recommended by @flowerlion-today , send in your recs here or my personal! Keep practicing, have fun, and I’ll see you next week!
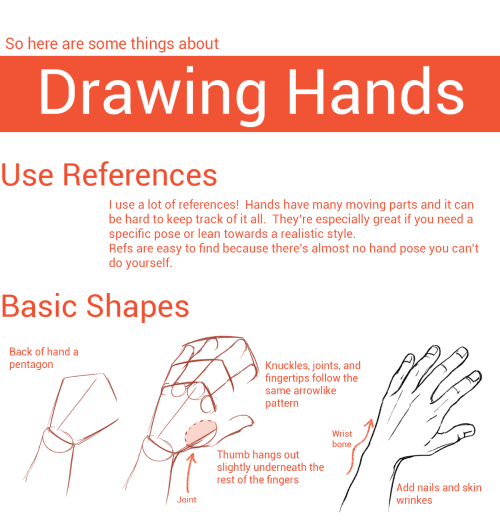
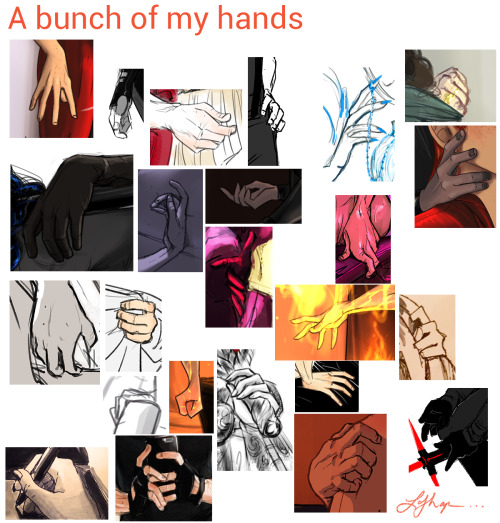
Hands
As I do with most things, I draw hands from a series of gesture strokes that insinuate the pose and shape I want. Something I personally find very appealing about hands are all the joints, bends, and crooked bits so I start with those and build the rounder, meaty bits from there.

In the first two steps here if you just look at the individual strokes I’ve drawn, you can see they’re just some curves, really, that sketch out the shape of the hand, and I’m focusing on the joints and knuckles. (The fingertips in the second one are actually rly unnecessary and ugly to me haha – that’s usually the kind of thing I’d just throw down in step 3.)
And again below, just starting w/ some curves and squigglies to show the joints and knuckles:


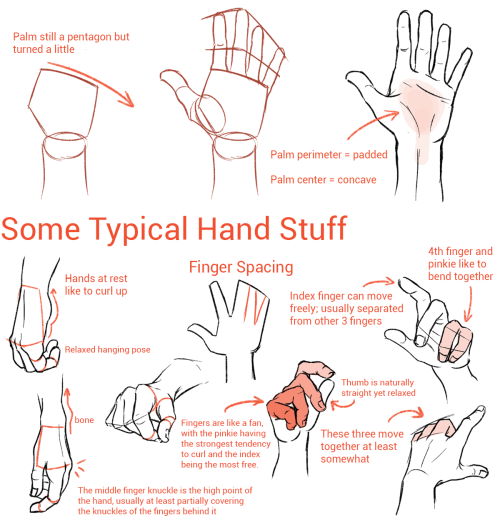
These hands are by no means realistic or fully proportional but drawing’s supposed to be fun and these are really fun! I’m like, really not about that whole “draw a box and then the little tubes and those are the fingers” thing. It’s too technical and so much life gets lost when you sketch that way. Maybe it’s helpful for a pose you’re uncertain about but then just look at a photo or your own hand to see how things work, y’know?
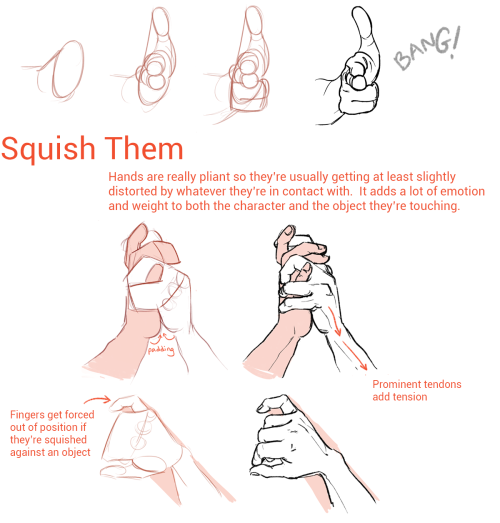
Something else I’m really about is using shading and line to emphasize the bends and stuff even after I’ve got the hand down:

The first image here you can tell the fingers are bent, but they also look lumpy imo. To stylize further, I add some thin lines for the joints and fingernails, and then shade for some extra depth + to pronounce the foreshortening etc. (Fingers are so ugly from this angle! But we gotta draw them like this sometimes…)
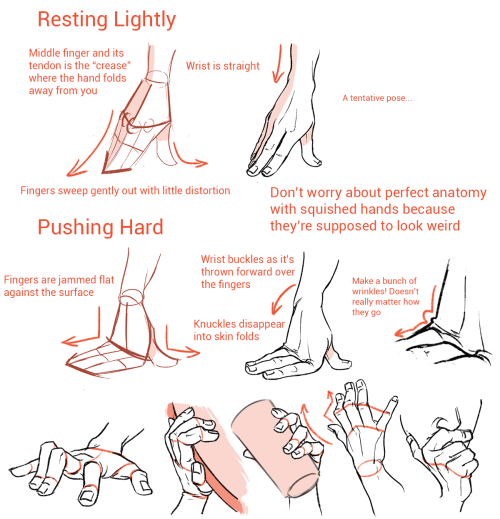
Some examples where these extra lines assist in conveying the shape:

And shading:

(Bottom right is the same pose as a previous example which I didn’t realize till now sorry haha)
Some general tips:
- Use asymmetry!!! When the joints don’t line up exactly right, or you’ve drawn two hands doing the same thing but idk one’s curled a little bit more or the right pinky sticks out but the left doesn’t – these little touches make the drawing more dynamic, even if the general pose/concept is flat.
- Thumbs are really cool? They’re like trapezoidal. The same tapering thing kinda happens where the hand meets the wrist. A hand is like a big thumb
- Two things that a lot of beginner artists get wrong: which side the thumb is on (…always double-check…I still double-check sometimes too), and drawing the fingers straight instead of slightly bent when trying to draw a relaxed hand. Relaxed fingers curl! And this is much easier to draw imo than perfectly tense fingers
- Study your own hands and think about their shape. Part of developing a style + comfort with drawing a particular thing is how you choose to simplify the form thru line. I explained above that I focus on the joints and knuckles and seek to simplify those with curves and squiggles but maybe you’re more interested in a different aspect. (Like, you can see I don’t draw palms v much…that’s cuz I like knuckles haha)
Hope this is helpful/feel free to ask followup questions!
should i be trying to master like each feature before i try drawing a face? like should i be able to draw eyes really well, then move to the nose, mouth etc? i dont know when i should be moving on to the next step. right now, mouths are a frustrating thing but i also try to draw the whole face because proportions practice, so its all very over whelming and then i get discouraged cause drawing lips is so hard and putting everything to make a face is hard ;-;
I think if you’re having trouble with a feature you should definitely do some studies of it! I practiced the face all at once so I don’t really think there are any rules to this haha. The downside to trying to master one feature at a time is, like you said, not being sure when to move on. You might end up drawing amazing eyes but the rest of the face will always be a little off because you haven’t put enough time into studying the other features. I’m sure you’ve also come across artists who draw nice heads and it all falls apart when they try to draw a fullbody. Personally I’d just tackle the face all at once, take time to study the separate features but try not to neglect any of them and don’t think you can’t draw a face because you aren’t a master of a particular feature! You can do it * V * Here are some quick notes on lips, I hope they help a little.

Hi. :3 I love your art and you're totally awesome! I just had a quick question. I saw your post about hair tips on Dean and Cas, and I was wondering if you had one for Sam. Thank you, it means a lot. ^.^
Sure no problem! Just part it slightly to the right and have the hair flow down from that line. Don’t forget his killer sideburns lol


Obviously, I’m not the best with drawing hands. But that basic shape helped me with drawing hands best. (Circle works for me too but not as good as that ‘fan shape’ my professor taught our class).
Don’t forget to keep practicing and using real life references–It’s the best way to draw good hands! Take your time drawing them! Don’t rush (unless you really wanna) It’s not a competition.
Got questions? Feel free to ask!


-
 pressedbetweenthepages reblogged this · 1 week ago
 -
 brainfog-and-books liked this · 1 week ago
 -
 meepspark1 reblogged this · 2 weeks ago
 -
 7rashstar liked this · 1 month ago
 -
 itsmeswaggyg liked this · 1 month ago
 -
 the-letter-horror-lover liked this · 2 months ago
 -
 artinbottles reblogged this · 4 months ago
 -
 bearnamedbear liked this · 4 months ago
 -
 galaxydrag0n liked this · 4 months ago
 -
 chibichunks reblogged this · 4 months ago
 -
 bartholomewls reblogged this · 4 months ago
 -
bartholomewls liked this · 4 months ago
-
 schlitterbaun reblogged this · 4 months ago
 -
 loveasachoice liked this · 5 months ago
 -
 creativetips-collection reblogged this · 6 months ago
 -
 brothbones liked this · 6 months ago
 -
 yeoubaby liked this · 7 months ago
 -
 k4ttfisk liked this · 7 months ago
 -
 artking-4 reblogged this · 7 months ago
 -
artking-4 reblogged this · 7 months ago
-
artking-4 reblogged this · 7 months ago
-
 gaymerchats reblogged this · 8 months ago
 -
 celestiall0tus liked this · 8 months ago
 -
 leesbian42 reblogged this · 8 months ago
 -
 leesbian42-crafts reblogged this · 8 months ago
 -
leesbian42 liked this · 8 months ago
-
 samaraistop reblogged this · 8 months ago
 -
samaraistop liked this · 8 months ago
-
 rachelbethhines liked this · 8 months ago
 -
 backupstardust reblogged this · 8 months ago
 -
backupstardust liked this · 8 months ago
-
 poor-ciceros-voring-again liked this · 8 months ago
 -
 cherrytheidiot liked this · 8 months ago
 -
 catarinarose liked this · 8 months ago
 -
 ruththe-reckless reblogged this · 8 months ago
 -
ruththe-reckless liked this · 8 months ago
-
 madebymaryssa reblogged this · 8 months ago
 -
 pockeye reblogged this · 9 months ago
 -
 plarn reblogged this · 9 months ago
 -
plarn liked this · 9 months ago
-
 freil7 liked this · 9 months ago
 -
 greattyphoontimemachine liked this · 9 months ago
 -
 beetle-ze-bub liked this · 10 months ago
 -
 micheelle548 reblogged this · 11 months ago
