Show, Don’t Tell
Show, don’t tell
"Show, don’t tell" means letting readers experience a story through actions, senses, and dialogue instead of outright explaining things. Here are some practical tips to achieve that:
1. Use Sensory Details
Tell: "The room was cold."
Show: "Her breath puffed in faint clouds, and she shivered as frost clung to the edges of the window."
Tell: "He was scared."
Show: "His hands trembled, and his heart thudded so loudly he was sure they could hear it too."
2. Focus on Actions
Tell: "She was angry."
Show: "She slammed the mug onto the counter, coffee sloshing over the rim as her jaw clenched."
Tell: "He was exhausted."
Show: "He stumbled through the door, collapsing onto the couch without even bothering to remove his shoes."
3. Use Dialogue
What characters say and how they say it can reveal their emotions, intentions, or traits.
Tell: "She was worried about the storm."
Show: "Do you think it'll reach us?" she asked, her voice tight, her fingers twisting the hem of her shirt.
4. Show Internal Conflict Through Thoughts or Reactions
Tell: "He was jealous of his friend."
Show: "As his friend held up the trophy, he forced a smile, swallowing the bitter lump rising in his throat."
5. Describe the Environment to Reflect Mood
Use the setting to mirror or hint at emotions or themes.
Tell: "The town was eerie."
Show: "Empty streets stretched into the mist, and the only sound was the faint creak of a weathered sign swinging in the wind."
6. Let Readers Infer Through Context
Give enough clues for the reader to piece things together without spelling it out.
Tell: "The man was a thief."
Show: "He moved through the crowd, fingers brushing pockets, his hand darting away with a glint of gold."
7. Use Subtext in Interactions
What’s left unsaid can reveal as much as what’s spoken.
Tell: "They were uncomfortable around each other."
Show: "He avoided her eyes, pretending to study the painting on the wall. She smoothed her dress for the third time, her fingers fumbling with the hem."
8. Compare to Relatable Experiences
Use metaphors, similes, or comparisons to make an emotion or situation vivid.
Tell: "The mountain was huge."
Show: "The mountain loomed above them, its peak disappearing into the clouds, as if it pierced the heavens."
Practice Example:
Tell: "The village had been destroyed by the fire."
Show: "Charred beams jutted from the rubble like broken ribs, the acrid smell of ash lingering in the air. A child's shoe lay half-buried in the soot, its leather curled from the heat."
More Posts from Ardouradvice and Others
Hover Notes or ‘Floating Boxes’in Ao3
This is a fun option if you use, for example, phrases in other languages in your story. I often do, and this is a nice way to give translations without having to scroll to the end of the text, or putting them in the starting notes where people have to keep checking back – or where they spoiler the story!
HOWEVER. The drawback is that the floating boxes only work when a ‘mouse’ is ‘hovered’ over the marked text. They do NOT show up on tablet or phone screens, so you’ll still need to put a list of translations in the notes for readers using those devices.
Let’s have an example.
“Qu’est ce que tu veux?”
Now if you speak French, you might know that means “What do you want?”
But not all of your readers will know that. So, you offer them a translation. And since the boxes don’t appear unless you hover directly above them, I usually add a Beginning Note to the chapter that reads something like this;
‘Hover over italicised foreign language text for translations! (Mobile and tablet users please see the Ending Notes)’
In HTML mode in Ao3, (if you try this in Rich Text mode you will get a horrible mess so don’t) the line with this example would appear as:
<p>“<em>Qu’est ce que tu veux?</em>”</p>
To add the floating box with the translation, you would select the words to be translated (that is, Qu’est ce que tu veux?) and paste in the following HTML.
<span title=“What do you want?”>Qu’est ce que tu veux?</span>
The whole line will now read:
<p>“<em> <span title=“What do you want?”>Qu’est ce que tu veux?</span> </em>”</p>
Review your work, hover over the part that requires translating, and you should see the following:

And you’re done!
I tend to set up a Word doc with all the <span> lines I want to use created in it, and then when the time comes, just copy/paste them into Ao3. Saves lots of time!
just saw another fic that completely misunderstood elementary schoolers. going to make a post as soon as my shift is done
Apparently a lot of people get dialogue punctuation wrong despite having an otherwise solid grasp of grammar, possibly because they’re used to writing essays rather than prose. I don’t wanna be the asshole who complains about writing errors and then doesn’t offer to help, so here are the basics summarized as simply as I could manage on my phone (“dialogue tag” just refers to phrases like “he said,” “she whispered,” “they asked”):
“For most dialogue, use a comma after the sentence and don’t capitalize the next word after the quotation mark,” she said.
“But what if you’re using a question mark rather than a period?” they asked.
“When using a dialogue tag, you never capitalize the word after the quotation mark unless it’s a proper noun!” she snapped.
“When breaking up a single sentence with a dialogue tag,” she said, “use commas.”
“This is a single sentence,” she said. “Now, this is a second stand-alone sentence, so there’s no comma after ‘she said.’”
“There’s no dialogue tag after this sentence, so end it with a period rather than a comma.” She frowned, suddenly concerned that the entire post was as unasked for as it was sanctimonious.

your art is so cool- oh my golly, do you have any drawing tips? and colouring tips? ❤🙏 (happy pride month btw)
I wrote a lot for this one X]] it's under the cut

First I'd just flat something out. I really just eyeball most color schemes, so I'm super sorry I don't have the most tips on that X[ The flats on this piece are mostly analogous. They're colors next to each other on the wheel, dark blue and cyan are next to each other, so they look all pretty together. Usually I like using complementary though, opposites, cus contrast is soooo pretty. I actually change it to that right after flats X]

than I either use a few multiply or screen or overlay layers on top! as a treat! or just like... eyeball some more colors. I like using colors from other places on the piece, so it looks cohesive. This is where I'll usually merge all my layers down to a single layer [including sketch, flats, shading, and background],,, I don't recommend it but this is just part of my process now X]

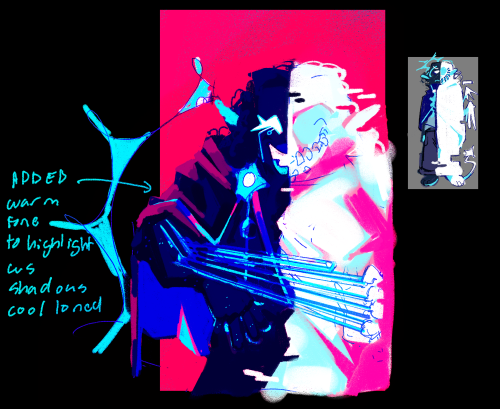
Next thing I do is just like,,, eyeball where I want More? He looked a bit boring being only blue, so I wanted to add more color; I chose red because the background is that lovely cherry pink, taking colors from other parts of the piece yippie! This is also just eyeballed too though...I just pick what I think looks pretty, sorry X[


than I just start rendering? I kinda just turn my brain off when I do I really don't know how to explain how I render, and looking at examples of the bullshit I deal with you probably don't want to render like me either HAHA [drew even more references X))]

and than it's done!!! yippie! I put it under a layer of chromatic aberation too cus I enjoy the affect X]] not shown here this is just the finished like. render render. w/out the extra bits. And happy pride month! completly forgor woof HGHG
I was wondering how achieve such a wonderful textured finish on your pieces? They are wonderful and I love their resemblance to aged photographs and the speckles of colors in the backgrounds. Your art is mesmerizing :)
you can see some of the texture brush sets i use in my #info_asks tag but i have some more (procreate) tips aside from just brushes
also hi i made this whole thing and then stupidly hit ctrl z to erase ONE word and i lost the entire bottom half of the post and all my image descriptions so fuck you tumblr i had to make this twice
to get a faded photo or old digital screen look, consider duplicating the canvas (once all the layers are merged) and using a gaussian blur tool on the new duplicated layer. then set that to low opacity to add a misty sort of look. looks nice in combination with some chromatic abberation and a small bloom effect. then a subtle noise filter on top:

for faded print effects, it's really worthwhile to learn how to use layer masks. you can use a layer mask to non-destructively 'weather' blocks of colour or lineart, without erasing the layer itself. the weathered ink/block print effect here was made using layer masks which means that if i just hide the mask, the lineart becomes solid black again and easy to alter or colour in:

for old paper effects you can just set a paper texture on multiply over the art sure, but you can also combine it with the blur & bloom thing, a really subtle drop shadow and canvas tilt, and highlights to make it look like an aged photograph of a card. this originally had a transparent bg but i'll post it here with a white bg so that the drop shadow is more obvious. the scuffed edges of the card (left) were hand drawn, simple white stucco brush. the bigger patch of scuffed ink (top right) was a texture stamp.

for block print looks you can move the colour layer out of alignment by a few pixels - but only after you're absolutely sure you're done with it, otherwise you'll get something like this -

i forgot to erase out her eye before i moved the red layer so now her eye defeats the 'look' of a misaligned print. the black lineart and red layer were also given the same layer mask treatment as described above to make them look faded or like the ink didn't stick down right to the paper
you can do this with multiple colour layers too. if the colour layers are separated and set to multiply (as in this cmyk example), it'll leave halos and edges around each shape which mimic old comic book print

just to show what you can do WITHOUT any special brushes, here's a piece of one of my mez tarot cards from before i got any extra brushsets at all. for this one, i added a green tint over everything to mimic a sun-bleached or faded print (my actual goal wasn't 'medieval illustration' but actually 'trading card from the 60s that got left on someone's windowsill for decades'). the background texture is the procreate noise brush. the texture under the green lion drawing is the procreate concrete brush (to make it look painted onto a wall). the lettering and lineart is procreate's 6B pencil. but to properly aim for The Look of it being a printed physical object, i also used a perspective blur so that the edges are out of focus, and metallic gold highlights which don't match the lighting of the actual illustration and appear to be catching some other external light. that texture was made from the procreate noise brush

it's pretty simple compared to my later stuff but i still really like the effect
in terms of colours, you need to keep them unified so that they all appear to be acting under the same external light source, like if someone is holding up a torch to a painting then the painting colours will be glazed with firelight even if there's no painted fire. a really easy way to do this is to slap a multiply layer over everything in one shade - grey-yellow for a weathered paper look, or greenish blue for sunbleached photos. this unifies all the colours of the drawing. or you can apply a gradient map at a low opacity so that there's only a subtle change. or just do it by hand - if you want everything to be slightly tinted yellow, just pick the colours you normally would, but move the colour wheel towards yellow to get a yellowfied version of the base colour. easy
it's really important to consider how fading and weathering can affect printed colour. white paper yellows, black fades. you will rarely see pure black or pure white. which means you can use pure black or pure white to add external effects like the white scuff marks on the hierophant card. if the whole drawing is yellowed from age but there's some white somewhere, it's an easy shorthand to show that the scuff mark or whatever was not originally part of the drawing (great way to add some nasty stains lol)
pssssst hey. hey. free and expansive database of folk and fairy tales. you can thank me later
SO! You've seen these little things I do sometimes and you want to know the process!


It's genuinely super simple, so here goes! Apologies by the way if anything is unclear or glossed over. A lot of this is personal taste and such so I hope this can be a nice boost to create something!

RESOURCES AND THINGS TO KNOW!
To preface this little guide already assumes you have basic knowledge of color distribution, lineless art, or breaking up art into proper layers for later processing! I am also assuming that your art program has access to scatter brushes and tiling textures. Personally I use Clip Studio Paint, but this can work on other apps. Anyways, here are some good sites for this:
EZGIF - Free, easy gif maker for assembling any kind of gif*! It also has stuff like converting those damn WEBP's back into png.
*PLEASE KNOW THAT YOU CANNOT MAKE GIFS THAT ARE PARTIALLY TRANSPARENT. YOU MUST USE A SOLID COLOR UNDER ANY PART THAT IS OVER BARE CANVAS
Transparent Textures - Free to use source for HQ transparent textures that tile! Amazing for finding a paper texture for these if you commit to the paper doll look. Best results for textures that are in white or black!
So! You have a finished, prepared piece that you want to glitterfy. Well I'm not covering that right now so you can scroll down to That part if you came just for the glitter. This next section is for...
PREPARING THE PAPER DOLL
To start, your piece should already be separated into respective layers in any order you'd like! We're about to use a ton of clipping masks so Make sure you know your program before starting! So, as my example we have my oc Roy, resized to around... 1500x1500 or the nearest equivalent Smaller is better because it brings out the texture! He looks a little ah...Flat, though right now?

I'm using this guy for a couple different reasons! Those being:
Roy has translucent bodyparts! Just so you will know what to do with characters who are translucent! I'll get to this in a moment so sit tight
He has a clear, defined, and distinct palette that is easy to pick a color to slap the glitter on! This is important because I personally find balance to be the most appealing part of the finished art.
He also just has a lot of doohickeys on his design.
This is where you need your transparent texture! You can use any kind of texture and I encourage experimentation and such, but I personally use a simple paper texture. What we are going to do is go through and clip our imported and tiled texture to each applicable layer! (Make sure to just Copy and Paste the layer you do NOT need to repeatedly go through this menu...)

And... When you are done, you should have something like this:

"But why don't I just clip the texture to the entire piece through a folder? Why go through the hassle of clipping to each individual layer?"
Well that's because of the next step, where we will be adding the shadows. If we don't clip each individual layer, your shadows will look like this example on the left which sort of just ruins the 3D effect and kinda just looks icky, as opposed to this, which is nicer and smoother.


Now I'm no lighting wiz! In fact I'm rather mediocre at best but some general tips for adding the shadows:
Try to keep your shadows going all in one direction mostly! It gives the effect of one light source and generally just looks better than if you shaded around ALL edges everywhere.
Try to only shade where there are parts overlapping that need the dimension! Overdoing it can make the piece look odd. It's especially helpful to separate any details like different shades of hair, layers of hair, etc so that you can put as much volume as you want.
Once the shadows are all added in you should have something that looks like this:

Which looks good! Now I'd sometimes stop here if I can't pinpoint how I'd like the glitter to sit or if I think the piece just doesn't need it, but we're moving on to the big important steps!
ADDING GLITTER
This part is entirely up to your taste! But I'll describe how I do my glitter stuff. Firstly I start out by identifying which color I want to pop out. For Roy here I chose the red parts! For your character it may be different. Experimentation is key!
This is also, however where you need that scatter brush I mentioned earlier. Personally I just use the default CSP spray brush, but again go wild!

Make a folder above your piece, set its blending mode to glow dodge (or add, or add glow depending on what options you have), and create three layers inside of this folder. Setting the folder to clip is optional right now but will be needed later.

Then, fill each glitter layer with your choice of particle in whatever color looks good! Yes, you can do gradients and other stuff on the particles too! World's your oyster.

^ Unclipped example of a glitter layer.
Glitter tips for the early 2000's webcore enthusiast:
Use different strokes and patterns for the glitter distribution! This helps it animate better by moving around. For example this time I went diagonally for the first, horizontally for the second, and then in loose circles for the third. Particle density and stuff is also completely up to you.
Use a color that would pop against the intended area! For Roy I used an orange-ish yellow since it compliments both blue and red.
So now we have the layers! This is where clipping is our best friend once again! You're just going to go in and clip the glitter to whatever layers you want it on. Entire folder, not just one of the layers!

Once that's all done, go through and toggle the respective glitter layer for the frame, saving individual copies when done. You should end up with 3 identical images with different glitter distribution.
"BUT WAIT! JONES, THE TRANSLUCENCY!!" I hear you call! Yes, this is where we handle that! If your character is NOT translucent, you can scroll past this section.
Open up your frames all in one canvas, stacked on top of eachother (no jittering or slight displacement! ON TOP of eachother!)

Our layout should look something like this...Note how the translucent parts are rather hard to see, well if you took your frames and put them in EZgif, they'd be gone entirely! That's because you physically cannot have a partially translucent gif due to technology limitations. So an easy little cleanup thing I did was:
1. SELECT THE CANVAS AROUND THE CHARACTER WITH THE MAGIC WAND TOOL. Do not have any expansion settings on or it probably won't look right in the end.

Make sure you do not miss any gaps! I personally missed the gap between the arm, leg, and lanyard and I had to redo this next step...
2. SELECT -> INVERT SELECTION


3. FILL SELECTION WITH THE DESIRED COLOR. IT MUST BE OPAQUE. I personally picked this cloudy gray color.

You can now save individual frames of your character with the fill so that they don't go bald when you move on to the next step! Again, you should have 3 frames.
FINISHING UP
This is nice and easy. Upload your three frames into EZGIF and wait for it to process. It'll look like this if you're in the right place.

Once things have loaded, make sure to change the settings to the following:
FRAME DELAY: 0 (this is how fast the frames move.)
DON'T STACK FRAMES: ENABLED
You can play around with this but I generally leave everything else alone because you don't need it. Just hit the make a gif button and you're all done!

Aaaand that's it! If you've read this far...Firstly thank you for dealing with my rambliness and horrible explanation skills. Secondly, I hope that this can come in handy for anyone interested! Would love to see if anyone puts this to use. n_n
hot artists don't gatekeep
I've been resource gathering for YEARS so now I am going to share my dragons hoard
Floorplanner. Design and furnish a house for you to use for having a consistent background in your comic or anything! Free, you need an account, easy to use, and you can save multiple houses.
Comparing Heights. Input the heights of characters to see what the different is between them. Great for keeping consistency. Free.
Magma. Draw online with friends in real time. Great for practice or hanging out. Free, paid plan available, account preferred.
Smithsonian Open Access. Loads of free images. Free.
SketchDaily. Lots of pose references, massive library, is set on a timer so you can practice quick figure drawing. Free.
SculptGL. A sculpting tool which I am yet to master, but you should be able to make whatever 3d object you like with it. free.
Pexels. Free stock images. And the search engine is actually pretty good at pulling up what you want.
Figurosity. Great pose references, diverse body types, lots of "how to draw" videos directly on the site, the models are 3d and you can rotate the angle, but you can't make custom poses or edit body proportions. Free, account option, paid plans available.
Line of Action. More drawing references, this one also has a focus on expressions, hands/feet, animals, landscapes. Free.
Animal Photo. You pose a 3d skull model and select an animal species, and they give you a bunch of photo references for that animal at that angle. Super handy. Free.
Height Weight Chart. You ever see an OC listed as having a certain weight but then they look Wildly different than the number suggests? Well here's a site to avoid that! It shows real people at different weights and heights to give you a better idea of what these abstract numbers all look like. Free to use.
![[Image ID: A series of digitally drawn diagrams of hands from different angles. Most of them have three sections of the palms highlighted in different colors, text beside them stating, "3 parts of palm; helps with perspective." There are a couple more, outlining the back of the palms in purple to show the shape. Text there reads, "Back is kind of a rectangle? But I tend to angle according to back of the wrist." Finally, there is a small doodle of my sona frowning & shrugging, saying, "Maybe unhelpful, sorry." End ID.]](https://64.media.tumblr.com/6ed5f4d1ba98657439ec6c89cf95aadb/16b19f760e1b478a-0b/s500x750/602f050bd045ca9300b138716ec059660808ad57.png)
-
 vanilleqs liked this · 2 weeks ago
 -
 creativemonkey reblogged this · 2 weeks ago
 -
 lovelight-magic liked this · 2 weeks ago
 -
 snowlilly reblogged this · 2 weeks ago
 -
 sweetcookiesjar reblogged this · 2 weeks ago
 -
 russetfoxfur reblogged this · 2 weeks ago
 -
 your-local-starstruck-dreamer reblogged this · 2 weeks ago
 -
 pol1arity reblogged this · 2 weeks ago
 -
 cxxiv liked this · 2 weeks ago
 -
 knoghtenderius liked this · 2 weeks ago
 -
 nonone000 liked this · 3 weeks ago
 -
creativemonkey reblogged this · 3 weeks ago
-
 pikkusani reblogged this · 3 weeks ago
 -
pikkusani liked this · 3 weeks ago
-
 captainhellothereworld reblogged this · 3 weeks ago
 -
 angel-fent reblogged this · 3 weeks ago
 -
 pottersboy liked this · 3 weeks ago
 -
 enruiinas liked this · 3 weeks ago
 -
 blahwesome liked this · 3 weeks ago
 -
 giv3ns liked this · 3 weeks ago
 -
 strawberryjei reblogged this · 3 weeks ago
 -
strawberryjei liked this · 3 weeks ago
-
 wingedkaijuu liked this · 4 weeks ago
 -
 bellspire liked this · 4 weeks ago
 -
 mannleemann reblogged this · 4 weeks ago
 -
 tinodasha liked this · 4 weeks ago
 -
 adorable-bookworm liked this · 1 month ago
 -
 aaustinwrites reblogged this · 1 month ago
 -
 strxwberrycandi reblogged this · 1 month ago
 -
 babypink-cowboy reblogged this · 1 month ago
 -
 northisnotup liked this · 1 month ago
 -
 audikatia reblogged this · 1 month ago
 -
 satire-please reblogged this · 1 month ago
 -
satire-please liked this · 1 month ago
-
 kaawaa liked this · 1 month ago
 -
 ar4chn01d3 liked this · 1 month ago
 -
 the-quackalyspe liked this · 1 month ago
 -
 mbleph reblogged this · 1 month ago
 -
 infraredbird reblogged this · 1 month ago
 -
infraredbird liked this · 1 month ago
-
 vitam-mortem-et-veritatis liked this · 1 month ago
 -
 aliehey reblogged this · 1 month ago
 -
aliehey liked this · 1 month ago
-
 marvelingjules liked this · 1 month ago
 -
 imbreonix liked this · 1 month ago
 -
 pls2daysatan liked this · 1 month ago
 -
 tigriswolf reblogged this · 1 month ago

sideblog for @letardoursprout so i have somewhere to collect all the tutorials/advice that i likeicon by lovelyshiz. header by hexh-pixel
66 posts